Showing posts with label roses. Show all posts

Friday, April 24, 2026

Another Wanderer

      So, two months later, she posts something again!  LOL  I find it's taking me longer to finish projects as the eyesight problems continue but I do manage to complete a few things along the way.  Today, I want to share the latest from Gnomeland.

     This one started because of a new hat style I tried.  I made the hat first, just playing with an idea in my head, then I had to make a gnome to wear the hat, and without realizing it, the gnome turned out to be a wandering gardener named Gregory who loves to plant perennial flowers and rose bushes wherever he goes, sprinkling the landscape with a multitude of colors, and returning each spring to see what's blooming.

    Today he found a bush producing unique, aqua blue, roses and clipped a few to adorn his tattered hat and coat.


      I also made a Panama Hat but it still doesn't have a gnome to wear it.  This one took a long time because the cord had to be wrapped so perfectly but the end result is delightful.  I haven't yet decided how to dress the gnome but I'm thinking maybe something from the roaring '20s or perhaps '30s, maybe even with a "gangsta" flair, but that's still in the idea phase.  Here's the hat.


     That's it for today.  Maybe I'll get another gnome finished and posted but no time promises.  Just see you when I see you.  :-D

     Happy Crafting.  NanaConnie

Friday, October 18, 2024

Lady of the Roses

     No Halloween cards today, no Thanksgiving, & no Christmas, just a birthday card for a young princess.  :-)  The image came from Moondrea Designs and she's called "Lady of the Roses."  

     I used Ohuhu alcohol markers to color her, then cut her with one of my first dies from QuicKutz.  I inked the edges, then printed and cut the sentiment with a die from Avery Elle.  I wanted a very CAS card so added only a hand-sewn bow for embellishment.  The ribbon for the bow was originally white but I 'dyed' it with a marker, then added the tiny half-pearl.  

     While I use both on my cards, I find myself reaching for ribbon much more often than I reach for and use twine or cord.  I think it's because I can tie so many different kinds of bows with ribbon and I have the advantage of being able to make white ribbon any color I like to more closely match a color in the image or on the card.  Either way, ribbon is my "go to" for feminine cards!


     Challenges:

     Happy Crafting.  NanaConnie

Friday, August 18, 2023

Butterfly Kisses

      Today I want to share one of Conie Fong's most gorgeous image, called "Butterfly Kisses."  I've used it before and each time I color it, I see something new in it.  This time I chose to do a mostly pink pallet with touches of aqua and purple (pink and purple being my favorite 2-color combo.)  I've also done her (previously) in purple and yellow, and in teal with spring green.  They were all delightful but this one pleases me the most.

     I used Sanjoki markers to color the image, then cut it with a CUTplorations, stitched die.  That die set has been left on my desk the last couple of weeks and I seem to grab it whenever I need a rectangle.  :-D  I also cut the sentiment with a die from that same set but because the set didn't have a die small enough, I cut it twice, adjusting the die in between cuts.  The sentiment is also from Conie Fong but please don't ask me which set because I don't have my Conie Fong files saved in 'sets;' I just keep a separate folder for sentiments.

     The background for this card is double embossed, meaning that I first embossed the entire front with my "Linen" EF, then went back and used a Roses EF from Cuttlebug to emboss all but the bottom portion where the ribbon and sentiment would go.  The sentiment was framed with a scrap of the background CS.  The ribbon is satin-edged, sheer ribbon and I think it's probably my favorite kind of ribbon.  At least, it's the one I hoard the most.  lol  I used my bow maker to tied the double-loop bow.


     Challenges:

     Don't forget that we have an Anything Goes challenge over on the Facebook site. All  you have to do is use a Conie Fong image (there are freebies available on the site so not having a CF image is not a valid excuse!)  If you haven't yet joined the Conie Fong FB site, it's free, quick, and easy to do that.  Come play in our challenge.  We  love seeing what people create.

     Happy Crafting.  NanaConnie

Sunday, June 11, 2023

Birthday Roses

      Time to restock the birthday card stash and I've found a new artist (new to me) whose art I really like.  She draws under the name Maya Silvercat but I'm still searching for a website for her.  If/when I find it, I'll edit this post to add a link for all of you.

     This basket of roses was the first of her images I saw and I colored it with my Sanjoki markers.  I cut both the image and the sentiment with dies from QuicKutz.  The golden CS behind the image (which looks brown in the photo) was embossed using my 'Linen' EF.  The lace strip along the side came from my box of scrap lace bits but it fit the card perfectly.  The tiny butterflies, one pink and one white, are the negative pieces which came out of a Spellbinders die.  I saved them after doing another project and they were waiting just to embellish this card.  :-D


     Challenges:
Butterfly  (Briar Rose & Banana + butterflies)

     That's all I have for today's post but I'll be back later this week.  Happy Crafting.  NanaConnie

Monday, May 8, 2023

The Duchess

      My card today features one of my favorite roses, the Duchess.  I remember my mother had one of these bushes in her rose garden when I was a young child.  It was such a delicate pink with a hint of lavender and white edges on the petals.  I used this for a Mother's Day card in honor of my mom who's been gone for more than 30 years now.

     I used my Sanjoki markers to color the rose and leaves, then cut the image with a stitched die from CUTplorations.  The sentiment was printed and cut with an Avery Elle die.  The background paper came from a Paper House stack.  I added 3 rows of tiny gems along the right side and added one gem to the center of the rose.  It just didn't need any further embellishment.  :-D


     Challenges:
The Four Seasons
Triple B

     That's it for today.  Thanks for stopping by.  Happy Crafting.  NanaConnie

Saturday, April 29, 2023

Two Roses for Mom

      You folks are going to begin to think I work for Mariola Budek or that I represent her in some way but I don't.  I have no affiliation with her whatsoever, other than having discovered and fallen in love with her magnificent artwork!  Today's card features one of her images which I turned into another Mother's Day card.

     This image was colored with Sanjoki markers, then cut with a die from Tonic Studios.  The sentiment was cut with a die from Avery Elle.  Both of the background CS came from Recollections and I had already chosen them before I started coloring the roses.  That made it easy to choose the color palette for them.

     I added no embellishments to this card, wanting the roses to take center stage, unobscured by anything that might have been put on or around them.  A nice, CAS card, flat for mailing.


     Challenges:

     Happy Crafting.  NanaConnie

Tuesday, April 25, 2023

Roses in Many 'Flavors'

      I'm about to overwhelm you with roses in this post!  I spent a bit of time over the weekend coloring the same Mariola Budek image, but with the roses and sentiment done in red, yellow, and pink, respectively.  I made one card for each color and they were all for Mother's Day - due to the sentiment which is part of the image.  See below and you'll understand immediately.

     I used my Sanjoki markers on the pink and yellow roses, but the red ones were colored with the few Copics I have left.  I really have shifted away from the more expensive Copics and have very few of them remaining.  I no longer invest in Copic refill colors because, truthfully, I can replace either ProMarkers (which I've used almost exclusively for almost 8 years now) or my newer Sanjoki markers for less money than what the Copic inks cost.  The Sanjokis are also less than the ProMarkers, have the brush tips which I prefer to the bullet tips, and they blend a little bit better, IMHO.

     Let's start with the 'red' image: colored with Copics and water color paints, then cut with a QuicKutz square die.  The red CS circle was also cut with a QuicKutz die.  I mounted those two onto a white card front, then added one of my signature hand-sewn bows, this time with a pearl.


     Next, I colored the yellow roses with my Sanjoki markers, gold paint pen on the sentiment, and again, cut the image with a QuicKutz die before inking the edges.  I layered the image onto green fiber paper (DCWV) which I used for the card front.  Very clean and simple.

     Finally, I colored the pink one with my Sanjokis, and used a metallic ProMarker on the sentiment.  These edges were also inked but this time I used an ink pad instead of a marker.  I used more of the fiber paper from DCWV, this time in pink and added two scraps of green fiber paper from the first card.  

     I'm going to enter the first card into the following:

     Challenges:
Double Trouble (all 3 things)

     Happy Crafting.  NanaConnie

Tuesday, April 18, 2023

Yellow Roses

      Another Mother's Day card and another Mariola Budek image, this one called, appropriately, "Roses."  What mom wouldn't love roses for Mother's Day?  My daughter loves yellow roses so I decided that would be the color of these.  I've printed three different copies of this black and white image so the other two will probably be red and pink, but I'm also thinking of white roses if I can figure out how to make them stand out from a white background.  :-D

     The image has been colored with a combo of  Sanjoki markers and water color paints, with tiny dots of Diamond Stickles added as dew drops to 2 of the rose petals.  I cut the shape of the image by laying on a Spellbinders die and drawing around it in pencil.  Then I used scissors to cut on the pencil line.  I inked the edges of the shape with a dark gray ink pad.  The sentiment was cut with an Avery Elle die and I inked the edges of it, also.

     I found twill ribbon in my stash and the yellow chevrons on it worked so well with the color of the roses.  The bow was made with a bit of muslin fabric, folded accordion style and wrapped in the middle, then hand-stitched on the back to make it stay in that shape.  Everything was mounted onto an olive green CS placed on the card front.


     Challenges:
Beautiful Blossoms

Wednesday, January 18, 2023

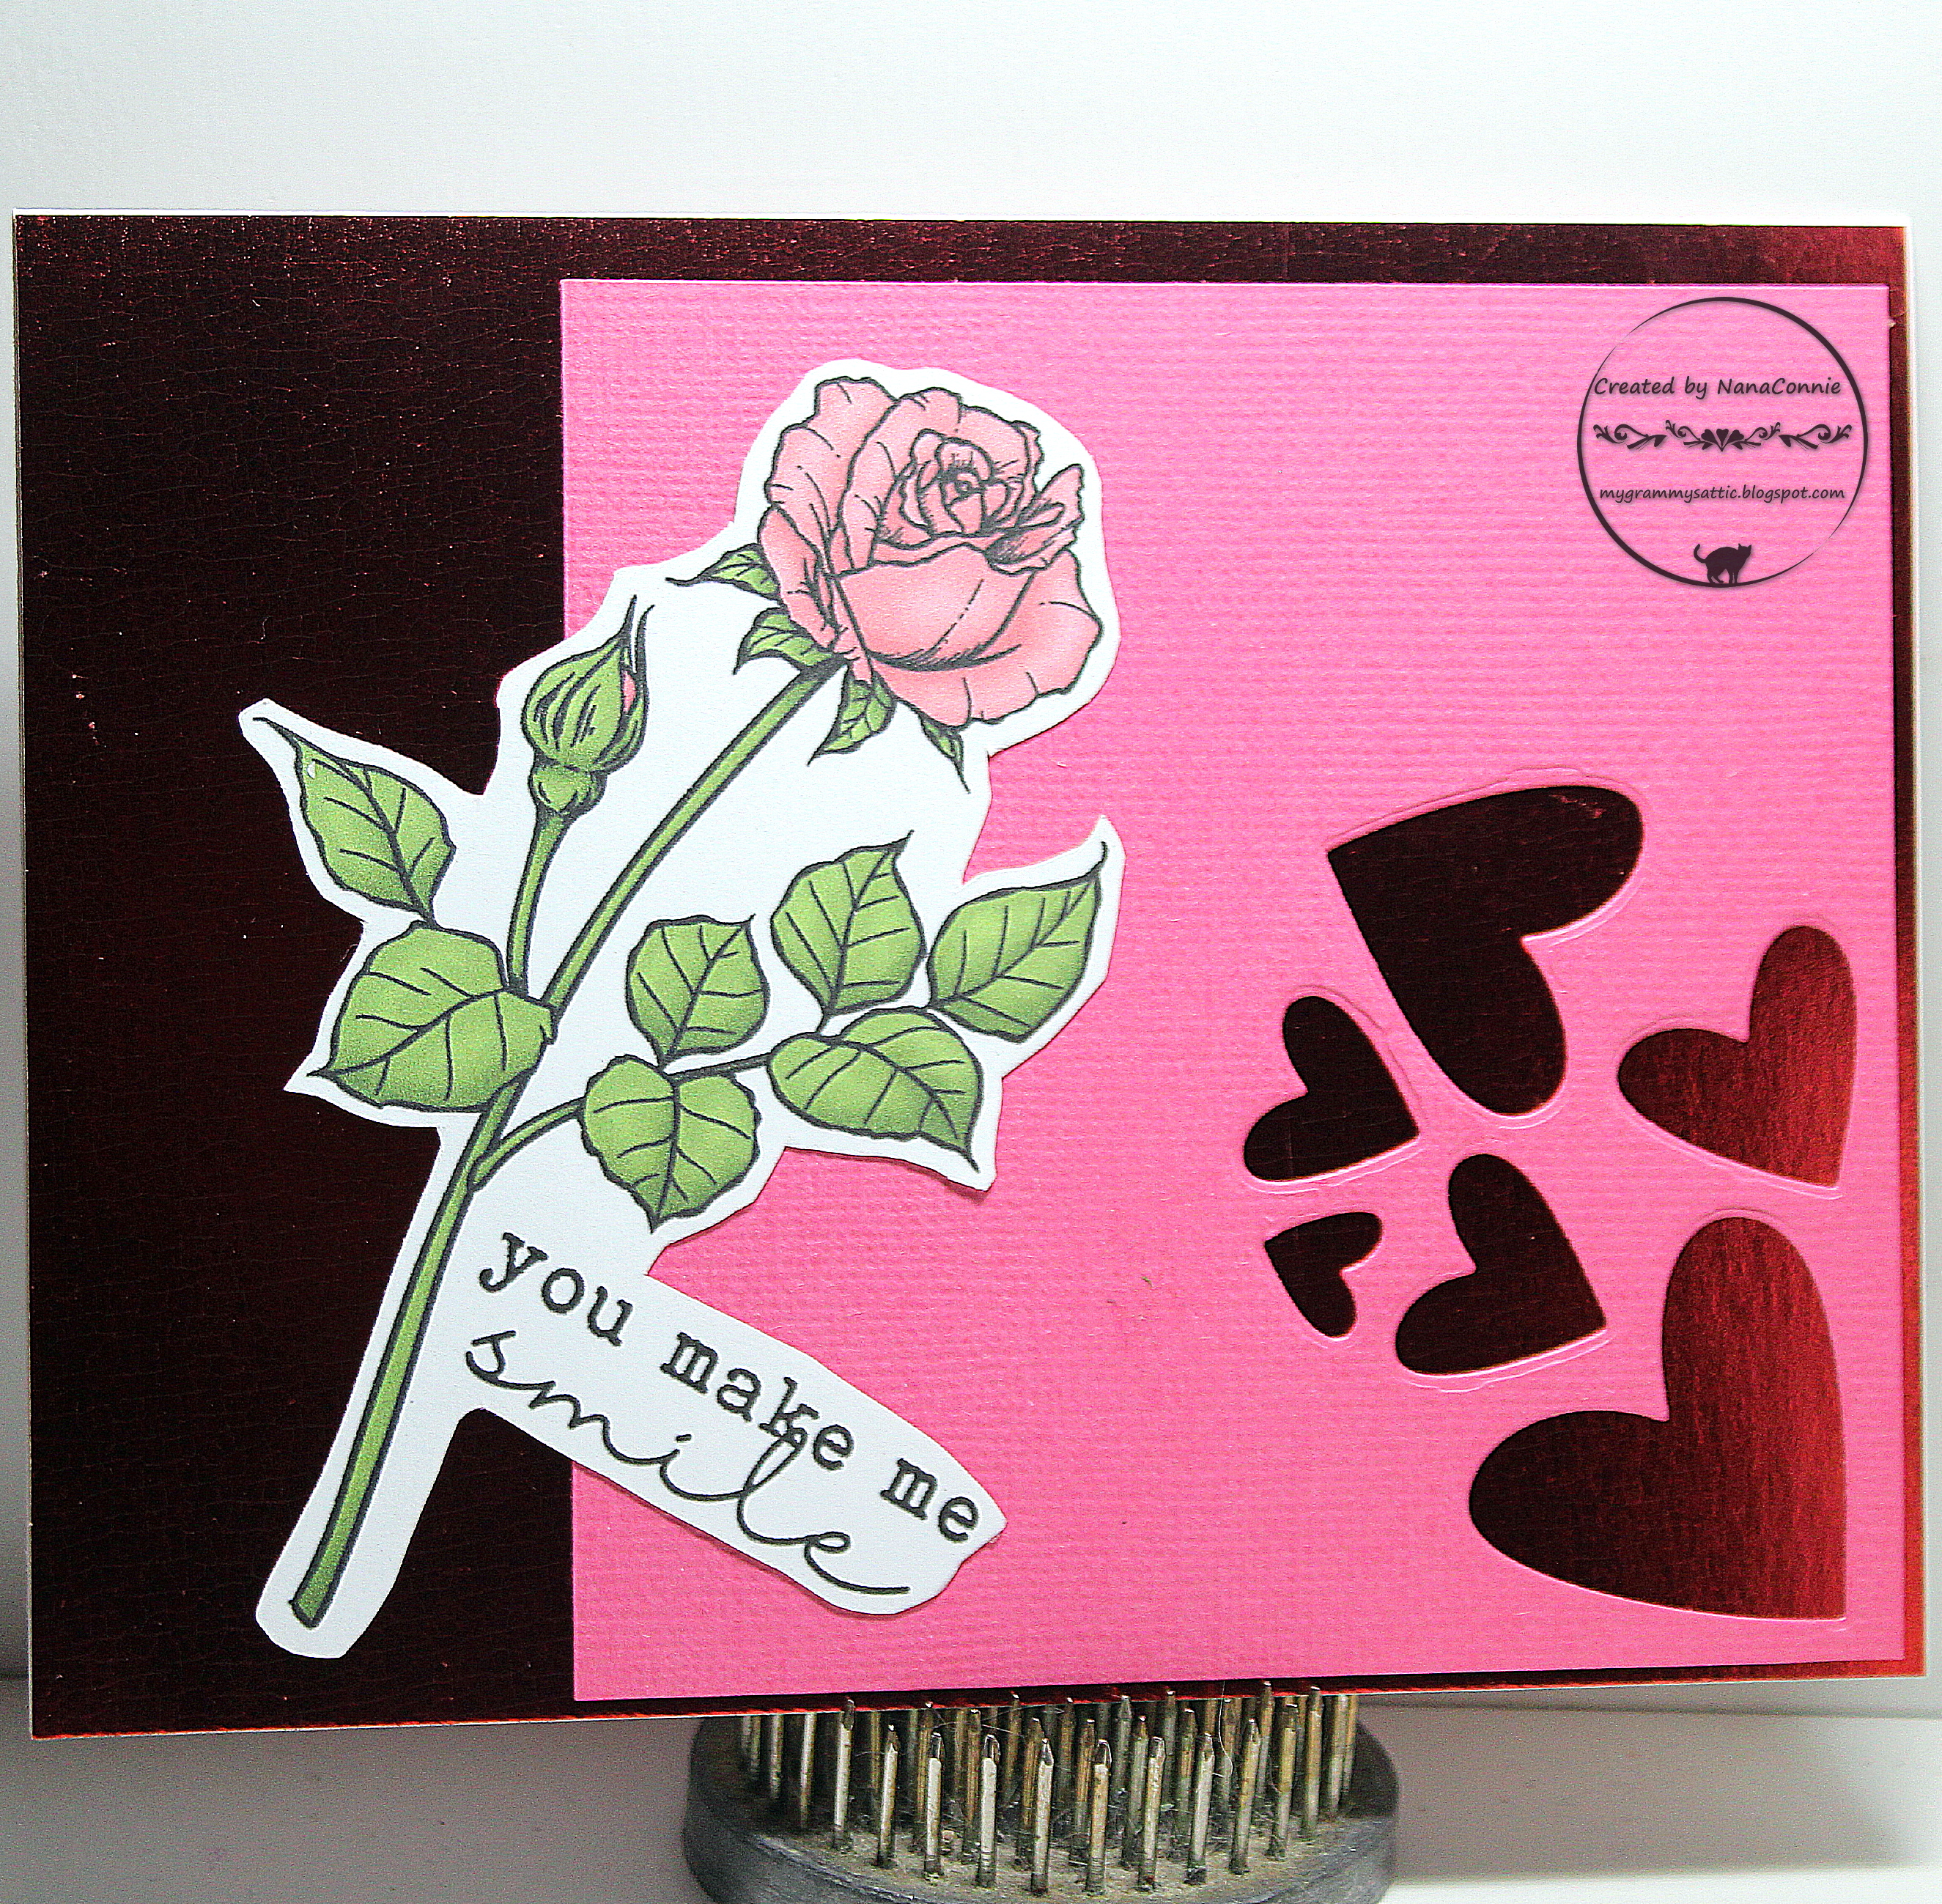
You Make Me Smile

      Another fun Valentine card with a Single Rose image and a sentiment which are from Beccy's Place.  I had printed them together but it was quite a while ago and I found them in the folder labeled 'Ready for Coloring.'  I knew I could turn them into a Valentine card so colored with ProMarkers (as close as I could get to the pre-colored image by Beccy but a bit more pastel), then fussy cut them into one piece.

     I looked through the scrap basket and found a left over, negative, die cut (Lawn Cuts from Lawn Fawn) of the hearts.  The pink CS was embossed with my Linen EF.  For the card front, I chose deep, garnet-color, metallic, 'mirror' paper.  Everything was layered together in an eye-pleasing design and that made one more card for my Valentine stash.

     I had a lovely rose bush with roses just this color for several years but I had to leave it behind when I moved into my current home.  Still, it reminds me of the years spent in that house so I do love it.


     Challenges:

     Well, I certainly have fallen behind on getting my full year's worth of birthday cards made this month, but maybe I'll just get the ones done for the February birthdays, and do the rest of the year next month.  I've just gotten some additional requests for Valentine cards by the batch (to be donated to a group putting together care baskets for local homeless families with children which will be distributed through a shelter on Valentine's Day) so I'm going to have a total of about 50 Valentine cards.  
  
     Happy Crafting.  NanaConnie

Tuesday, March 29, 2022

Birthday Roses

      Hello and welcome to my latest DT post for I Love ProMarkers, where our latest challenge starts today.   We are sponsored this time by Ike's Art and our theme is Anything Goes + optional: use die cut or punch.  Ike's provided images for the team to use and I chose "Rose Corner" but I reversed the image top to bottom.  

     I decided on white roses (coloring done with ProMarkers, of course) and framed the image with a die cut (Frantic Stamper die.)  Other than the fancy frame, this is a really CAS birthday card.


     Challenges:

    Come visit our challenge, see what everyone else on the DT has created, and find some inspiration to play along.  Happy Crafting.  NanaConnie

Monday, February 14, 2022

Rose Bouquet

     HAPPY VALENTINE'S DAY ! 

     On my card today, I used a lovely image from Beccy's Place.  This is another of the cards I made for the vendor faire I did over the weekend.  Something different than any I had done before and I think I had expectations which were just too high for a 'pop up' event with little advertising or promotion.  Still, I met some lovely people and made some new contacts.  I even had one lady who not only bought a card for her granddaughter right then and there, but also commissioned another one for her daughter who is getting married next month!

     I really love this image.  It always reminds me that I live in one of the rose growing capitals of the world.  In my local area of California, we have roses blooming all the way from late February until nearly Thanksgiving in late November.  South of us, in the Los Angeles County area of Pasadena, they hold the rose parade every January 1.  How's that for a bit of local history?   :-D 

     I colored the image with ProMarkers and gel pens, then cut it with a Spellbinders die.   I used lace from my stash for the background.  The sentiment was printed and then cut with an Avery Elle die.  Pretty simple, really, but looking much fancier.


     Challenges:

      Happy Crafting.  NanaConnie

Sunday, August 1, 2021

Birthday, Slim Line, Easel Card

      I played a bit with an idea while making this DT card for Your Scrapbook Place and did something I've not seen before, a slim line, easel card !  Our theme is always Anything Goes.

     Our sponsor this month was Bugaboo Stamps and they supplied the images used by the DT.  Then, rather suddenly, the shop closed without any notice!  So, we're going to offer the challenge winner a prize which will include the images used by the DT on their inspiration projects.  I'm so sad that Bugaboo is closed.  I adore all their images and love working with them.  

     On my card today, I used an image called "Rose Block Trio" and, despite it being a silhouette style, I still managed to color it with ProMarkers.  I used CS textured with my 'Linen' EF and folded into a lengthwise easel.  I added pink ribbon and green pearls, using those same pearls as the easel stopper.  The bow is hand-tied and I added a gem to it.


     Challenges:

     Happy Crafting and come play in our challenge.  NanaConnie

Tuesday, June 8, 2021

Spring Roses

      I wish I could tell you what company made the stamp used for this card but this is another of the stamped images sent to me by a dear friend last fall after I lost my entire digi collection when a flash drive crashed.  Devastating!  But Lindsey sent me three or four dozen stamped images so that I didn't have to stop crafting altogether, and I'm still coloring and using them for various occasions.  

     She sent me only 1 of these, but I colored it with polychromos pencils, photographed it, cropped the photo, and then printed it three times.  That way, the coloring on each image was exactly the same.  

     I cut those three images with a QuicKutz rectangle die, matted each one with eggplant CS, and mounted them onto a white, A2, card base.  

     The sentiment is the negative of a CUTplorations die cut (never throw out those scraps!) and I think it works perfectly on this rather simple card.


     Challenges:

     Happy Crafting.  NanaConnie

Friday, February 5, 2021

Roses for You

      I was lucky enough to be a challenge winner last week and the challenge was sponsored by Artsy Stamper.  I  chose a set of images called Vintage Birds and Roses and used this one to make a Valentine card for a friend who loves green and gold as a color combo.  Her birthday just happens to fall on Valentine's Day so I've used her favorite colors.  Roses are perfect for a Valentine card regardless of the colors.

      I actually love making Valentine cards for friends more than for a special sweetie since I have many more friends than sweethearts.  Besides, for friends I can change the color combos instead of having to use the traditional red/pink/white of Valentine cards and nobody questions it!  :-D

     When I printed this digi image, I first chose one of the pre-colored versions, then turned it into a grayscale image before printing it.  I'm getting more and more experience with this technique and have even learned that with my MS Word software, I can lighten or darken the grayscale which gives me more or less shading before I color it myself.


Colored w ProMarkers
Image & frame cut w Spellbinders dies
Plaid dp was a scrap
White, pearl CS embossed w Wild Roses EF (Darice)
Sentiment cut w Avery Elle die
Sheer, hand-tied, gold bow 

     Challenges:
Scrapping4Fun

     Happy Crafting, my friends.  NanaConnie

Sunday, September 27, 2020

Live, Laugh, Love with Roses

      Today I'm using another of the stamped images given to me ages ago by someone in my crafting group.  I really wish I knew which company had made this stamp so that I could give them credit but I have absolutely no idea.  I do know I love the way it colored up.


Colored w water color pencils, blended w Gamsol
Fussy cut w scissors
Green CS embossed w Linen EF
Sentiment stamped w black ink
Hand tied bow, 'dyed' w ProMarker
Background dp scrap from basket

     Challenges:
Paper Girls (flower/polka dots/gold)

     Happy Crafting.  NanaConnie

Tuesday, September 10, 2019

Yellow Rose of Texas

     I occasionally have to salute the great state of Texas since 3 of my grandchildren were born there and I have a couple of very dear blogging buddies who live there still.  These delightful roses from LeAnn's World 101 seemed a perfect image to accomplish the purpose.  I know we've all heard of The Yellow Rose of Texas and now you have that tune running through your head.  :-D


Colored with ProMarkers
Image and Card shape cut with QuicKutz dies
Lace was a scrap
Computer font sentiment, hand cut.

     Challenges:
a2z Scrapbooking
Crafter's Castle
Crafty Catz
Dies R Us
Do Al(l) Creatives
Outlawz PAM
Southern Girls
Stamping Sensations
Take It, Make It

     Happy Crafting.  NanaConnie

Sunday, August 25, 2019

Purple Roses

     I've been going through my folder of images and projects which are awaiting completion, getting inspired all over again about how to use them.  I don't know if you have one of those folders but it holds images I've colored but not yet used and even uncolored images waiting for the ProMarkers or polychromos pencils. 

     I also store stamped images which others have given to me.  I belong to a group of ladies who regularly exchange images they have stamped, giving them to others in the group who then color and use them to make cards.  It's a great way to expand the number and kind of images you might have available.  These roses came from someone in that group and I have no information on who made the stamp or how old it might be.


The inspiration for my colors came from


Colored with ProMarkers
Fussy Cutting
Heat embossed with "Bullfrog" EP
Hand sewn bow
Stamped sentiment

     Challenges:
Allsorts
Colour Crazy
Crafty Gals Corner
Cute Card Thurs.
Digi Choosday
Outlawz Stash
Southern Girls
TTCRD
Word Art Weds.

     Happy Crafting.  NanaConnie

Sunday, April 21, 2019

Tilda's Birthday Roses

    ~HAPPY EASTER~
Related image


      Now, on to my post for today.  It's been a while since I used any Magnolia stamps and I admit to missing sweet Tilda so today I've done another card for my birthday stash.


     I colored with ProMarkers, then cut the image with a die from QuicKutz.  I cut a larger frame out of pink CS with another die from the same set.  The pink leaves were cut with a Cheery Lynn die and the white flowers are mulberry paper cut with a die from Spellbinders.

     I added glitter and center gemstones to the top 3 flowers.  Finally, I printed the sentiment, hand cut it, inked the edges, and added it to the top corner.

     Challenges:
Aud Sentiments
Crafting by Designs
Crafty Addicts
Cute Card Thurs
Digi Choosday
Magnolia-licious
Paperminutes
Scrappy Land
Simon Says Stamp
TTCRD

     Enjoy your Easter celebrations, whatever they may be.  I'm spending the day with family.  Happy Crafting.  NanaConnie

Thursday, April 18, 2019

Celebrate Life !

     I've been practicing my coloring on roses, using ProMarkers, or pencil, or charcoals, even pastel chalks.  I'll be sharing more of those in the upcoming days but today I wanted to show you what I did with a combination of ProMarkers, gel pens, and water color pencils.

     The image is from LeAnn's World 101.


     After coloring the image, I cut it with a stitched, scalloped die from Memory Box.  I used another, larger die from that set to cut the solid golden piece used as an offset mat.  The 'damask' background is a scrap of DCWV dp and the stitched bronze ribbon was a scrap I found in my stash.

     I printed the sentiment and hand cut it before adhering it below the image.  This one goes in my stash of birthday cards.

     Challenges:
A Gem of a Challenge
Cardz TV
Colour Crazy
Crafty Friends
Jo's Scrap Shack
Outlawz Twisted Thurs.
Pattie's Creations
Pile It On
Take It, Make It

     That's all for today.  Happy Crafting.  NanaConnie

Wednesday, March 13, 2019

Yellow Easter Rose

     I absolutely love the vintage feel of this card and I know exactly who's going to get it for Easter.  I have one friend in particular who adores anything vintage and this will be perfect for her.  She also loves yellow roses so, of course, that was the color I chose for the main focal point.


     I printed the image in gray scale, then colored it with ProMarkers.  I printed the sentiment and cut both image and sentiment with Unbranded, oval, dies.  I found a strip of scrap lace, trimmed it to size, and added it to the left edge of the card front.

     I used one of my signature, hand-sewn bows, which I 'dyed' yellow to match the main rose, then added a tiny button.

      Challenges:
Crafty Addicts
Crafty Friends
Dare 2B Artsy
Dragonfly Dreams
Get Creative
Jo's Scrap Shack
Southern Girls
Take It, Make It
Unicorn
Word Art Weds.

     That's it for today.  Happy Crafting.  NanaConnie