Showing posts with label Tonic Studios dies. Show all posts

Friday, March 7, 2025

Welcome Country

      Our newest challenge has begun at FarmQuest General Store, where our theme is always "Anything Country Goes."  No cityscapes, shopping malls, crowded freeways, or high rises; just calm and lovely country scenes.

     The image I used on my DT card today is a clip art image, colored with Sanjoki markers to give it a sepia effect, with yellow and white gel pens used to give the lights their warm glow.  The sentiments at top and bottom were originally white but I used a beige marker to tone things down a bit.

     The image was cut with a Tonic Studios die, then I cut a white CS frame for it (also a Tonic Studios die from the same set.)  I inked the edges of that before adding the piece to the background dp, which came from an old DCWV stack.  That pad of papers has been in my stash for probably 5 years, unused, and that page seemed to be perfect for this "country" card!


     Challenges:


     I'll have a second post today for FQ Country Christmas so be sure to scroll up to see it, too.  Hope you'll come over and play in our challenge this month.  Happy Crafting.  NanaConnie

Friday, February 28, 2025

On the March ...

      This morning we are starting our newest challenge over at FarmQuest.  Our theme for the next month, in addition to the underlying "Farm or Country" which is always there, is "Nocturnal Animals."  

     As soon as I saw this clip art, owl image (it may even be a photograph but AI digital is so good these days, who knows for sure?), I knew I had to use it for my DT card.  Doesn't he look like he's determined to get home quickly before the sun can get any higher?  It's obviously waaay past his nocturnal bedtime!

     I cut the image with a Tonic Studios die, matted it with white CS (also cut with another Tonic Studios die from that same set), and added brown, gingham ribbon to the top and bottom.  I tied a separate bow and added it to the top strip of ribbon.  That ribbon has been in my stash for longer than I care to remember, lying about, forgotten in the midst of brighter ribbon colors.  It originally came from Really Reasonable Ribbon and still had the paper sleeve on it, proving it was unused.

     I printed the sentiment, then cut it with an Avery Elle die.  I mounted everything onto a kraft card base.   

     I love making masculine cards because they can be kept pretty simple in design, compared to feminine cards which tend to get over embellished (in my house, at least!)   Even when I do add ribbon, I find that the ginghams can feel masculine, especially when they are in the brown and black families.  But the real reason I do so many masculine cards is that I have more guys in my family than gals.  :-D


     Challenges:

     Hope to see you playing along in our challenge this time.  It runs until March 26 so you have plenty of time to create something with a country flair and get it entered into our challenge.  We love being inspired by you!

     Happy Crafting.  NanaConnie

Tuesday, February 25, 2025

Gothic Valentines

      Today is my turn to share my DT projects for the February challenge at Conjuror of Dreams.  The theme is Anything Goes but we give you an optional theme and this month, it's "Gothic Hearts."

     I did three cards using fabulous Conjuror images from two different sets.  This first one is from the "High Priestess of the Heart" set.  I printed her in grayscale, then colored her with Ohuhu markers.  I cut the image with a Tonic Studios die, matted her with white CS, and then inked the edges.  The background dp (both of them) came from a Lawn Fawn stack.


     Challenges:

     This second card is from the same "High Priestess..." set and again, I printed it in light grayscale, colored it with markers (Sanjoki, this time), and cut it with a Spellbinders die.  Again, the dp came from that same Lawn Fawn stack.  The sentiment was printed and cut with an Avery Elle die.


     Challenges:

     Finally, this last card features an image from the Conjuror set called "Love Potion."  This time, I used the pre-colored version but used Word to adjust the color tone and brightness before printing it.  I cut the image with a die from Tonic Studios, and inked the edges with a black marker.  The background dp came from that same Lawn Fawn stack and the red strip is CS cut with a long punch on one side.  I dropped this one into a neighbor's mail box anonymously.  She collects old, fancy, perfume bottles so I knew she'd love this image!

   
     Challenges:
  
     I know Valentine's Day is gone for this year but our challenge is still open and you can enter it but only for the rest of this week.  Our next challenge starts on Saturday, March 1.  I hope you're going to play along with us this month.  Don't forget that we also have a Progressive Challenge on our Facebook page.  You need to use a Conjuror of Dreams image to enter the Progressive challenge, but then you get the image for the following month free!  

     Happy Crafting.  NanaConnie

Wednesday, January 15, 2025

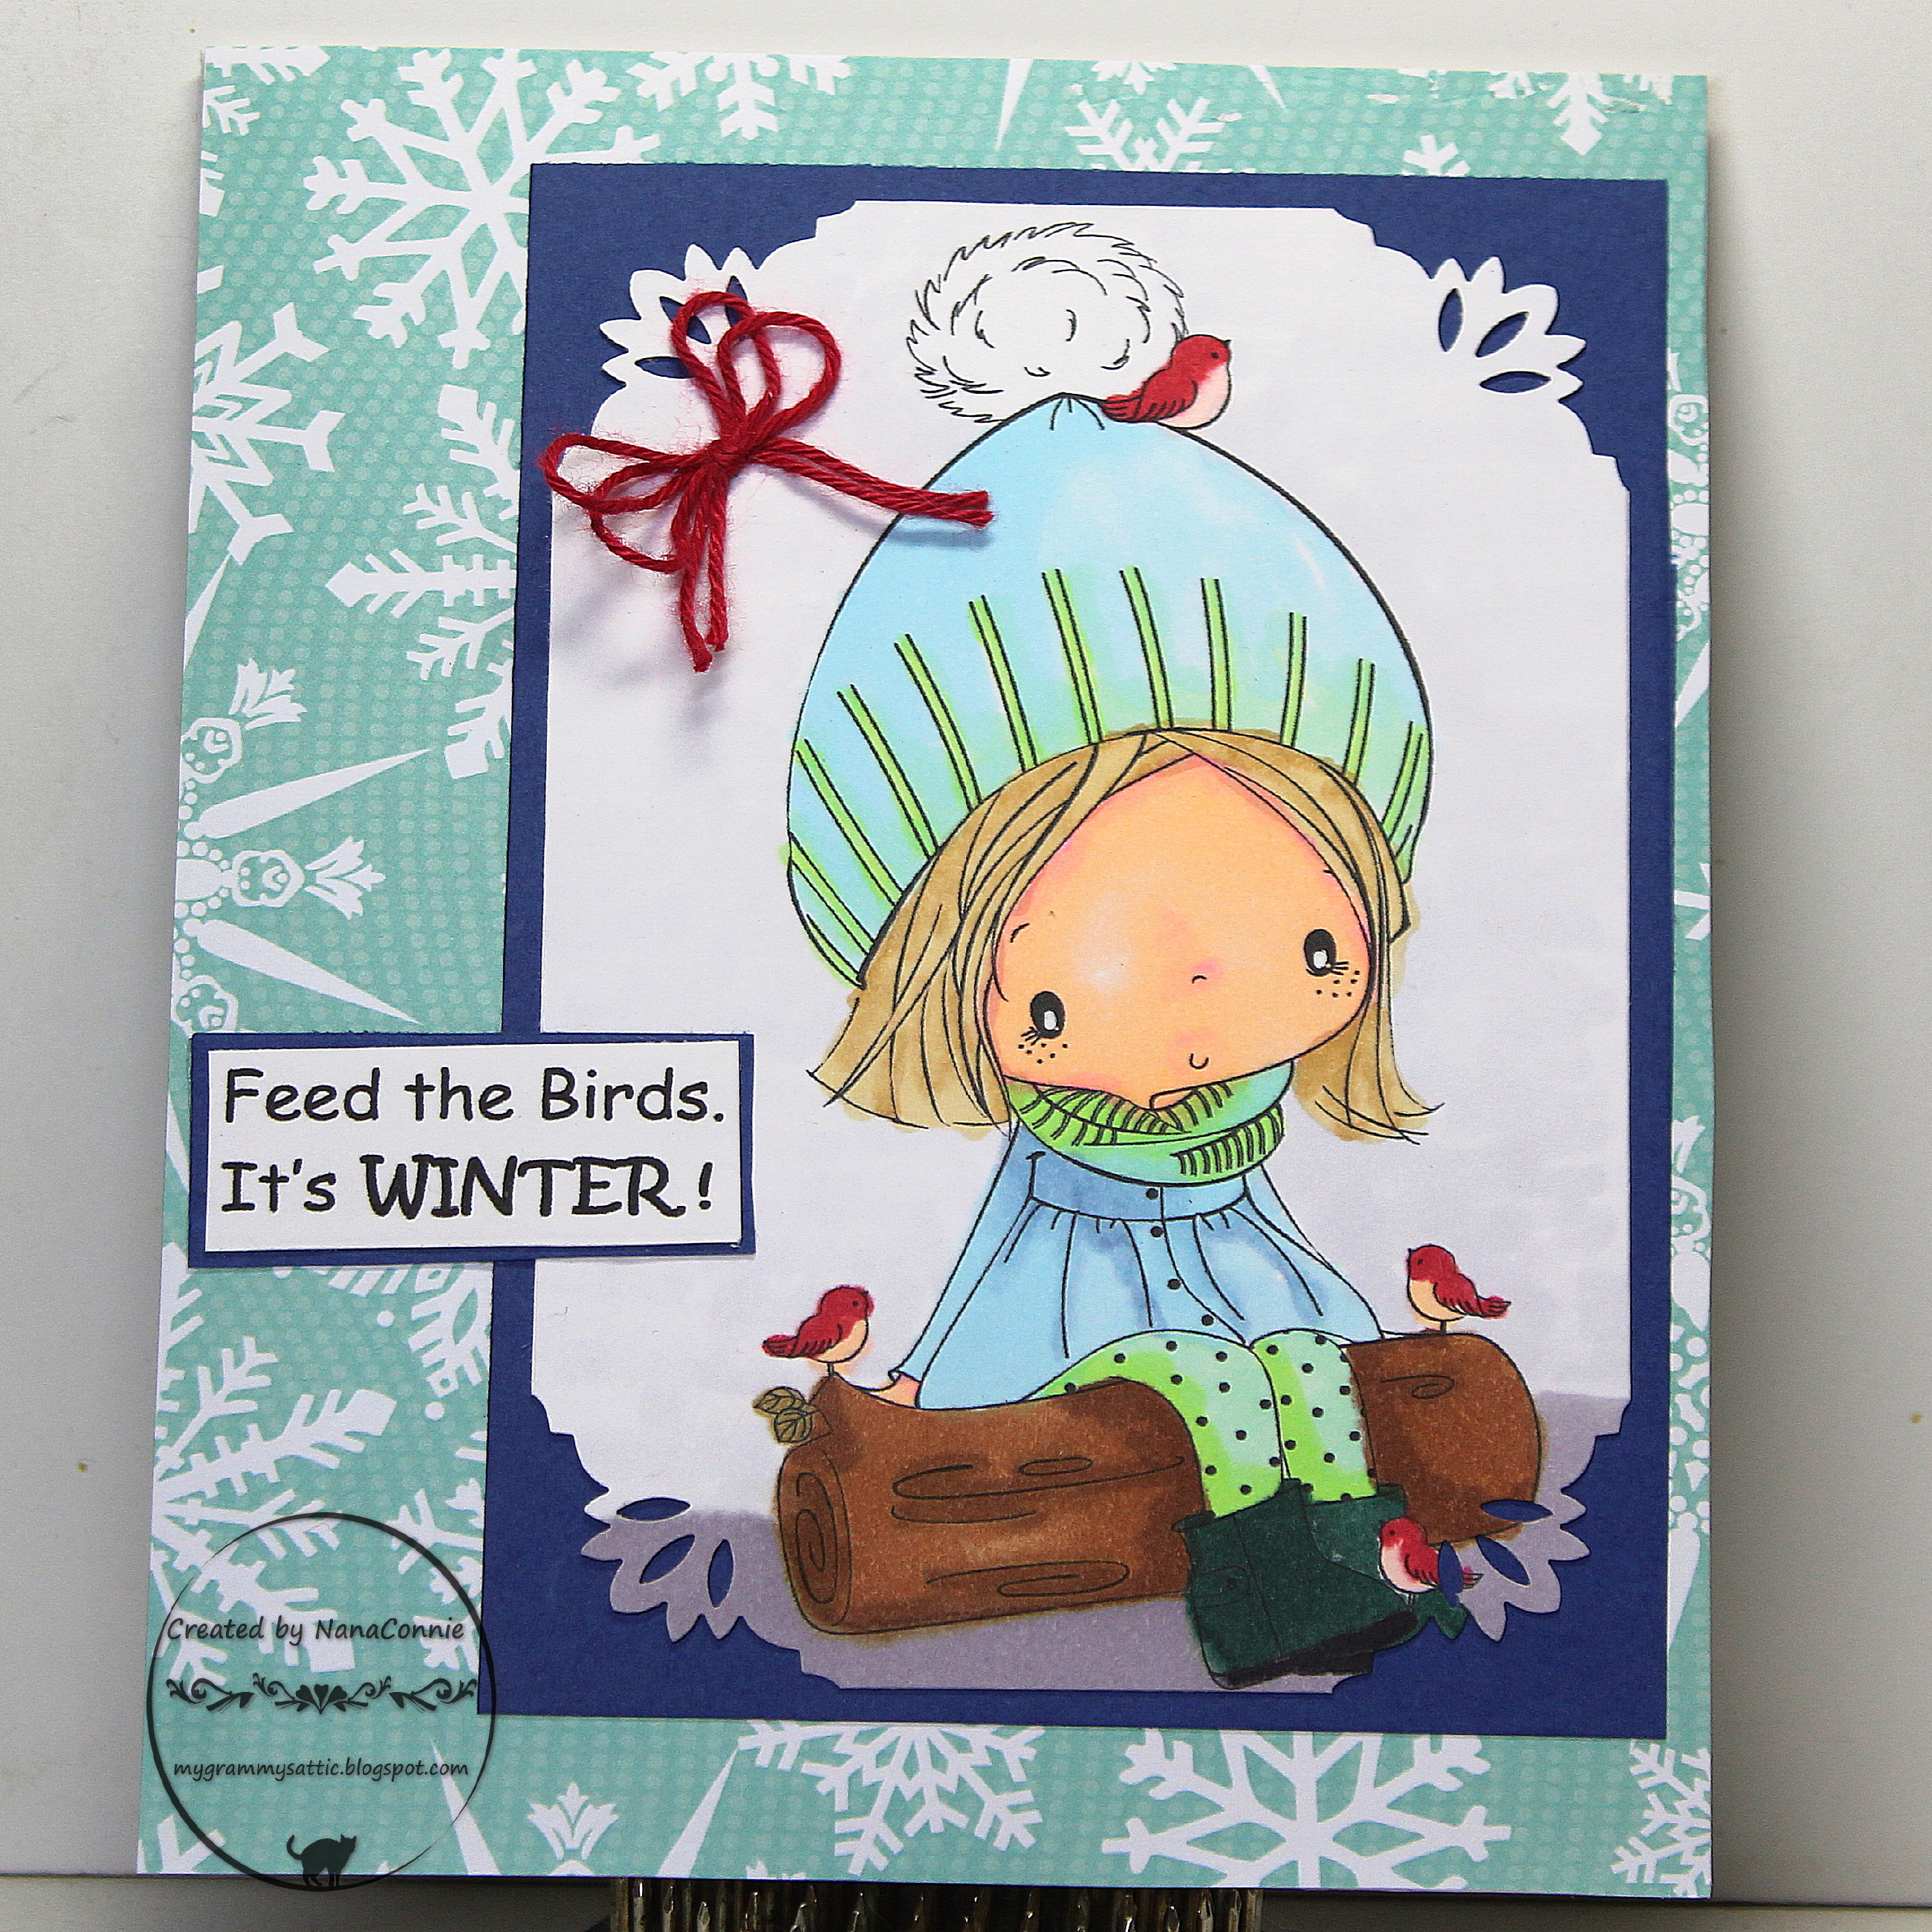
Feed the Birds

      I'm honored to be a guest designer for Penny's Paper-Crafty this fortnight and the sponsor of the image I used is All Dressed Up.  They supplied images for the DT and GD to use.  I used an image called "Feeding the Birds."  I thought it made a perfect winter card.  

     Colour of Love is the second sponsor for the challenge this month.

     I colored the image with a combination of Sanjoki and ProMarkers, then cut it with a die from Tonic Studios.  I used a Fiskars punch on the four corners.  That piece was mounted onto a rectangle of deep blue CS.  I cut the sentiment with a QuicKutz die and framed it with a scrap of the blue CS that framed the image.

     The snowflake dp came from a DCWV stack and I added some texture by dry embossing it with a brand new folder from Sizzix (thank you, Santa!)  My final touch was to embellish the card with a hand-tied, double loop bow made with simple red twine.


     Challenges:

     I hope we see you playing in the challenge this time around.  Happy Crafting.  NanaConnie

Friday, January 10, 2025

The Dragon & the Knight

      Guess what?   There's a new challenge starting today at Star Stampz and it's the first one of 2025.  Boy, I'm not used to typing 2025 yet.  I had to go back and correct it from typing 2024.  :-D  Our theme is always Anything Goes with an optional theme.  This time, the option is "Inspired by a Song."

     I took that to heart and went searching for a Star Stampz image that had a dragon because "Puff, the Magic Dragon" was running through my head.  The image is The Dragon and the Knight.  I colored it with my Ohuhu markers, then cut it with a Tonic Studios die, and cut the corners with a Uchida punch.  

     I did the same things to a piece of DCWV dp and used it for the frame around he image.  The background was made with another piece of dp from that same DCWV stack.  I know I tend to use DCWV papers more than any others and part of that is because they are a favorite of mine but also because I own more DCWV stacks than any other brand.  That may have happened because when I first started paper crafting, the craft store where I made my purchases back in those days carried mostly DCWV,  I've used other brands over the years but I still tend to go back to DCWV.  (and I have a HUGE stash of it which I'll never use up, even if I live to be 100!)

     I added a wrap of purple Really Reasonable Ribbon and tied a bow with it also.


     Challenges:

     Come play with us in this challenge, won't you?   If you don't find yourself inspired by a song, you can always enter an Anything Goes card.

     Happy Crafting.  NanaConnie

Wednesday, December 25, 2024

Cuddles with Santa

      It's Christmas Day and, in case you haven't seen my Christmas Greeting to all, just scroll down one post. 

     I'm also sharing this card today because I'm way too far behind on posting the cards I've made over the last 2 weeks!  This one is another collaboration with my SIL, Lainy, where she's done the coloring and I've turned it into a card.  She was still coloring images for Christmas cards yesterday!  Of course, we both put off a good share of our gift wrapping efforts until yesterday so last minute cards were almost to be expected.  :-D

     This is another clip art image and this one was AI generated.  I've joined a FB group of very talented people who create AI images based on requests from people all over the internet.  They are free for personal use.  I'll share more about that group (including a link to the site) in my next post.  Today, time is short and I need to get this post finished before the dinner bell rings at my house.  :-D

     Lainy colored this image with colored pencils and, once finished, I cut it with a Tonic Studios die.  I inked the edges using a red marker.  The sentiment was printed and cut with a QuicKutz die, and I used the same marker to ink the edges of it.  The background dp came from an old (very, very old!) K & Co. stack.  The red and the green candy cane embellishments were cut with a hand punch but it has no company name on it so I can't tell you who made it.  I've had it for a good many years and it's a favorite of mine during the Christmas season.  I added a single wrap of green ribbon around the bottom of the front flap.


     Challenges:
Rudolph Days

     Make your Christmas as merry as possible!  Happy Crafting.  NanaConnie

Monday, December 23, 2024

Christmas Girl

      For all my promises last week about having posts each day for the past 7 days, the "To Do" list just got the best of me and, even though I've been very busy creating in the midst of the Christmas preparations, I didn't have time to sit down and write posts.  But today, I finally finished the Progressive Challenge image from Moondrea Designs and I want to get her posted to the Challenge.

     I colored with my Ohuhu markers, then added Stickles to the holly leaves, the berries, and the candle flame in the lantern.  After it all dried, I cut the image with a Tonic Studios die, and decorated the corners with Fiskars and Uchida punches.  I framed the image with a die cut rectangle of green CS (Spellbinders die.)  The background dp is a scrap from the Christmas stash (probably DCWV) and the sentiment was printed and cut with another Tonic Studios die.


     Challenges:

     Hopefully, I'll have additional posts this week.  We aren't celebrating our Christmas holiday until Saturday when my college-attending, granddaughter gets home for her Christmas holidays.  Maybe I'll have posts all week long of Christmas cards I've made even though Christmas will be on Wednesday.  You won't mind, will you?  The Christmas holidays don't really end until the New Year, right?

     Happy Crafting.  NanaConnie

Sunday, December 15, 2024

A Steampunk-y Christmas

      It's been ages since I did anything steampunk but my sis-in-law has a grandson who adores steampunk and when she saw this steampunk rabbit image in my collection of images from SheepSki Designs, she wanted to turn it into a Christmas image, even though it wasn't drawn as one.  I think she did a fantastic job by using traditional Christmas colors to get the effect she wanted.

     I took her colored image (pencils), cut it and the red frame with QuicKutz dies, and decorated the corners of each with Fiskars punches.  I found a scrap of dp for the background in my Christmas papers stash and thought it worked well with the steampunk aspect.  The sentiment was printed and cut with a Tonic Studios die.

     For embellishment that heightened the steampunk, I dug through my drawer full of charms and found a little baggie filled with tiny gears and cogs and other metal bits, many of them actual old watch parts.  I bought those more than a dozen years ago at a Michael's store and haven't used them in longer than I can remember.  But they were perfect for this card!


     Challenges:

     I may have an additional post today if I can find the time to sit down and write it.  My list of things still be be done before Christmas arrives grows longer and the number of hours I have to accomplish all of them grows shorter, and desperation is setting in!

     Happy Crafting.  NanaConnie

Wednesday, December 11, 2024

Snowflake Santa

      I have to share a card with a spectacular image which was colored by my sis-in-law using pastel Ohuhu markers and white gel pens.  Didn't she do an incredible job?  The image is clip art and I think originally it was a digital coloring book page but I sized it for a card before printing it.  

     After she colored it, I cut it with a QuicKutz die, then used a Fiskars punch on the corners.  The sentiment was printed and cut with a Tonic Studios die.  I decided to use blue glitter paper on the card front to enhance the soft blues in the image.  The two snowflake embellies are die cut foam and the dies were from Cottage Cuts.


     Challenges:
Crafty Gals Corner
Creative Inspirations
Penny's P-C

     Christmas is less than 2 weeks away and I'm still making cards!  Yikes!  Have you finished all of yours?  Happy Crafting.  NanaConnie

Saturday, November 30, 2024

Last Day of 30 Days of Holidays

      Here it is, my final card for the 30 Days of Holidays at Beccy's Place.  The last day theme is always "Do What You Love," kind of like Anything Goes but better because we get to use things we love.  For me, there are so many things I love to put on Christmas cards, but I think snowmen have to be at the top of the list.  Actually, if I could find a good reason, I'd do snowmen cards all year round.  :-D

     Today's card features one of Beccy's new snowmen, named Winston and released this year.  I thought he'd look great dressed in a burgundy hat and scarf with gold fringe and earmuffs.  I colored him with ProMarkers and added gold Stickles to the star.  I cut the image with a Tonic Studios die, then trimmed the corners with a Fiskars punch.  

     I wanted the card to sparkle so I dug through my stash of glitter CS scraps and pieced together the background on the card.  I love glitter and when it comes to Christmas cards, I always debate with myself about whether silver glitter or gold glitter is best.  In this case, I was able to use mostly silver glitter but the star has gold sparkle, so a combination of them is the absolute best!

     The image and the "Snowball Fight" sentiment were layered on, using a good amount of craft glue (which I've found is the most effective for attaching CS to glitter.)  Even the stickiest of double sided tapes tends to come loose and peel off of glittered CS after just a short time so glue it is.  


     Challenges:
Jingle Bells (sparkle & colors)

     The Christmas season is really on top of us now but it's nice to have another 30 cards in my stash.  Ok, maybe 25 instead of 30 since I did use Thanksgiving as the holiday on 4 or 5 of my cards this month.  Still, my Christmas card stash is looking good this year because of all the other cards I've done between January and October.  I still have colored Christmas images waiting to be made into cards so I'll have several additional posts throughout December.
  
    In the meantime, Happy Crafting.  NanaConnie

Tuesday, November 26, 2024

Christmas Angel & Letter "W"

     It's the day for "W" over at the 30 Days of Holidays for Beccy's Place and I've managed to play along each day.  I started the month of November thinking that I'd get maybe 14 or 15 cards done so I'm really proud of myself for being this far through the alphabet and having done a card for each letter and each of the theme challenges.  My "W"s are: White, Wings, Winter, & Webbing (the 'ribbon.')

     This is another card that's a collaboration with my sis-in-law, who colored this gorgeous little angel and then had me put together the card.  It's not that I don't do my own coloring any more but she just isn't into the card making side of things (not yet, anyway!) so we've fallen into a lovely pattern of taking her coloring and turning it into cards.  In between, I color my own images and make those into cards, too.

     Lainy hand-colored the angel (from Monsoon Publishing) with water color pencils, and I cut the image with a Tonic Studios die.  The sentiment (from Beccy's Place,) was cut with a QuicKutz die.  I inked the edges of both using an alcohol marker.  The wintery background dp came from an old (very old!) DCWV stack. The glittered webbing seem perfect to use as a wide ribbon and the glitter added wonderful sparkle (oooh, another "W"!)


     Challenges:

     I'll have another post tomorrow.  Until then, Happy Crafting.  NanaConnie

Monday, November 25, 2024

"V" for Vintage Victorian Christmas

      Today I'm sharing my "V" card for the 30 Days of Holidays over at Beccy's Place and it's another of my collaboration cards with my SIL.  She colored this clip art image and used watercolor pencils after I had printed it in gray scale.  She loves the coloring part but I haven't yet gotten her into the card making side, so she colors and I create the cards.

     For this card, my "V"s are: Vintage, Victorian, Verdigris green, Vermillion red on the berries, and white Velvet on one layer of the snowflake.  I cut the image with a Tonic Studios die, then did a white mat, inked with a vermillion marker on the edges.  The sentiment was cut with an Avery Elle die and those edges were also inked.  

     The background is a scrap of dp from DCWV (!) and the snowflake was made with Cottage Cuts dies.  I put the two layers together and added a touch of glitter and a rhinestone for sparkle.  The final embellishment was the row of flat-back pearls.  A Victorian card seemed to call for sparkle and gems and a fair amount of embellishment.


     Challenges:
Outlawz Thurs (Dickens' Christmas Carol)

     That's all for today.  Happy Crafting.  NanaConnie

Tuesday, November 19, 2024

All I Want for Christmas

      I adore this latest image for the FB Progressive Challenge at Moondrea Designs.  The image is named "Summer" but I wanted her for a Christmas card so I gave her long sleeves, colored her in traditional red and green using my Ohuhu markers, and added a Christmas sentiment.  

     Once colored, I cut the image, and the dark green mat framing it, with Tonic Studio dies.  I added green Stickles to her earrings, and little drops of gold Liquid Pearls to the flower centers.  The background dp was stamped with Versamark on a large, decorative stamp, then heat embossed with gold EP.  I think she made a delightful & feminine Christmas card.  :-D


     Challenges:

     Happy Crafting.  NanaConnie

Sunday, November 17, 2024

Letter "O" - 30 Days of Holidays

      Today we return to the letters of the alphabet for the daily challenges at Beccy's Place and I'm up to the Letter "O."  I've done an Offset Gate Fold card (tutorial is available on Beccy's blog under the A - Z Folds tab at the top of the page.  In my opinion, Beccy does some of the best tutorials around; step by specific step, clear, and easily understood.)

    I colored the cute snowman image (also Beccy's Place) in Odd (odd for Christmas) colors of purple and pink and I used my Ohuhu alcohol markers.  The sweet snowman is carrying an Ornament as he readies his home for Christmas.  Once colored, I cut the image with a Tonic Studios die, and cut the mat for it with another die from that set.  The papers on each flap of the gatefold came from Doodlebug.  I thought the print on the papers was enough so that no further embellishment was needed.


     Challenges:

     Happy Crafting.  NanaConnie

Saturday, November 16, 2024

A Tartan Theme - 30 Days of Holidays

      This darling elf is an image from Beccy's Place and I love how proudly he's carrying those presents.  The challenge for today is one of the themed challenges rather than an alphabetical one and Beccy chose "Tartans or Plaids."  I immediately thought about this paper I knew was in my Christmas stash and chose the elf as the image I wanted on the card.

     I printed the pre-colored version, adjusted it to almost grayscale before printing it, and then enhanced all the reds with one of my Sanjoki markers, chosen because it was an almost exact match to the red in the dp.  The sentiment came from an old magazine.  I cut it out with a Tonic Studios die, matted it with red CS, and layered it onto the image piece after I cut the image with a QuicKutz die.  The three snowflakes are from Jolee's.


     Challenges:

     Happy Crafting.  NanaConnie

Friday, November 15, 2024

"N" is for Nutcracker - 30 Days of Holidays

      One more card for the 30 Days of Holidays at Beccy's Place and today we're working with the letter "N" so a Nutcracker was a Natural.  Because I'm still fighting that nasty respiratory virus, I decided on something really quick and printed out a pre-colored version of one of Beccy's Nutcrackers. 


      I cut the image with a die from Tonic Studios, then punched the corners of the image piece with a Fiskars corner punch.  After that, I began searching through my Christmas ribbons.  I was looking for a plaid ribbon and  was found in the scrap basket.  I really love the plaid on Christmas cards and I think it goes well with the masculine Nutcracker image.  I think ribbon is my favorite embellishment because it works so well with both feminine and masculine cards.

     I used an Art Impressions die to cut the snowflakes, made the center one with 2 layers, and added glitter and a gem to the top snowflake.  The NOEL sentiment was cut with a Die-Versions die and it gave me one more "N."

     Challenges:
Outlawz Thurs (The Nutcracker, of course!)

     Happy Crafting.  NanaConnie

Wednesday, November 13, 2024

... Laid in the Manger

      It's time for the letter "L" in the 30 Days of Holidays challenge over at Beccy's Place.  Today, I'm working with this sweet Baby Jesus image, showing him Lying in the manger.  (And, yes, for those of you wanting to correct my grammar, it really IS "lying," not "laying."  Remember, "lay" means "put" as in "Lay the book on the table."  In all other cases, it's "lie," as in "I'm going to lie down," or "I'm lying on the bed."  Those sentences have nothing to do with telling lies, which is a completely different use and meaning of the word!  Just because three entire generations have used 'lay' incorrectly doesn't change the rules of grammar.  I was raised by an English teacher and grew up hearing the language spoken correctly.  Thank you, Mom.  :-D)

     Back to the card: My "L"s include Lambs, Lamb of God, Light (the halo), Light green (the swaddling clothes), Lemon yellow, Layers, Lord, Lavender (mat behind the image), and a Latch card.  For a great tutorial on Latch cards, check out the A - Z Folds tab at the top of the page on Beccy's blog.  Her tutorial shows the latch piece on the side of the card but I chose to put it on the bottom of my card due to the shape of my image piece, an A2 turned sideways so the opening is at the bottom.

     The sentiment is also from Beccy's Place and I merged it with the image before printing.  I used Sanjoki markers to color the image, then cut it with a Tonic Studios die.  The lavender mat was also cut with another die from that set.  The background dp came from a very old DCWV stack that's been hiding in my Christmas stash.  The 'latch' piece was made from a scrap of dp, folded twice and glued together into as square, then attached to the bottom corner of the back card flap.  The front flap tucks into it to hold it closed.


     Challenges:


     I have a card ready to post for tomorrow and will get that post prepared and pre-scheduled because my respiratory virus has really drained the energy out of me, to the point where I'd love to just sleep through the morning tomorrow without a care for having to get up and write a post.  :-)

     Happy Crafting.  NanaConnie

Thursday, November 7, 2024

Old Time Santa

      This CAS card is my DT sample for the FarmQuest General Store challenge which starts today.  Our theme is always "Anything Goes" and we are always sponsored by QKR Stampede.  The DT use three images from QKR and those are the prize for the challenge winner.

     I chose to use the Old Time Santa image and I colored him with Sanjoki markers, then cut the image and the two mats with Tonic Studios dies.  I used a Uchida punch of each of the corners and then layered them all together.  The card font was dry embossed with my Linen EF.  The sentiment was printed and cut with an Avery Elle die.  A delightfully CAS card and very masculine.


     Challenges:

     Come play with us this month.  We love being inspired by you and what you make.  Who knows, you might even end up the winner of the three QKR Stampede images.

     Happy Crafting.  NanaConnie

Wednesday, November 6, 2024

Letter "G" at 30 Days of Holidays

      My next card in the 30 Days of Holidays at Beccy's Place is for the letter "G" and I have a Thanksgiving card to share.  The image is pre-colored clip art, printed in gray scale, and colored in my own chosen colors using pencils and alcohol markers.  I added Glossy Accents to the hot chocolate cup for a bit of shine.  Fortunately, it photographed really well.  I also added glitter to the steam coming off the cocoa.

     Once colored, I cut the image with a Tonic Studios die, then matted it with a scrap of dp, also cut with a die (QuicKutz, I think.  I forgot to write it down.)  I decided to make a gate fold card and went searching through the scrap basket for papers to put on both sides of the gate.  On the left side (mostly covered by the image piece) I put Glossy Accents on the flowers.  For the right hand side, I used small rectangles of CS and put them onto the flap one above the other.

     I put glitter EP on each of those small rectangle snippets and heat embossed them.  I love the sparkle.  The sentiment was printed and cut with an Avery Elle die, then placed at the top of the image piece. 


     Challenges:


     That's all I have for today.   So far, I'm doing pretty well at playing every day at Beccy's Place and I hope to be able to keep going for the entire month.  We'll see.  In the meantime, Happy Crafting.  NanaConnie

Monday, November 4, 2024

Winter Mice for the Letter "E"

     Today's card is going to be entered for Day 5 in the 30 Days of Holidays at Beccy's Place so we're using the letter "E" as the theme.  My "E"s are: Embossing, Ecru (the stars), & Embellishments. (and a little Eeek for all of you who are afraid of mice!)

     I'm also playing again in the challenge over at Conjuror of Dreams and this month their optional theme is "Winter Critters."  The image I used is from Conjuror of Dreams and I adore these little mice.  I just know they are perched on that log, singing Christmas Carols from their tiny hearts.

     The image and its white frame were die cut with dies from QuicKutz and Tonic Studios.  The sentiment was cut with an Avery Elle die. I embossed the gray CS background, using my 'Linen' EF.   I found a strip of red dp in the scrap basket and added it to the left side, then put the angels and snowflake embellishments along the left side.


     Challenges:

     Happy Crafting.  NanaConnie