Showing posts with label ribbon. Show all posts

Sunday, January 26, 2025

Carnation Lady

      I'm finally getting around to posting a card for the progressive challenge over at Moondrea Designs this month.  I had problems for several days getting the image to print out but Wendy managed to send me a Word document with the image and I was ale to print that just fine.  Thanks so much, Wendy!

     The image is called "Carnations" and once I had it printed, I was able to color it with a combo of Sanjoki and Ohuhu markers.  After coloring it, I cut it with a Tonic Studios die.  The pink CS frame was cut with my Fiskars paper cutter and I mounted the image piece onto it.  The background dp came from a DCWV stack.  I found that delightful, embroidered ribbon in my stash of Christmas ribbons and I'm pretty sure it came from Really Reasonable Ribbon.


     Challenges:


     That's all I have today.  Happy Crafting.  NanaConnie

Wednesday, December 25, 2024

Cuddles with Santa

      It's Christmas Day and, in case you haven't seen my Christmas Greeting to all, just scroll down one post. 

     I'm also sharing this card today because I'm way too far behind on posting the cards I've made over the last 2 weeks!  This one is another collaboration with my SIL, Lainy, where she's done the coloring and I've turned it into a card.  She was still coloring images for Christmas cards yesterday!  Of course, we both put off a good share of our gift wrapping efforts until yesterday so last minute cards were almost to be expected.  :-D

     This is another clip art image and this one was AI generated.  I've joined a FB group of very talented people who create AI images based on requests from people all over the internet.  They are free for personal use.  I'll share more about that group (including a link to the site) in my next post.  Today, time is short and I need to get this post finished before the dinner bell rings at my house.  :-D

     Lainy colored this image with colored pencils and, once finished, I cut it with a Tonic Studios die.  I inked the edges using a red marker.  The sentiment was printed and cut with a QuicKutz die, and I used the same marker to ink the edges of it.  The background dp came from an old (very, very old!) K & Co. stack.  The red and the green candy cane embellishments were cut with a hand punch but it has no company name on it so I can't tell you who made it.  I've had it for a good many years and it's a favorite of mine during the Christmas season.  I added a single wrap of green ribbon around the bottom of the front flap.


     Challenges:
Rudolph Days

     Make your Christmas as merry as possible!  Happy Crafting.  NanaConnie

Friday, November 15, 2024

"N" is for Nutcracker - 30 Days of Holidays

      One more card for the 30 Days of Holidays at Beccy's Place and today we're working with the letter "N" so a Nutcracker was a Natural.  Because I'm still fighting that nasty respiratory virus, I decided on something really quick and printed out a pre-colored version of one of Beccy's Nutcrackers. 


      I cut the image with a die from Tonic Studios, then punched the corners of the image piece with a Fiskars corner punch.  After that, I began searching through my Christmas ribbons.  I was looking for a plaid ribbon and  was found in the scrap basket.  I really love the plaid on Christmas cards and I think it goes well with the masculine Nutcracker image.  I think ribbon is my favorite embellishment because it works so well with both feminine and masculine cards.

     I used an Art Impressions die to cut the snowflakes, made the center one with 2 layers, and added glitter and a gem to the top snowflake.  The NOEL sentiment was cut with a Die-Versions die and it gave me one more "N."

     Challenges:
Outlawz Thurs (The Nutcracker, of course!)

     Happy Crafting.  NanaConnie

Thursday, November 7, 2024

Humbug Cat for Letter "H"

      I tried something completely new to me in making my next "30 Days of Holidays" card at Beccy's Place, a Handbag card.  I followed the tutorial Beccy has posted on her blog, made a couple of size adjustments because of the image I wanted to use, and I know I'll do this card type gain.  With more practice, I'll get better and the results will look better.

     The image is clip art and it was colored by my sis-in-law.  She used water color pencils and I think the fur is incredible!  Don't you just love those Harvest Gold eyes?  I cut and folded the CS into the handbag shape, cut the image piece into that shape, then printed and die cut (Avery Elle) the "Humbug" sentiment.   I dug into my stash for the Hunter green, glitter CS.  The handle was made using holographic ribbon (it changes color from red and gold to green and gold.)


     Challenges:

     Happy Crafting.  NanaConnie

Friday, November 1, 2024

30 Days of Holidays - "B"

      This is my second post for the 30 Days of Holidays at Beccy's Place, and although I posted my card for "A" early this morning, Beccy's Place is on Australia time so they have already started the second day of the challenges.  The theme is to use things starting with "B."

     I love Birds on my Christmas cards and this time I even chose a Baby bird.  I colored him with markers using mostly Burgundy and Bayberry (green) on the bird and holly leaves & Berries.  After coloring, I cut the image with a QuicKutz die.  The sentiment was merged into the image before printing so it came out as part of the image when I die cut it.

     The Background paper was a scrap from an old DCWV stack.  I found some red ribbon, wrapped it around the card front, and tied a Bow.


      Challenges:

     Happy Crafting.  NanaConnie

Monday, August 19, 2024

Sweet Tulip Mouse

      This image is from Di's Digi Designs and I printed it ages ago.  It's been sitting in a folder, waiting to be colored.  I ran across it this past weekend when I was cleaning, clearing, and reorganizing the craft room.  I colored it with my Sanjoki alcohol ink markers, then cut it with an old Spellbinders die.  I inked the edges with an ink pad.

     I decided it would make a great birthday card, so I printed the sentiment and cut it with an Avery Elle die.  The background dp came from a DCWV stack.  I found a long scrap of gold ribbon in the stash and  did both a wrap around the card front, plus hand-tied a bow.


     Challenges:

     Happy Crafting.  NanaConnie

Tuesday, May 7, 2024

Very Vintage Santa

      This is the second post today.  To see the first one, just scroll down one post.  This one is for FarmQuest Country Christmas and my "country" elements are: vintage, quilted background, and Santa outdoors.  The "Country" is our only theme requirement, other than it must be for Christmas.

     This Santa image is from Jan's Digi Stamps, sized small enough to fit an A2 card, leaving plenty of room to show off the 'quilted' background.  I colored it with Sanjoki markers, then cut the image with a Tonic Studios die.  The "quilt" was pieced together with scraps from the Christmas basket.  I hand-printed the sentiment and cut it with an Avery Elle die.  The Ho Ho Ho ribbon was a left over bit from another project which was a perfect fit along the left edge.


     Challenges:

     Happy Crafting.  NanaConnie

Thursday, March 7, 2024

Happy Snow Couple

      Once again, a new challenge has started over at FarmQuest Country Christmas.  Our theme is always "Anything Country Christmas Goes."  For today's card, I chose a clip art snow couple, happily dancing in the yard of their country home.

     The image started out in black and white but I used computer software to change it into sepia tone before printing it.  I love the vintage feel it gave the card.  I cut the image with a QuicKutz die and the sentiment was cut with a Tonic Studios die.  The background dp came from a DCWV stack.  I used very narrow, 1/8" ribbon which is wrapped around the card front and tied into a simple bow.


     Challenges:
Digi Choosday
Peace on Earth

     I hope we're going to see you playing along this month.  If you make something to enter into our Country Christmas challenge each month of the year, you'll have 12 cards done before the holiday rush hits you next Christmas.  :-D  Besides, we love being inspired by what you create and share with us.

     Happy Crafting.  NanaConnie

Thursday, August 3, 2023

Back to School

      The three most dreaded words for any school kid who hasn't yet drained the last drops out of summer are "Back to School"!!    My youngest granddaughter claims to be ready for school instead of summer but then, she's in college and has spent her summer working to earn money to come home for a few days this month and again at Christmas break.

     I'm going to give her this card right before she heads back into classes.  It's my DT card for the August blog challenge starting today over at LeAnn's World 101.   The image is called "Bookworm" and you can find it in the store by clicking on the name.

     I colored the image with my Sanjoki markers, cut it and the frame behind it with QuicKutz dies.  I used 2 pieces of embossed CS to make the background and I used a Darice EF on the top piece with the diamond pattern, and a Sizzix EF for the leaves on the bottom.  The sentiment was printed and fussy cut, then "framed" by inking the edges.  

     I used some fall ribbon from my stash to wrap the card front and to hand tie the bow.

I pulled colors from the challenge at My Favorite Things
     Challenges:
Thru...Purple Haze (center column)

     I hope we're going to see you playing in our Blog Challenge.  Our theme is always "Anything Goes" and it runs until the end of the month.  Don't forget that our Progressive Challenge has also restarted on our FB site and it goes live on the 5th of each month.  Go check out the post and you'll find all the rules in the August Progressive album.

     Happy Crafting.  NanaConnie

Monday, January 23, 2023

Candy Hearts

      Only House Mouse could make finding mice in your bowl of candy hearts something cute!  :-D  

     I used water color paints and pencils to color the image, then cut it with an oval die by QuicKutz.  The shiny, metallic CS frame for the image was cut with another QuicKutz die from that same set.  I used one of the smallest oval dies from that set to cut a scarp of the metallic CS and layered the sentiment on top of it.  The sentiment piece was cut with an Avery Elle die.

     I found a scrap of pink dp and layered it onto the white card bade,  then added a bit of ribbon, hand tying it just off centered above the image.  I thought the shine from the metallic CS, plus the ribbon, was enough 'splash' so called it finished.


     Challenges:

     Happy Crafting.  NanaConnie

Sunday, October 23, 2022

Witches' Brooms

      Today's Halloween card makes the sentiment the focal point.  I love the way this laid out.  It was done on orange paper and I received it through my crafts exchange group, where we all mail images or die cuts to everyone, then email everyone a photo of our finished creation.  The group exchanged a dozen images/cuts for October and most of those were Halloween related with a few fall/harvest images. 

     I made the purple background with water color paints.  I did an ombre with purple paint, let it dry, then spattered it with water.  I used extremely narrow, black, satin ribbon (from my stash) to wrap the card front and added one of my hand-sewn, signature bows with a pearl.  Quick, easy, and more or less CAS.


This is also my Day 23 entry for the
 LeighSBDesigns 31 Days of Halloween Blog Hop.
 

     Challenges:
Paperbabe
Your Scrapbook Place

     Happy Crafting.  NanaConnie

Saturday, November 27, 2021

Tie the Bow

      This card is for the 30 Days of Holidays at Beccy's Place and it features things with the letter "T" - Tent card, Toys, & Tying the bow (too bad he Tied his beard into the bow!)  These gnomes are from Beccy's Place, and while they aren't specifically for Christmas, they certainly do work well on Christmas cards.  But they are versatile enough to be great for birthdays or other gift giving occasions.

     These two gnomes are from the same set but I merged them into one image.  I colored with ProMarkers, then cut the image with a die from QuicKutz.  I used two scraps of CS for the corners behind the image.  The sentiment was printed, then cut with an Avery Elle die, and matted with green CS.

     The dp with the text greetings came from a Recollections stack (don't ask me which one since it was separated from the stack) and the toy embellies are from K & Co., along with the one tiny present in the bottom corner.  Ribbons are from my stash and the double, quad-loop bow was tied using my bow maker.


     Challenges:

      OK, this finishes my posts for today but I'll have another post or two tomorrow.  Happy Crafting.  NanaConnie

Friday, November 19, 2021

Kris Kringle Kristmas

      Just from the title of this post, you should be able to figure out this card is for the letter "K" in the 30 Days of Holidays at Beccy's Place.  I've used Kris Kringle, Kristmas, Kraft, & Khaki.  The Kris Kringle image is from Beccy's.

     I used ProMarkers and gel pens for highlights, including a silver sparkle pen on the bell.  Then, I cut the image with a CUTplorations stitched die.  I inked the edges of both the image and the card with a Khaki ProMarker.  The ribbon edges were also colored with a khaki marker.  The trees in the ribbon are shiny metallic gold.  The sentiment was cut with an Avery Elle die and the edges were inked with khaki.  

     Obviously, everything was laid onto a kraft card base.


     Challenges:

     I'm heading back to the kraft room.  It seems to be taking me forever to get things done these days but I keep working on them and eventually they do get done.  :-D  Happy Crafting.  NanaConnie

Tuesday, October 19, 2021

Christmouse Wishes

      Today I'm sharing my DT card for I Love Promarkers, featuring an image from our sponsor, Hetty Clare, which is called "Christmouse Wishes."   Our theme for this challenge is "Dies or Masks" and now I have one more card for the Christmas stash!

     I colored with my ProMarkers and used a QuicKutz die to cut the image.  The red circle behind the image was cut with a die from Dare 2B Artzy.  The image was layered onto a piece of dp from DCWV.  The background is a piece of Graphic 45 dp.  

     I found some lovely satin, snowflake, ribbon and used it for the strip across the card front and for the hand tied bow.  The single sparkly snowflake was cut from glitter paper with a Die-namics die.


My colors came from the CMH Color Dare 
board #465, first column plus gold.

     Challenges:

     It would be great to see you playing along in our challenge.  We do love being inspired by you and your creations.  So grab a die or a mask and make something wonderful to inspire us!  
     
     Happy Crafting.  NanaConnie

Friday, October 15, 2021

Time to Ride the Broom

      This is my second post of the day (scroll down 1 post to see the first) and I've done a DT card for the mid-month reminder post at Your Scrapbook Place.  Our sponsor is Moon Flower and the image I used is called "Gina Little Witch."  

     Colored with ProMarkers and gel pens, then cut with a Spellbinders die.  Both pieces of the sentiment were cut with Avery Elle dies.  I used a short scrap of purple ribbon and added ne of my signature, hand-sewn bows.  Everything was layered onto a simple background made from black and orange CS.


      Challenges:

     If you haven't played in our "Anything Goes"  challenge this month, you still have until the 29th to get something entered.  We love seeing what you've created.  Happy Crafting.  NanaConnie  

Tuesday, October 5, 2021

Magical Halloween

      Our next challenge at Paper Funday starts today and our theme is "Halloween or Use Purple."  I love making Halloween cards and purple is my favorite color so I was in heaven with either option on this theme!  Our fun sponsor is Paper Nest Dolls and they generously provided the team with images to use for our inspiration cards.  I chose to use "Wizard Avery" and used standard Halloween colors of purple, green and black.

     I used my ProMarkers to color the image, then added a bit of glitter to the light of her magic wand (difficult to see but if you enlarge the photo it might show) and Liquid Pearls (gold) to the teeny stars surrounding it.  The image was cut with an Unbranded die, then the sentiment was printed and cut with an Avery Elle die.  I used two different ribbons from my stash, (wide satin and shimmery 1/2") layered one on top of the other.  Everything went onto a black card front which helps the image to pop off the card front.  


     Challenges:

     I certainly hope we're going to see you playing along this month.  For those of you who don't do Halloween cards, just grab your purple markers, pencils, or  paper and ribbon, and show us what you  create.  Happy Crafting.  NanaConnie

Friday, October 1, 2021

Why We Have Friends

      I love the sentiment on this card (QKR, called "Friends") which I paired with this delightful image, also from QKR Stampede, called "Checking Shadows."  The image is colored with my ProMarkers, and cut with a die from Cuts.  The delicate frame was a Sue Wilson die cut.  The sentiment was fussy cut and matted.

     I added satin & sheer, aqua ribbon to the top of the card, and a bow tied using brown lace, folded in half lengthwise before tying.


     Challenges:

     Our challenge at QKR Stampede runs from today through the 14th of October, then a new challenge starts on the 15th and runs through the end of the month.  Our theme is always "Anything Goes" and we love to see you playing along with us.  Won't you please come and play?

     Happy Crafting.  NanaConnie

Monday, September 27, 2021

Newest Reindeer

      This adorable image is the freebie for the Progressive Challenge at LeAnn's World.  It's called "Dillon" and I reversed the image before printing it.  I used my ProMarkers to color the image, then cut both it and the frame with oval dies from QuicKutz.  The sentiment was printed and cut with an Avery Elle die.

     The background dp came from a Graphic 45 stack and it's really old.  I've probably had that in my Christmas stash since 2014!  I added a wrap of satin ribbon plus a hand-sewn, polka dot bow with blingy gemstones.  The bow is made from grosgrain ribbon and gives wonderful texture, both actual and visual.  :-D


     Challenges:
Christmas Crafts ... (reindeer, ribbon)
Clever Dexter (sparkly gems + opt colors)

     Happy Crafting.  NanaConnie

Thursday, September 23, 2021

Snow Globe Mom

      A new challenge starts this morning at Creative Knockouts and we're sponsored by Jan's Digi Stamps.  We have a fun TicTacToe board and I used both the Middle Row and the Right-hand Column.

     I started with the "Snowglobe Family" set from Jan's Digi Stamps.  I merged the Mother Snowman image into the Snow Globe, added the sentiment, and printed the whole thing.  I colored with my ProMarkers and white gel pen, then fussy cut the image.  I mounted the image on dimensional tape before adding it to the background.

     I made the background with a scrap of aqua CS which had been cut with a Memory Box die.  I added a wrap of Really Reasonable Ribbon and found the snowflakes in my Christmas embellishments box.


Inside sentiment, also from the JDS set -

     Challenges:
Christmas Crafts AYR (R for ribbon)

     Hope we're going to see you playing along this week.  Happy Crafting.  NanaConnie

Wednesday, August 18, 2021

A Little (Halloween) Magic

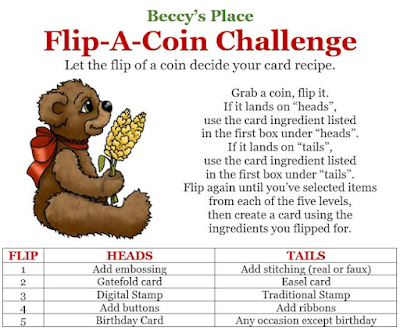
      This is my second card for the August monthly challenge at Beccy's Place, where the theme is always Anything Goes but where there is also an optional theme which you can use if you desire.  This month, Beccy gave us a Coin Flip chart.  For each line across (1 - 5), you flip a coin and then you use the item listed under either Heads or Tails depending on how the coin landed.


I ended up with: Stitching/Gate fold/Digi image/Ribbon/& Other occasion.

     I chose a sentiment and a digital image from two different Beccy's sets.  The cat is "Hemlock" from 'The Witching Hour' and I can't remember the name of the set for the sentiment.  I looked for it and didn't find it but it may have been retired.  
 
     Hemlock's eyes were colored with a ProMarker, and he was cut with a QuicKutz die.  The sentiment was also cut with a QuicKutz die from a different set.  Both were framed with CS cut with dies one size larger.  My stitching is on the ribbon I used and I added a small, fabric pumpkin.  I folded my card into a modified gate fold with overlapping flaps.  


     Challenges:

     Have yourself a wonderful day and Happy Crafting.  NanaConnie