Friday, September 28, 2018

Checking His List

     We all know that Santa checks his Naughty or Nice list at least twice for accuracy, but the truth is he knows if you've been bad or good even without checking.  lol  So, since it's another Friday, and since you've obviously been "good" enough, QKR Stampede is bringing you a new "Anything Goes" challenge.

     I've used a QKR image called "Checking It Twice" and I think it's adorable!


     I colored with water colors and used ProMarkers to add the shading and highlights.  I cut the image with a pinpoint die from Memory Box.  The two matting pieces were cut from red and green CS using a Lawn Fawn, cross stitch, die.  I layered those three pieces together and found a pale green card blank for the base.

     I cut one more piece - the snowflake (Intricutz die) - added glitter to it, and then began laying out all the pieces onto the card front.  I printed and hand cut the sentiment, matting it before adding it to the card.

     The design is pretty CAS but that will make it good for mailing and so many of my family cards go out of state.  It's also a great masculine card for one of the grandkids (or even great grands!)

     Every year, as the holidays get closer and closer, it's always a toss up for me as to whether I love winter and Christmas best or autumn and Thanksgiving.  Both are family times and I love that the cold weather means staying inside in the craft room so thinking about that today, winter wins!  Tomorrow, who knows?  :-D

     Challenges:
Addicted to Stamps
As You Like It
Crafty Hazelnut's 
Creative Fingers
Di's Digi Designs
Hiding in My Craft Room
Lil Patch of Crafty Friends
Outlawz Festive Fri.
Pattie's Creations
Winter Wonderland

     Come play with us, won't you?  It's Anything Goes and you are not required to use a QKR Stampede image.  However, if you do, then your entry goes into a separate draw for QKR only and that really increases your chances of winning!   Happy Crafting.  NanaConnie

Thursday, September 27, 2018

Poinsettia Girl

     Look, after all the Halloween and Thanksgiving cards this month, I've actually done a Christmas card!   That beautiful image is from Lemon Shortbread.


I used the sketch at Try Stamping on Tuesday 
for inspiration, but turned it sideways.


     I colored with ProMarkers, added yellow Nuvo Crystal Drops to the centers of the poinsettias, then used a Memory Box die to cut the image.  The dp is from an old stack by K & Co. found in my stash, and the deep, forest green is CS which I embossed with my "Linen" folder.  The leaves were cut with a Cheery Lynn die and I added glitter to them for some Christmas sparkle.

     The card base is made from kraft CS and, after the papers were added but before the leaves or image, I wrapped sparkly, golden, ribbon around the bottom, then added all the other pieces, including the sentiment.

     Challenges:
Addicted to Stamps
Angie's Digital Stamps
Crafty Sentiments Designs
Digi Choosday
I {heart} ProMarkers
Outlawz Festive Fri.
Scrappy Land
Tuesday Throwdown

     OMGoodness, it's nearly the weekend!  I have lots of crafting planned because the first of the month is almost here and I have DT projects which will be posting that day.

     Happy Crafting, my friends.  NanaConnie

Wednesday, September 26, 2018

Apples and Ants

     Yesterday I promised you a second card inspired by the challenge photo at Catch the Bug and here it is, again using an image from Bugaboo Stamps.


Here's the challenge photo.

     I colored my image with water colors and white gel ink, then cut it with a die from Spellbinders.  I backed that piece with some olive CS and trimmed the edges to size.  That went onto an embossed card front.  I printed and hand cut the sentiment.  I added one of my signature bows, leaving it white this time.  I added a tiny, red button to the center of it and called the card finished.

     Challenges:
Crafty Sentiments Designs
Creative Inspirations
Pammie's Inky Pinkies
Scrappy Land
Stamping Sensations (bug, bow)
That's Crafty
TTCRD
Tuesday Throwdown (red/green)
Words 2 Craft By

     I hope your week is going well and that the crispness of fall has arrived for you.  In my neck of the woods, it looks as though we're going to have to wait at least another week for cooler weather, and even then, that may mean temperatures in the 80s instead of high 90s.  Sigh...  Hey, Mother Nature, if you send fall now I promise not to complain about the weather throughout the entire winter.  :-D  Happy Crafting.  NanaConnie

Tuesday, September 25, 2018

Apple Pie Happy !

     My dad loved apple pie more than any other dessert and it was probably the only way he ever ate apples.  My mom, on the other hand, hated making pie of any sort (cakes, cookies, sweet rolls, even candy was fine but she didn't like making pie crusts) so home-made apple pie in our house was something to celebrate.  As apple harvest season rolled around, the whole family would drive up into the foothill country for a day of picking apples at the orchards and we'd come home with bushel baskets which would be stored in the cellar for as long as they lasted under the onslaught of kids craving fresh fruit long after it had disappeared from the trees.  Usually we picked so many during the harvest that we still had apples well into the winter - certainly through Christmas and the New Year.

     When Mom broke down and made the first apple pie of the season, my dad would declare himself to be "Apple Pie Happy!" and we'd all celebrate and declare it was the best she'd ever made.  :-D

     Here's a salute to my mom and her harvest-season, apple pies. 


Both the memory and this card were inspired by the challenge photo at Catch the Bug
and I used an image from Bugaboo Stamps.


     This card is a combination of old and new things.  The childhood memories made me appreciate and reach for things from my stash which are the old.  The dies I used are my newest ones and the yellow CS is from a package I just purchased.  I was getting low on fall colors in my CS stash so had to purchase replacements. 

     I colored with ProMarkers, then cut the image and the yellow frame with my newest cross-stitch dies from Lawn Fawn.  I found a scrap of forest green CS to use on the card front, then printed, hand cut, and matted the sentiment.

     I had another scrap of that net mesh and I added it to the side of the card, tucking it under one side of the image.  I also found the leaf embellie in my autumn stash and thought it would look good tucked into the mesh.  I added three, tiny, brass, brads to the bottom corner but they're hard to see in the photo.

     Challenges:
Crafter's Cafe
Cutie Pie
Do Al(l) Creatives (Diagonal: top left to bottom right)
Double Trouble
Incy Wincy
Lawn Fawnatics
Pammie's Inky Pinkies

     I'll have another card tomorrow inspired by the same photo from the Catch the Bug challenge but completely different.  The only common thread between the two cards would be the "apple" theme.  Check it out tomorrow to see what I mean.  :-D

     Happy Crafting.  NanaConnie

Monday, September 24, 2018

Thanksgiving Greetings

     A couple of weeks ago, I saw this card on Jane Willis's blog, Onions and Paper, and was so impressed with it that I just had to CASE it!  Thanks for the inspiration, Jane!


I love the simple design, striking background paper,
and wonderful autumn theme.

     Here's how I used that inspiration.


     The sentiment/image is from my growing collection of Victorine Originals stamps.  I actually added the little pumpkins on each side (also Victorine) so the main stamp is the sentiment.

     I used ProMarkers to color, then cut it into the long rectangle.  I inked the edges to make it stand out.  The argyle plaid paper is a digital paper and I really don't remember from what company.  It was a leftover scrap large enough to cover my card front and had gorgeous autumn colors.

    After putting on the sentiment piece, I added glittered ribbon above and below and knew instantly that the card was finished.  

     Challenges:

     Happy Crafting.  NanaConnie

Sunday, September 23, 2018

Teddy's Wagon

     I've been digging through my collection of Di's Digi Designs again and found this image - perfect for a Thanksgiving celebration.


I used a sketch from The Outlawz, turned on its side
and colors (again) from Time Out.


     I colored with ProMarkers, using muted autumn shades.  I trimmed the image to size and layered it onto a scrap piece of digital dp left over from another project.  I cut the orange frame with a Memory Box die and put that on top of the image and dp.

     I found that ribbon in my autumn stash and added the two strips of it, top and bottom.  I printed the sentiment, hand cut it, and inked the edges before adding it.  I did small pearls in each corner, then added the two leaves and the pumpkin on Pop Dots for some dimension and texture.

     I think this will be a perfect Thanksgiving card for one of the boys in my family.  :-D

     Challenges:
Angie's Digital Stamps
Cute N Crafty
Lil Patch of Crafty Friends
Outlawz Twisted Thurs
Pammie's Inky Pinkies
Send a Smile 4 Kids
Stamping Sensations (bear, bounty)

     Enjoy the last part of our weekend and Happy Crafting.  NanaConnie

Saturday, September 22, 2018

Hedgehog Gratitude

     Can hedgehogs be grateful?  Sure, why not?  Give them a few leaves to line their nests before winter hits and their gratitude knows no bounds.  :-D

     I did this sweet card using an image from Lemon Shortbread.


I started with the sketch from Tuesday Morning Sketches
and the autumn colors from Time Out.


     I colored with ProMarkers and water colors, then cut the image with an Unbranded die.  The glittery dots which make up the flourish along the left side and the three on the top right I made by hand punching the dots out of paper which I had glittered and let dry before punching.

     I printed the sentiment, inked the edges and added it above the image.  The bow was hand sewn from sheer ribbon and I put one of the glittered dots on it.

     Challenges:

     That's all I have for today but I'll be back tomorrow with something else for you to see.  Happy Crafting.  NanaConnie 

Thursday, September 20, 2018

A "Git 'er Done" Birthday

     I unexpectedly needed a birthday card and had almost no time to make it so I dipped into my quick and easy ideas, decided on die cuts, and put this together in about 15 minutes.  I'm on my way to deliver it to my neighbor who needs it for a coffee get-together this morning.  :-D


I took my color inspiration from the Color Dare
challenge at Color My Heart.
I'm really trying to support their challenge
and I encourage others to do the same.
You just have to use all and only the 3 designated colors.


     The background circle with the leaves was cut with an Unbranded die and the sentiment came from a Memory Box die.  I cut them from CS I had on hand and put them onto a kraft card base, thereby using all three colors and only those three.

    Challenges:

     Happy Crafting.  NanaConnie

Wednesday, September 19, 2018

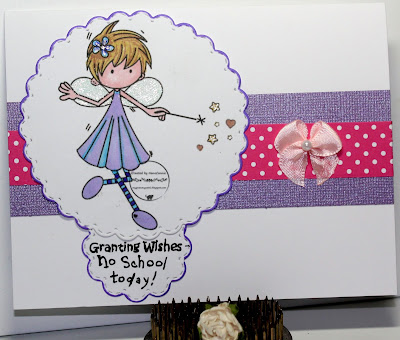
Back to School Fairy (or Not)

     While all the adults I know are thrilled that school is back in session, there are lots of grandkids (some of mine included) who would give anything to have a Magic Fairy who would let them out of school, even for just a day.  That was the inspiration for this card and sentiment.

     The image is the freebie for the Progressive Challenge over at Sasayaki Glitter.


     I colored with ProMarkers, then die cut the image with a stitched, scalloped die from Memory Box.  I printed and cut the sentiment with another die from that same set.  I inked the scalloped edges of both pieces.

     I ran a piece of shiny, lavender CS through my "Linen" folder to add some great texture and wrapped that piece with pink, polka dot, ribbon.  All the layers gave even more texture to the card. 

     For a simple embellishment, I made one of my signature bows with a pearl and added it to the ribbon. 

     Challenges:
Crafty Gals Corner
Creative Moments
Digi Choosday
If You Give A Crafter a Cookie
Outlawz Twisted Thurs.
Passion for ProMarkers
Sasayaki Glitter
Scrappy Land
Tuesday Throwdown

     If I can get back into my craft room today, I may have a post for tomorrow.  I've been "babysitting" these two delightful, 'great-grand' fur babies (my oldest granddaughter's kittens) for a few days and they are very demanding of my time (to say nothing of being too cute to ignore!)  So very little has been done in the way of crafting for the last few days.  Good thing I had things ready to post.  :-D


Ivory and Ebony (perched where they can watch my every move!)

     Happy Crafting.  NanaConnie

Tuesday, September 18, 2018

Lead the Way, Rudolph

     Well, for the last couple of weeks, I've been doing Halloween cards with an occasional Christmas card thrown in and today I have one more Christmas card to share.  This one is definitely made for a child and it features an image from Bugaboo Stamps, a fun little reindeer which I turned into Rudolph (from the Christmas song fame) with his bright, red nose.


I started with the sketch at Stella Says Sketch,
although I let the bobble head be the circle shape.  :-D


     I colored with ProMarkers, pencils, and gel ink.  I used red glitter to his nose and colored the shine of its light onto his face.  The image is cut with a stitched die from Die-namics.  The dark blue dp is from DCWV - "Winter Magic" stack.  I used embossed dp for the white strip at the bottom (and filled in the top corner, also), then added the three snowflakes with sparkly, gem centers for embellishment.

     Challenges:
Cardz TV
Catch the Bug (bottom row)
Color My Heart
 
(Poppy, Pacifica, Nutmeg, Bashful, Crystal Blue, Flaxen, Tangerine)
Crafting with Friends
Crafty Catz
Creative Fingers
Outlawz Festive Friday
Polkadoodles
Take It, Make It

     That's all I have for today but enjoy your week and Happy Crafting.  NanaConnie

Monday, September 17, 2018

Welcome Home

     Neighbors on my street have been traveling the whole summer and got home just in time for the Labor Day holiday so they shuffled the things in their bags and took a weekend at the beach.  lol  I thought if I did a card welcoming them home, maybe they'd stay more than one day.

     My card features this sweet little girl collecting her travel bags and it's from Whoopsi Daisy.


I was inspired by the sketch at The Outlawz.


     I colored with ProMarkers, then cut the image with a stitched, scalloped die from Memory Box.  I cut the mat for the image with a larger die from that same set.  

     The butterfly dp was a large scrap I had in the basket and, with glitter and embossing, I thought it was the perfect way to enhance this card so I cut shapes dictated by the sketch and added them appropriately.  The sentiment was printed and added above the image and my final touch was the sheer bow with a tiny button.

     Challenges:
Butterfly (all 7 elements)

     Have a wonderful week and stop by again tomorrow for the next post.  Happy Crafting.  NanaConnie

Sunday, September 16, 2018

"Impossible" Fold for a Witch's Stew

     Beccy, from Beccy's Place, has done a couple of fancy fold tutorials this month and I'd never made either kind of card before so I tried them.  The Dutch Door fold I posted a week or so ago and now this one, an "Impossible Card," for today.  I followed her Tutorial exactly and discovered that despite the "Impossible" name, it's really quite simple to make. 

     The image is - make that WAS available as a digi through Sparkle n Sprinkle, and may still be available as a rubber stamp but I haven't checked that.  In any case, I'm using it for their challenge.


     I colored with ProMarkers and cut the image piece with a square die from Spellbinders.  I inked the edges and mounted it onto the middle flap.  The sentiment is part of the image set and I printed, cut, inked, and mounted it onto a scrap piece of embossed, beige CS.

     That beige piece (and the one like it at the back of the card) was layered onto a scrap of the main dp, then onto black CS, and each of those was cut to size for the card.  That checkered dp is digital paper from Doodle Pantry (now closed. :-(  )   I love that paper because it has my favorite fall color combo and works with most fall/autumn projects.

     I used a die from Impression Obsession to cut the bats from scraps of black CS and added them last.  The stand-up flap folds down for mailing.

     Challenges:
Brown Sugar
Crafter's Castle
Crafty Calendar
Crafty Sentiments Designs
Creates and Makes
Cutie Pie
Die Cuttin' Divas
Passion for ProMarkers
Pixie's Snippets

     I hope you are enjoying your weekend and getting a bit of relaxation/"me" time and not spending it all doing household chores.  :-D  Happy Crafting.  NanaConnie

Saturday, September 15, 2018

Walking the Cat

     This card, which I've done as my DT inspiration for the latest Creations in Pink challenge, is going to my #1 granddaughter.  I'm 'babysitting' her two feline fur babies for a few days while she's out of town.  When she brought them over, we had a conversation in which she shared that she takes her 5- month-old babies out for walks on a leash.  They have harness collars which makes it easier but she says her neighbors think she's crazy.  Still, the babies seem to like it.

     Our sponsor is Ppinky Dolls and they have some of the most precious images!   My collection of  Ppinky Dolls is growing.  Every time I visit the shop, one or two of them sneak into my cart and come home with me.  :-D  This one is called "Jerry."


     I colored her with my polychromos pencils and ProMarkers, then cut the image by hand.  I mounted her, popped up with foam tape, onto an embossed die cut (Spellbinders) which had been left over from another project.  I had some glittery, embossed paper on the craft desk and I cut it into flag shapes and also die cut one tiny circle (Sizzix.)  I added those to the right hand side of the image, then tied a tiny, pink bow which I put in the middle of the circle piece.  I added one tiny gem to the bow.  Finally, I printed and hand cut the sentiment, matting it with a scrap of deep pink CS before adding it below the image.

     Challenges:

     I hope you'll came and play in our second challenge at Creations in Pink.  It's an "Anything Goes" theme but you do have to use lots of pink on your project.  Happy Crafting.  NanaConnie

Friday, September 14, 2018

Venitian Masquerade

     We've just started the latest monthly challenge at World Wide Open Design Team Challenge and we have our usual theme of "Anything Goes."  The winners from the last challenge have been chosen and you can find them on the World Wide blog.

     We are sponsored by Julia Spiri.  You can find her FB page here.

     I used a beautiful image from the Venice Collection, Mask.  Julia's designs seem to draw the purples and turquoises out of me but since that's my favorite color combo ever, I don't mind.  :-D


     Once again, I colored with my ProMarkers and used a white gel pen for the highlights.   Both the image and the scalloped piece behind it were cut with dies from Sizzix.  However, the dp (from the Juniper Berry stack by DCWV) was just a scrap I saved from the trash bin so it's not a complete circle.

     The other two papers are from Graphic 45 and I put them onto the card front, wrapped the 2 layers of different ribbons (Really Reasonable Ribbon) around, added one of my signature, hand-sewn bows, and then layered on the two die cut pieces.

     Finally, I printed and hand cut the sentiment, inked the edge, and added it.  Not overblown with embellishments but not exactly CAS, either.  :-D

     Challenges:
As You Like It (Girly - because I have so many guys in my family that I end up doing masculine cards much more often and it's fun to do feminine creations instead.)
Cardz TV
Crafty Creations
Crafty Gals Corner
Creative Inspirations
Creative Moments
Outlawz Twisted Thurs.
Penny's Paper-Crafty
Scrappy Land
Word Art Weds.

     That's it for today but since I gave you a twofer, I think that's enough.  If not, check back tomorrow to see what's new.  :-D  Happy Crafting.  NanaConnie

A Frankenstein Pumpkin

     Yes, it's time for the latest challenge over at QKR Stampede where our theme is alway 'Anything Goes.'   I'm still on my Halloween kick.  I first saw "Frankenstein Pumpkin" a few years back when I first joined the QKR DT and loved him at first sight!  I can't believe it's taken me this long to color him and put him on a card.  :-D


     I colored him with ProMarkers, then fussy cut the image and inked the edges.  I found a yellow card blank and added the glittered ribbon, then layered on the image piece.  I printed the sentiment, hand cut it, matted it with some lavender CS, and added it to the top corner.

     The witch's hat is a die cut (Cheery Lynn) and I tied the little black bow using my bow maker.  Very CAS and it will mail easily.

     Challenges:
Crafting from the Heart
Cute N Crafty
Cutie Pie
Digi Choosday
Dragonfly Dreams
Everybody Art  (middle column)
I {heart} ProMarkers
Lil Patch of Crafty Friends
Pammie's Inky Pinkies
TTCRD

     Have yourself a wonderful day and remember that the weekend is only hours away!  Happy Crafting.  NanaConnie

Thursday, September 13, 2018

Bicycle Birthday

     Another birthday card for my stash, this one using a cute image from All Dressed Up.


I started with the sketch I found at Carlin's Card Paradise.


     I used ProMarkers to color the image, then die cut it with a die from Spellbinders.  I framed it with another die cut, also Spellbinders.  The dp came from the scrap basket and I layered everything onto a kraft card base.

     I printed, hand cut, and inked the sentiment.  The lace butterfly seemed perfect for this sweet card.  Because I am always interested in 'using up' instead of 'tossing out' things from my craft table, I took two of the tiny strips which dropped out of the frame and added them to opposite, diagonal, corners, then added three tiny pearls beside each of those strips.

     Challenges:
All Dressed Up FB
Butterfly (Apricot/Amethyst/Add Layers + Lace butterfly)
Crafty Creations
Crafty Sentiments
Creative Inspirations
Cute Card Thurs.
Penny's Paper Crafty
Scrapy Land
Word Art Weds.
Work It Weds.

     See you again tomorrow with a new DT card for QKR Stampede.  Be sure to visit.  Happy Stamping.  NanaConnie

Wednesday, September 12, 2018

Dust Off the Spells, You Wizards and Witches

     I've been working on Halloween cards and have almost enough to send out to all the kids, grandkids, and great grands.  However, this particular card is for a friend who celebrates her birthday on Halloween and I try to do a Halloween themed, birthday card for her each year.  I've always teased her that she must have magic spells to keep her age from showing.  :-D

     I also did this one for the challenge at Catch the Bug (Bugaboo Stamps image) and it should bring a smile.


     Believe it or not, this is a single layer card.  I started with placement of the black and white. outline image (plus the sentiment), then I scanned some saved packaging from a stamp set I bought a couple of years ago, and used my Word software to make strips of it at the top and bottom of what became the card front.

     I colored with ProMarkers, added the bow, and it was done!   Fun card but not all that fast.  Scanning and playing with the Word program took nearly an hour before I ever got to start coloring.  :-D

     Challenges:
Cardz TV
Crafter's Castle
Ellibelle's Crafty Weds.
...Give a Crafter a Cookie
Jo's Scrap Shack
Outlawz Festive Friday
So Suzy/Crackerbox
That's Crafty
Tuesday Throwdown

     I'll be back tomorrow with yet another Halloween card.  Happy Crafting.  NanaConnie

Tuesday, September 11, 2018

Treats, Not Tricks

     I admit it - I've fallen in love with Conie Fong stamps.  I'd probably do a project every day with one of her images if I didn't have other commitments (and if my monthly crafting budget would allow me to buy that many new images.)  lol

     In any case, this is my second project this month using one of those images and we're not even half way through the month.  But, in my defense, I'm trying to use Autumn and Halloween images in my collection which I've not used before or at least didn't use last year.


     I used ProMarkers to color her and fussy cut the image.  I matted the image with black and fussy cut it again.  The inlaid background framing was cut from shiny, lavender, CS using 3 dies from a set by Spellbinders.

    I printed the sentiment, hand cut it and added it below the image.  All of that was mounted onto a black card base.  The framing was so intricate that I decided no other embellishment was needed.

     Challenges:
A Bit More Time to Craft
Crafting from the Heart
Crafts Galore Encore
Let's Craft and Create
Outlawz Twisted Thurs.
Pammie's Inky Pinkies
Paper Nest Dolls
Scrap from Your Heart
Send a Smile 4 Kids

     Happy Crafting.  NanaConnie

Sunday, September 9, 2018

Envelope Card Tutorial

     A few weeks back, I made an Envelope Card and posted it to my blog.  I had several inquires about how it was made, including one from The Outlawz Monday Greetings Challenge.  They wanted to know if I could do a tutorial of it and I agreed.  Because I had no photos of the process for the first one I did, I made another one and photographed it as I went along.

     So, today I'm a Guest Designer for the Greetings challenge where "Christmas" is our theme and  "Fred, She Said" is our sponsor.  They generously supplied the "Nuthatch" image for me to use.   I'm showing the step by step process here on my blog.  I tried to keep it as short as possible but if I ended up not being clear about something, please leave me a comment and I'll do my best to clarify it.


    Starting at Step 1:  I printed and colored the image with ProMarkers, then cut it to a 4 inch square.

     Step 2:  I used scissors to distress the edges of the image.
     Step 3:  Cut the envelope paper into a square measuring 6 7/8 inches, (I used solid teal green instead of patterned but either will work as long as the back side is plain) then cut a notch at the mid-point on each side.  Don't worry that the notch is a perfect right angle cut.  That will be done later.  
     Step 4:  Measure 2 1/2 inches in from the point (or whatever distance you need to match the notches), draw a light pencil line between two notches, then score and fold along that line.  Do this between each notch to make a square.
     Step 5:  Make the notches exact right angle cuts by trimming with scissors straight with the scored lines.  It's easier to do this now than to try to make it a perfect right angle when you first make the notches.  Trust me on this one!  :-D
     Step 6:  Cut a CS square, just slightly smaller than the inside square of your envelope.  Mine is 4 1/4 inches square.  If you are using paper with a printed design for the envelope, make sure you adhere the smaller square to the side with the print.  You'll need the plain, white side for your address if you are mailing the finished card.
     Step 7:  Adhere the image to the inside square.  I also added my sentiment at this point.
     Step 8:  Fold the points along the score lines to close the envelope.  DO NOT glue or tape them closed.  Instead, make a sleeve by cutting a strip of paper or CS 10 1/2 inches long and about an inch wide.  
Wrap it around the folded envelope, overlap it and adhere the overlap to hold it.  That sleeve will slip off to allow for opening the card.
     
     Challenges:

     Remember, if I've been unclear on any of the steps, leave me a comment and I'll try to fix that.  :-D  Happy Crafting.  NanaConnie

Gratitude

     For today's card, I've used "Earth Fairy" from Fabrika Fantasy.  She colored up so beautifully!


     I colored with ProMarkers, cut the image with a die from Spellbinders, and backed it with orange CS.  I printed the sentiment, matted it with a scrap of that same CS, and added it to the top of the image piece.

     I made a card base from kraft CS and added a scrap of dp which had been lying on my desk.  I wrapped the card front with some sparkly brown ribbon, then layered on the image.  I cut tiny pumpkins with an Impression Obsession die and added them to the bottom of the image.

     The double layer butterfly was cut with a die from Cottage Cuts and I added pearls to make the body.

     Challenges:
Angie's Digital Stamps
Cards in Envy
Crafter's Castle
Crafty Catz
Jo's Scrap Shack
Lil Patch of Crafty Friends
Pammie's Inky Pinkies
Stamping Sensations (Bounty, Butterfly, Brown ribbon)
TTCRD

    I'll have another post tonight, around 6:00 p.m Pacific time.  I don't normally pre-schedule my posts for that hour but in this case, I'm guest designing and that's when the Outlawz Monday challenge goes live.  So think of it as being my post for Monday and check back when you have time.  :-D

     Happy Crafting.  NanaConnie

Saturday, September 8, 2018

The Perfect Pumpkin

     When was the last time you wandered through a pumpkin patch (with or without kids/grandkids) searching for that one perfect pumpkin?  I remember the days when we actually went out to the farmer's field and found pumpkins for Halloween and Thanksgiving.  Now, they come to us by way of our super markets and a good number of grandkids don't even know that pumpkins grow on vines which are found trailing across acres and acres of ground.  Sigh...

     I absolutely love this darling image from Ching-Chou Kuik and I know that she didn't find her perfect pumpkin in a grocery store.  Nope, she and her kitten found that one in the field and picked it straight off the vine.  :-D


     I colored the image with my ProMarkers, then use dies from Sizzix to cut it and the frame piece.  I had already decided on a CAS design so I grabbed a scrap of kraft CS which was not large enough to made a standard A2 size card.  I left the back side as a 4.25" x 5.5" rectangle but the front flap was only 3" wide.

     I used my Scor-Pal to make the score lines vertically on that front flap, then added the scalloped circle image.  Although it's not really clear in the photograph, it gives a very interesting shape to the card.  I printed and hand cut the sentiment, adding it below the image.  There are no additional embellishments, only the score lines.

     Challenges:
Aloha Friday
Cardz TV
Ching-chou Kuik FB
Creative Fingers
Fussy and Fancy
Outlawz Festive Friday
Pattie's Creations
Scor-Pal
Take It, Make It

     It's the start of the weekend and we still have another few sweltering days before cooler air moves in from the Canadian north.  Weatherman is saying we'll be down in the 80s before the end of next week and I can hardly wait!  Happy Crafting.  NanaConnie
Friday, September 7, 2018

Jumping in Leaves

     Nothing is more fun in the fall than jumping in leaves!  Kids love doing it and grown ups love remembering when their bodies were young enough to do it.  Well, at least I do.  :-D

     Another Friday and another "Anything Goes" challenge from QKR Stampede.  I'm sticking with doing autumn cards in hopes that the fall weather will finally arrive and today's card is no exception.  I've used an image and a sentiment from QKR's sister company, Eureka Stamps.  The image is called "Lady Throwing Leaves" and the sentiment is "Jump into Pile of Leaves."


I was inspired by the sketch at AAA Cards
turned sideways.


     I chose the scrap of paper before I started coloring with ProMarkers and pulled colors from it.  I cut the image and the brown frame with Sizzix dies.  I printed the sentiment, hand cut it and inked the edges with a ProMarker. 

     I took the scrap of paper and tore the edges all the way around for a distressed look.  I layered everything onto a kraft card base.  I dub out black and gold jute cord and wrapped the card front with them, tying a knot.  I also tied a small, black, polka dot, bowtie bow and added it.  I really liked the CAS look of the design so I left it as it was.

     Challenges:
Crafty Gals Corner
Crafty Sentiments
Digi Choosday
Dragonfly Dreams
Lil Patch of Crafty Friends
Penny's Paper-Crafty
Scrappy Land
Time Out
Word Art Weds

     OK, now it's all up to you.  Come enter our challenge this week and you might win some fabulous QKR Stampede images!  See you there.  NanaConnie