Wednesday, October 31, 2018

Gratitude in All Forms

      This is the first of four, first-of-the-month, DT posts I have and I'm sharing my DT card for the new challenge at Simply Magnolia.  This month our theme is everyone's favorite, "Anything Goes."

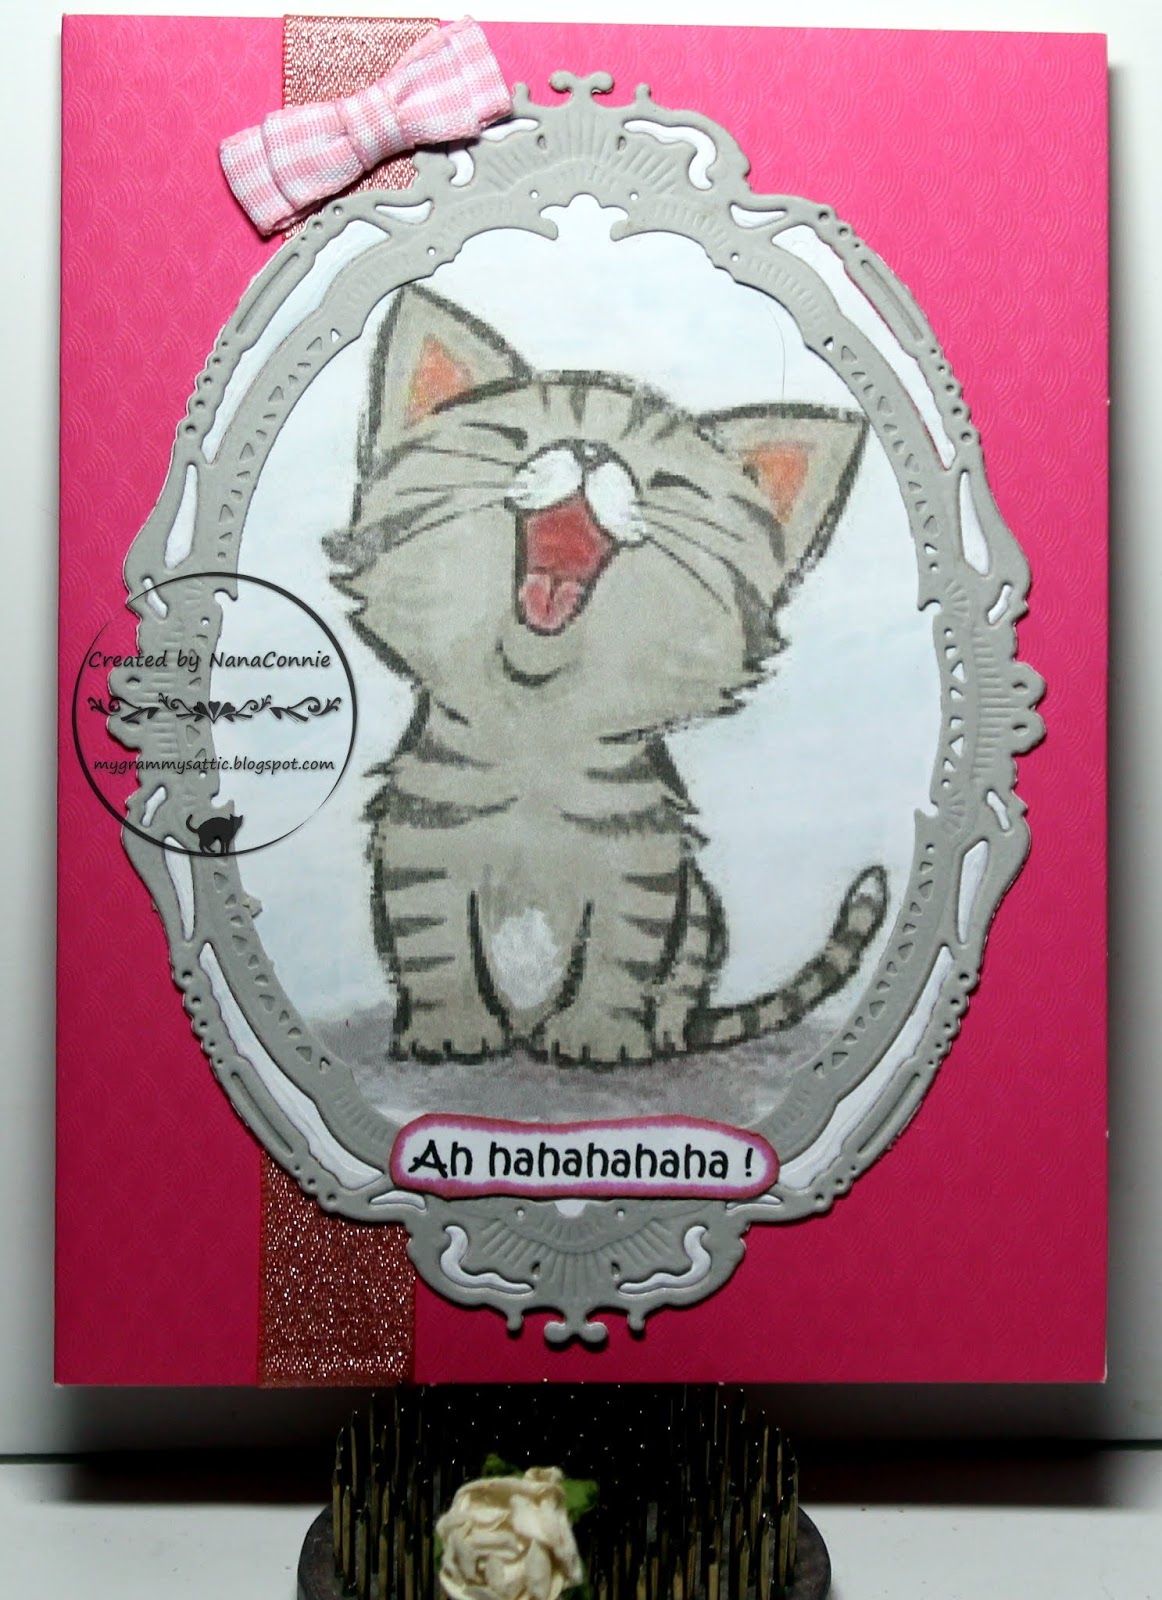
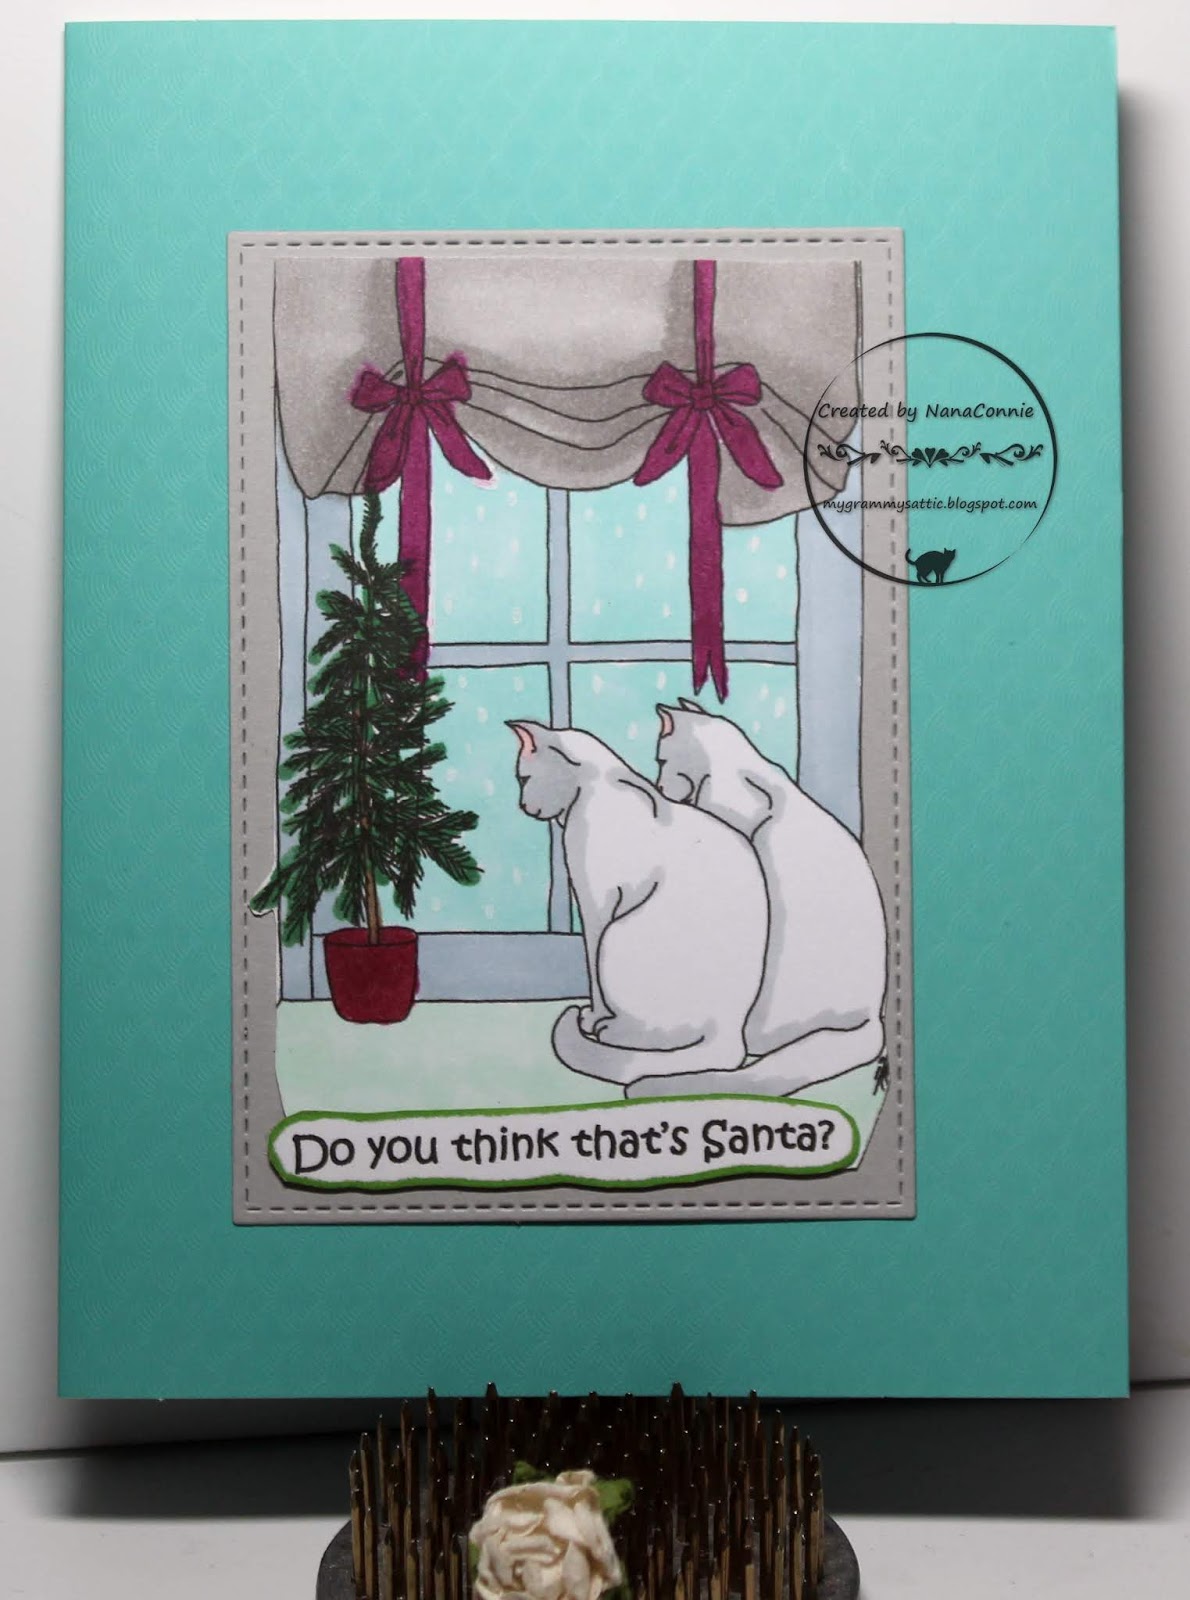
      We all share moments of gratitude and this sweet little Tilda by Magnolia Stamps is showing her gratitude for all things, even turnips and parsnips.  :-D  I know this looks like an A2 card but it's actually only 2 x 4.5 inches.  I did it that small to give the illusion of the stamp being larger.


I started with the colors at My Favorite Things.

     I colored with ProMarkers, then cut the image with a die from Spellbinders.  I inked the edges of it so that it would stand out from the background.  I used another Spellbinders die to cut a left over scrap of fall dp, inked the edges of it, and put it behind the image piece.  Everything is layered onto an embossed card front.

     As embellishment, I added three of my signature-style, hand-sewn bows, leaving them white this time instead of dying them.  I printed the sentiment onto a scrap of white CS, hand cut it, and matted it with a scrap piece of beige CS.

     Challenges:
A Gem of a Challenge
Aloha Friday
Aud Sentiments
Cardz TV
Cute Card Thurs.
Time Out

     I love fall - it's my favorite season.  The oppressive heat of summer has finally gone and the evenings are crisp and cool.  It's fun to dig out the sweaters and heavy socks, and my cats come to cuddle me in the night, seeking that body warmth they know is curled up under the covers.  It's a great time to hide in the craft room and be creative.  Happy Crafting.  NanaConnie

Fancy Sunbonnet's Thanksgiving

     One more quick post for you today because the rest of the week I have a ton of posts lined up, including 4 tomorrow for the first of the month! 

     For this one, I used a cute image from Bugaboo Stamps; one of their sweet Fancy Sunbonnet images, and this one is perfect for Thanksgiving.


I started with the sketch from the Outlawz
and color inspiration from Catch the Bug.


     I  love using autumn colors because they reflect my favorite season, mirroring the leaves drifting off the trees and the clear skies of a crisp fall day.

     I used ProMarkers to color the image and a die from QuicKutz to cut it.  The sentiment was also cut with an oval die from QuicKutz.  I embossed the golden CS with my Linen folder.  The bits of dp above and below the sentiment were scraps left on my table from some other project.

     The ribbon is from Crafty Ribbons and the bow is one of my hand-sewn bows, made by the dozens and put into my stash for future use.  I added the pearl when I was making the bow.

      Challenges:
Art Impressions
As You Like It
Crafting from the Heart
Crafty Friends
Cutie Pie
Hiding in My Craft Room
Time Out

     That's it for today and I hope you'll visit all my posts tomorrow.  Feel free to take your time.  No need to rush though all of them in the morning.  :-D  Happy Crafting.  NanaConnie

Joyeux Noel - all from scraps!

     I was working ahead on a card for one of my DT commitments and had some scraps on my crafting desk afterward.  I almost tossed them and then decided to see what I might be able to create in the way of another Christmas card for my stash.  This was the lovely but simple result.


     The burgundy square with the cut corners is the center negative of the frame I used on my DT project (Spellbinders die.)   I had used another Spellbinders die to cut out the snowflake and a Die-Versions die for the "Joyeux Noel" sentiment, both of which were used on the DT project.  I found a square of glittery, embossed, white CS, which I trimmed and used as a backing for the burgundy piece. 

     The decorative corner came from another Spellbinders die in the same set as the frame/center piece and I thought it made a great decorative corner for this simple card.  The ribbon was a scrap of  2 inch wide, wired ribbon which I had used to tie a large bow for a tree decoration.  Actually, I made two dozen of those as Christmas tree decorations and that's what was left over.  I folded it along the length and curled the two points up, then ran it diagonally across the card front, layering the other pieces on top.

     It took more time to write up the explanation of what I did than it did to actually make the card.  :-D

     Challenges:
A Gem of a Challenge
Crafty Hazelnut's
Cute N Crafty
Jo's Scrap Shack
Kreativinkauf
Outlawz Greetings
Scribbles Designs
TTCRD

     Happy Crafting.  NanaConnie

Tuesday, October 30, 2018

Halloween Sewing

     Gosh, I got so busy yesterday that I never got a post written!  Sorry, but today's post should make up for it. 

     Most of us who love Halloween (and who are crafters) get into making cards with witches or ghosts, or goblins, or Frankenstein, or other creepy things that go bump in the night, to send to friends and loved ones.  But I remember the days when my kids (and then the grandkids) were wanting Halloween costumes.  I loved making them and I've probably sewn 2 dozen or more over the years, and that doesn't count the home-made-but-not-sewn costumes. 

     I decided to do a card which celebrates that kind of creativity and salutes all those moms and grandmoms who slave away at the sewing machine making all those good things the kids love to wear.  :-D


     The Penny Black image is colored with ProMarkers, cut, and then framed with a decorative cut from a Spellbinders die.  I grabbed a scrap piece of orange CS to make that frame.  I layered those together and matted them with an embossed and glittery scrap of CS. 

     I was trying to stick with Halloween colors and use up some of the scraps still on my crafting table from all the Halloween cards I did this year.  The orange ribbon with the stars was a scrap left in my ribbon basket and it seemed a good place to use it.  I added one of my signature bows, 'dyed' lavender with a ProMarker.

     I printed the sentiment, hand cut it, and added it to the bottom of the black card front.

     Challenges:
Crafting from the Heart
Di's Digi Designs
Hiding in My Craft Room
Lil Patch of Crafty Friends
Outlawz SAR
Paper Girls
Penny Black and More
Penny Black Saturday
Pile It On
Pixie's Snippets

     Have a great day and Happy Crafting.  NanaConnie

Sunday, October 28, 2018

Stencil Christmas Tree

     Last year, when the Linda Simpson Designs blog was still holding challenges and I was part of the DT, I got this wonderful Christmas Tree stencil.  Unfortunately, it arrived in my mailbox when I was off on my holiday travels so I never did get to use it.  But this year, I dug it out and this is my first (but definitely not last) card using it. 


     I used removable tape to put the stencil down on white CS and just colored the tree instead of using it for dimensional pastes.  I started coloring with ProMarkers, then added white gel pen for the 'snow.'  The star and tree trunk are also done with ProMarkers.  I cut the corners with two different Fiskars punches, then matted the image with a scrap piece of red CS.

     The dp came from my Christmas stash of papers and I think it's from Doodlebug.  The burgundy ribbon is also a scrap.  I tied a double loop, double layer, bow using my bow maker.  After looking at the photo, I think I may add a die cut "Merry Christmas" sentiment to the top.

     Challenges:
12 Months of Christmas
Country View Crafts
Craft-Dee BowZ
Crafts Galore Encore
Crafty Hazelnut's
Crafty Hazelnut's DP
Hiding in My Craft Room
Jo's Scrap Shack
Scribbles Designs
So Suzy/Crackerbox

     OK, I finally got a post up for today.  I was beginning to think everything would have to wait until tomorrow.  It seems that every project I started got interrupted with something else which had to be done right then, and that led to another something which required immediate attention.  Ever have one of those days?  Yeah, me, too - too often!  Happy Crafting.  NanaConnie

Saturday, October 27, 2018

Helpful Kitties

     This is my last project for the Cat Lovers Hop and I'm going to miss it.  Hopefully, it will be back again next October and maybe you can come play if you didn't get in this year.

     Those of you who have had kittens at or near the holiday season, or even some of our fully grown cats, will be familiar with how "helpful" those little fluff balls can be, especially when it comes to wrapping packages and tying (untying?) the ribbons.

     These little sweethearts (found in a clip art file I downloaded a few years back) decided to  decorate the front of a Christmas card.


I knew I wanted to play in the Color Dare challenge
and was delighted to find it was a monochromatic challenge.

     Once I saw that Color Dare inspiration, I knew I could use my MS Word software to get the monochromatic green image.  When I had that part done, I printed it, added some highlights with ProMarkers and white gel pen, then cut the image and the green CS mat with dies from Spellbinders.  Those went onto a green card base and I added the 2 jute cord strings, tied into a square knot.

     I found some old Christmas embellishments from K & Co., and added the holly leaves plus one tiny pine cone right next to the jute cord knot.  There are tiny red gems for the berries on the holly leaves.

     Challenges:
Allsorts
Crafty Friends
Crafty Hazelnut's
Crafty Sentiments
Cute N Crafty
Outlawz Festive Fri.
SUYP Cats
Tuesday Throwdown

     That's it for today.  Happy Crafting.  NanaConnie

Flying In

     Today is another double post day and all because of the Cat Lovers Hop.  It's the last day and I've had so much fun visiting all the other folks who've been doing feline related projects.  Lots of wonderful inspiration!

     I've tried to do cards for varied occasions and this one is for a birthday, though I think it could pass for Halloween as well with a different sentiment.  I used to have a friend in Arizona whose birthday was on Halloween, and I loved making cards for her each year.


 I started with the sketch from Sketch Saturday
reversed with sentiment on top.
My colors came from the 3rd column of the tic tac toe
along with Mink and a neutral, beige.
 

     I used ProMarkers and gel pens to do the coloring, then cut the image piece and wrapped it with lemon yellow ribbon.  I used one of my lace bow tie bows to set off the ribbon.

     After I had those steps complete, I added the layer of mulberry paper.  The card front itself sparkles with glitter and embossing, but it's a bit difficult to see in the photo.

     Challenges:
Aloha Friday
Cardz TV
Cute Card Thurs
If You Give a Crafter...
Jo's Scrap Shack
Outlawz Festive Fri
Outlawz PAM

     Stop back later for my second post of the day.  Happy Crafting.  NanaConnie

Friday, October 26, 2018

When Cuddling is Needed

     Day 5 of the Cat Lovers hop and I have to share with you what happens when one of the fur-babies needs a cuddle and I'm busy doing something.  I get this kind of stare - usually from the desk or craft table closest to where I am.


     If I don't respond within an appropriate amount of time (their calculation as to how much time, not mine) I get a paw on my shoulder or arm.  If that doesn't get the desired response from me, then they move closer and I get cat whiskers on my cheek and breathing in my ear, accompanied by a few judiciously rendered yowls of disapproval at being ignored!

     I colored with pencils and ProMarkers, then cut the image with plain, square die from Spellbinders.  Both the green paper and the black CS were scraps from my stash and I mounted everything onto a kraft card base.  I added one strand of green jute cord and called it finished.  I really wanted that cat stare to be the focus of the card.

     Challenges:
Ike's World
LeAnn's World 101
Lemon Shortbread
Outlawz Twisted Thurs.
Pammie's Inky Pinkies
Penny's Paper Crafty
Scrappy Land
SUYP Cats

     That's the last for today but I may have a double post again tomorrow.  It will depend on what I get done this afternoon.  I've had one ready for a few days now that will get posted and we'll have to wait to see if the other one also is ready.  Until then, Happy Crafting.  NanaConnie

Warming Up

     New "Anything Goes" challenge starts today over at QKR Stampede and I'm sharing my DT inspiration for it. 

     When the snow is flying and you're stuck outside, it's tempting to build a fire and stand close to it.  Sometimes, that might have unexpected consequences - especially if you're a snowman!  QKR image:  "Warming Up."


I used colors from the middle column of the tic tac toe 

     I colored the image with ProMarkers and chalks, then cut it with a die from Gina Marie.  The plaid paper came from my Christmas stash and who knows how long I've had it.  It was a scrap, just big enough for the card front.

     I also added a strip of ribbon and a red bow with a pearl. 

     Challenges:
Art Impressions
Christmas with the Cuties
Crafter's Castle
Cute N Crafty
Hiding in My Craft Room
Lil Patch of Crafty Friends
Outlawz Festive Fri.
Pammie's Inky Pinkies
TTCRD

     I'll have a second post today - for the Cat Lovers hop - so stop by again later.  In the meantime, Happy Crafting.  NanaConnie

Thursday, October 25, 2018

Laughing Kitty - Cat Lovers Day 4

     Day 4 of the Cat Lovers Hop and today's kitty is so tickled to be part of it, he has an irrepressible laugh going on!  If you can resist this face, check your pulse - you may need to call the undertaker.  :-D


     ProMarkers, Spellbinders dies, ribbon from Really Reasonable Ribbon, and a double bow tie bow.  All of those put onto a card front for a CAS design that looks much fancier than it it.  It took less than half an hour to put together.

     Challenges:
Cardz TV
C.R.A.F.T.
Crafter's Castle
Crafty Creations
House that Stamps Built
Polkadoodles
Outlawz Twisted Thurs.
Scrappy Land
Word Art Weds.

     Short, sweet, awesomely cute, and all I have for today.   Happy Crafting.  NanaConnie

Wednesday, October 24, 2018

Santa's Cats

     At first glance, you might think these cats are waiting for Santa to come down the chimney but they are actually Santa's cats and they worry about him when he's gone on his Christmas Eve travels. They always wait anxiously, watching from the upstairs window for him to return.  Of course, this year they seem to have to contend with a snowstorm!

     This is my second post today and also my third card for the Cat Lovers Hop.  This precious image is from Ike's Art. 


     Colored with ProMarkers and gel pens, then cut with a stitched die from Die-namics.  Sentiment printed and added to the bottom of the image.  Everything mounted onto an embossed card front.  Left CAS to showcase the image and for ease of mailing.

     Challenges:
Crafty Sentiments
Digi Choosday
Lemon Shortbread
Let's Craft and Create
Scribbles Designs
Sunny Day Crafting
SUYP Cats
TTCRD
Try Stampin' on Tues

     Check in tomorrow for another feline fantasy.  Happy Crafting.  NanaConnie

Cat Lovers Hop - Day 2

    This is my first of 2 posts today since I'm trying to get caught up on on the Cat Lovers Hop so that I can enter each day between now and Friday.  I did one yesterday for Day 1 but Wednesday is actually Day 3 so this one is for Tuesday.


I was inspired by the sketch from Sketch Saturday.
I turned it a quarter turn to better fit my image.

    It's a really quick post with only the most basic information:  Framing dies from Tonic Studios and CUTplorations.  Butterfly die cuts are out of a large circle die from Spellbinders - the 'negative' bits, if you will, and I added metal brads for the bodies.  (I save, and then use, everything!)  The mouse at the bottom was cut with a Cottage Cutz die.

     Challenges:
Cardz TV
Creative Inspirations
Di's Digi Designs
DL.ART
Outlawz Twisted Thurs
Scrappy Land
Southern Girls
Take It, Make It

     That's it for now.  Check back in a few hours for the next post in the Cat Lovers series.  Happy Crafting.  NanaConnie

Tuesday, October 23, 2018

Sandy Claws

     Today couldn't have jelled any better.  I needed a cat card for the Cat Lovers Hop which started yesterday and I wanted to share this adorable cat image from Whimsy Stamps!  Isn't that the best form of  "2 Birds with 1 Stone?"

     My oldest granddaughter is in college and has her own home (with roommates), and has adopted her first felines.  When she has to be out of town, I get to fur-babysit her two felines (brothers, now aged 5 months) and I love it.  Here's a photo of them which I took last month when they were here with me for a week and which I used to make a card for my granddaughter.


     But my card today (which will be her Christmas card) looks like this.


     I colored with ProMarkers and fussy cut the image with scissors.  I used a Sue Wilson die to cut red CS twice and white CS once.  I layered those die cuts onto the front of a confetti CS base.  I added the image on top of those die cuts and printed the sentiment.  Once printed, I cut it by hand and added it below the image.

     For embellishment (kept to a minimum), I sewed one of my signature bows and added a sparkly, red sequin.  The entire card took me less than 20 minutes to put together, including the die cuts, so a very quick card.

     Challenges:
ABC Christmas
Ike's Art
Lemon Shortbread
Outlawz Festive Fridays
Scrappy Land
Southern Girls
SUYP Cats
TTCRD

     I'll see you tomorrow with another Fabulous Feline for the Cat Lovers Hop.  I'll probably have one each day the rest of this week.  I may even have 2 posts on Friday!  Happy Crafting.  NanaConnie

Monday, October 22, 2018

Bounty for Body and Soul

     This lovely image is from Digistamps4Joy and it's a freebie for their challenge for the next week or so.  I thought it made a perfect autumn bounty card so I pulled together a bunch of scraps bits and pieces which were on my craft desk and this is the result.


I was influenced by the colors in the middle column (willow, gold, apple) of the TicTacToe Color Dare challenge at Color My Heart and I also used lemon and nectarine from the board plus the neutrals black, white, and brown.
     I colored with ProMarkers, then cut the image with an Unbranded oval die.  I had a scrap of dp left which had been cut with a stitched die from Memory Box.  I tucked it behind the image.  The gold ribbon scrap with the checkerboard pattern (Really Reasonable Ribbon) was just long enough to wrap around the card front and then I began putting on the other layers.  The sentiment was printed and cut with the smallest die from the Unbranded die set.

     My final embellishment was to tie a triple loop bow using my bow maker and I added it on top of the other RRR ribbon.

     Challenges:
Cardz TV
Catch the Bug (bottom row)
Crafty Calendar
Creative Fingers
Lil Patch of Crafty Friends
Outlawz Festive Fri
Outlawz SAR
Pattie's Creations

     Happy Crafting.  NanaConnie

Sunday, October 21, 2018

New Car for Christmas

     This cute image is from the progressive challenge at Cute as a Button and it reminds me of what became a long running, family joke at the holidays.  One Christmas, when we asked my dad what he wanted for Christmas, he replied, "Well, maybe Santa will bring me a new car."  Now, even as kids we knew that Santa didn't bring presents to adults but on Christmas morning, when we all opened our packages, there under the tree was a small box for my dad and in it was a toy car!   Since nobody claimed to be the giver, we could only assume that Santa had indeed brought my dad a car.

      Over the next 7 or 8 years, each year there was a package for my dad and each contained some kind of car - a toy, a kit to put together, a framed photo of that year's new car(s), etc.   One year there was even a Chevy dealer's calendar with a different car on each month.  lol  Everyone in the family loved the joke and nobody ever admitted they were the one to keep the joke going.

     So, here's a salute to you, Dad, and here's your Christmas car for this year.  If he was still with us, I know he'd love it!


     I colored with ProMarkers, added Glossy Accents to the car and sparkle gel ink to the part that would screw into the light socket, and then cut the image with a stitched die from Lawn Fawn.  All the smaller squares are also cut with Lawn Fawn dies and they were all cut from scraps.  The red circle was cut with a QuicKutz die.

     The snowflake paper is from Doodlebug.  What doesn't show at all in the photo is that each snowflake is sparkly so there's lots of blingy, shimmer and shine.  I used burlap ribbon to tie the bow and I 'dyed' it green with a ProMarker.

     Challenges:
Allsorts
Crafter's Corner
Crafty Friends
Crafty Hazelnut's
Hiding in My Craft Room
Jo's Scrap Shack 
Lawn Fawn
Pammie's Inky Pinkies
Passion for ProMarkers (middle row)

     I'm heading back to the craft room.  I have a pile of images I colored yesterday and the day before and they are all begging to be made into cards.  Happy Crafting.  NanaConnie

Saturday, October 20, 2018

Autumn Fox


     This darling little fox is an image from MMedal Illustrations and he's the freebie image for the Outlawz Progressive challenge this month.  I considered treating him as an Arctic Fox but decided that he'd be perfect for a card done in autumn colors.  I may use him again in icy colors for a winter card.


I decided to use colors from the 3rd column of Color My Heart's
Tic Tac Toe color challenge, plus neutrals of brown and gray.

     I love the expression on his face - he seems so happy!  I colored with ProMarkers and polychromos pencils.  I cut him with an octagon die from QuicKutz and matted him with another, larger octagon cut.

     The polka dot paper is a scrap which I chose because it has the three colors in the column perfectly matched.  I chose CS as close to the "nectarine" color as I could get and made the card base.  My two ribbons look much more orange than they are IRL; they really are just deeper hues of the nectarine color but I have photographed this card 4 different times in different light each time and they continue to look orange.  Sigh....

     Challenges:
Addicted to Stamps
A Gem of a Challenge
Cardz TV
Crafty Calendar
DL.ART
Dragonfly Dreams
Polkadoodles
Southern Girls

     Well, the weekend has officially started and I'm on a coloring binge.  That means I'll have plenty I can do tomorrow to put cards together and get them ready to post.  In the meantime, a few hours of sleep is in order.  Happy Crafting.  NanaConnie

Friday, October 19, 2018

Pumpkin Patch

     Friday morning and I'm sharing another DT card for the weekly challenge at QKR Stampede which started this morning.  It really is fall (according to the calendar if not the weather) and that means Halloween and Thanksgiving are right around the corner.  If you want to play along in our challenge this week, you could make something for either of those occasions or anything else you choose because we always have an "Anything Goes" theme.  I chose a beautiful autumn image from our sister company, Eureka Stamps, called "Pumpkins and Fence."


I started with the sketch from Sum More Fun
and colors from The House that Stamps Built.


     I colored with ProMarkers and used water colors for the muted sky and ground.  I cut the image with a stitched die from Memory Box.  I had one piece of that lovely dp left in a DCWV stack and I though it went perfectly with the image.

     If you look closely, you'll see that the background dp is also cut with a stitched die from that set and the image is inlaid into the background.  I added the wider, paler, polka dot ribbon before inlaying the image, then I wrapped that whole piece with a deep orange, polka dot, ribbon before putting it onto the card front.

     I love how the vertical and horizontal stripes in the background make a box for each pumpkin or leaf or other fall item.  Stripes, squares, and polka dots are wonderful geometric shapes for visual interest and texture.

     On this card, rather than leaving it completely CAS, I added a white, hand-sewn, bow with a button, and the stitched pumpkin.  The sentiment was printed, hand cut, and inked on the edges.

     Challenges:
Double D
Ellibelle's Crafty Weds.
I {heart} ProMarkers
Paper Shelter
Penny's Paper-Crafty
Scrappy Land
Word Art Weds.
Words to Craft By

     I hope you'll come and play along with us this week.  We want to be inspired by you.  Happy Crafting.  NanaConnie

Thursday, October 18, 2018

With Sympathy

     Today I have a sympathy card to share.  I rarely make these ahead of time because I prefer that they have a personal touch, something which I think fits the person or situation.  This one I did for a friend who loves CAS and whose favorite color is blue.


     The image is from A Day for Daisies and I colored it with ProMarkers.  I cut it with my largest QuicKutz rectangle die, inked the edges, and added it to the front of the card blank.  No embellishments, just a very CAS design which I know she'll appreciate.  A favorite of mine, too, because they are designed to be mailed and this one is in the mailbox already.

     Challenges:
ARTastic
As You Like It
Cardz TV
Dream Valley
Jo's Scrap Shack
Lemon Shortbread
Outlawz Festive Fri
Pammie's Inky Pinkies
Path of Positivity
TTCRD
Word Art Weds.

     Be sure to stop by tomorrow to see my latest DT card for QKR Stampede.  Happy Crafting.  NanaConnie

Wednesday, October 17, 2018

Halloween Wrap Up

     I think this will be my last Halloween card but I'm not promising.  I keep finding other adorable images which somehow make their way into my collection and they just cry out to be used.  This darling little bear mummy from Di's Digi Designs is one of those.  :-D


     I used ProMarkers to color the image and water color paints for the evening sky, moon glow, and ground.  Both the kraft card base and the image piece were die cut (QuicKutz) to give them lacy edges.  Despite the visual effect of that, this is still a very CAS design - 1 image put on top of a card base.  No ribbon, no flowers, no buttons, no twine, no embellishments except the witch which actually becomes part of the overall image.

     The full moon with the witch is one of those die cut, foam, circles (QuicKutz) which I stamped with the flying witch.  I made half a dozen or more of them at the beginning of the fall season and I think I've used 2 or 3 of them.  If I don't use the rest, I'll hang onto them for next year.

     I printed the sentiment, hand cut it, and matted it with a tiny scrap of dp before adding it to the card.

     Challenges:
AAA Cards
A Gem of a Challenge
Angie's Digital Stamps
Aud Sentiments
Cupcake Inspirations
Cut It Up
Double Trouble (all 3)
Dragonfly Dreams
Lil Patch of Crafty Friends
Outlawz Greetings
Paper Girls
Unicorn

     Thanks for stopping by and Happy Crafting.  NanaConnie

Tuesday, October 16, 2018

Keeping Warm with Gratitude

     I've become so hooked on the images at All Dressed Up and my Wish List for these long-legged gals is growing each week!   Today I used an image called "All Wrapped Up" so it was perfect for a fall card.  I turned it into a Thanksgiving card with the sentiment.


I used colors from House of Cards.


     I think this is a pretty simple design but one with lots of visual interest.  I started by coloring the image with my ProMarkers, then cut it with an Unbranded, oval die.  I had a scrap of plaid paper in my autumn stash and grabbed it for the card front.

     While searching for the dp, I came across the silk leaf and knew it would make a perfect textural piece.  So, I adhered it to the plaid paper, then layered on the image oval, using dimensional tape.  I printed the sentiment, matted it, and used more dimensional tape to mount it onto the card.

     Challenges:
Bastel-Traum
Crafts Dreamy
Crafts Galore Encore
Cupcake Inspirations
Cute N Crafty
Die Cut Divas
Double Trouble
Pammie's Inky Pinkies

     I hope your week is going well.  Happy Crafting.  NanaConnie

Monday, October 15, 2018

Forest Witch

     It seems that even the woodland animals celebrate Halloween!   Over the weekend, I shared a card showing how the fairies disguise themselves as toadstools to avoid the witches and goblins on Halloween but today I'm sharing another delightful image from Ching-Chou Kuik showing a gentle witch of  the woodlands.  I guess not all of them are scary or dangerous.  At least, the squirrels aren't afraid.  :-D


I used colors from Outlawz Colors.

     I colored the image with ProMarkers and did the sky and ground with water colors.  I cut the image with an Unbranded oval die.  The purple piece is a CS scrap, cut into a rectangle with a simple die from Spellbinders, then framed with a Bo Bunny die cut piece, also a scrap.  Everything was layered onto a scrap of orange CS, including the sentiment, and that layered piece was put onto a kraft card base. 

     I added mesh for texture, then found a scrap of purple ribbon which I wrapped around the card front.  I tied the purple, gingham check, ribbon into a bow and added it on top of the sheer ribbon.

     Challenges:
A Gem of a Challenge
Crafty Sentiments Designs
Hiding in My Craft Room
Jo's Scrap Shack
Pile It On
{Pin}spirational
Pixie's Snippets
Stamping Sensations
Unicorn

     How can we be halfway through October already?   My daughter's birthday is just around the corner and I haven't even thought about doing a card for her.  OMGosh, I'd better get going on that one!  Happy Crafting.  NanaConnie

Sunday, October 14, 2018

Anniversary Flowers

     Good afternoon and I'm so glad you stopped by again.  I'm sharing my DT card for the newest challenge at World Wide Open DT.  Our theme is always "Anything Goes" and Julia Spiri is our sponsor.  This beautiful image is called "Wedding Flowers" and I thought it would make a fabulous anniversary card.


     In keeping with the fall season, I chose autumn colors and colored the image with ProMarkers.  I fussy cut the flowers with scissors, then inked the edges with a ProMarker.  I cut a background piece of dp with a stitched die from Die-namics, and heat embossed the corner with glittered embossing powder.

     I put that onto dimensional dots and added it to the card front, then did the same with the image piece, adding still more dimension.  The sentiment was printed, hand cut, and was inked on the edges before adding it to the image background.

     My final touch was to hand tie a bow using satin ribbon and I added a tiny, diamond-shaped, shank button off of a doll's cape.

     Challenges:
Addicted to Stamps
Cardz TV
Crafty Catz
Dragonfly Dreams
Dream Valley
Lil Patch of Crafty Friends
Outlawz Festive Fri
Outlawz PAM
Stamping Sensations
Take It, Make It

   Come play with us this month, won't you?   Anything goes and you could win as many as 3 wonderful images from Julia Spiri!   Happy Crafting.  NanaConnie

Sasayaki Witch

     I'm finally getting my card made for the Progressive Challenge at Sasayaki Glitter.  The image is one of the most adorable witches this season.  :-D


     I colored with ProMarkers, then cut the image with a Bo Bunny die.    I matted the image with a wonky stitched die from CUTplorations.   I printed the sentiment, hand cut it, and matted it with a scrap of purple CS.

     The jack-o-lantern doily is die cut from glittered paper and the Happy Bat die cut was sent to me by my friend, Christi, who loves Halloween almost as much as I do.  :-D  Thanks so much, Christi!

     Challenges:
A Gem of a Challenge
Angie's Digital Stamps
Crafty Friends
Cute N Crafty
Cutie Pie
Jo's Scrap Shack
Outlawz Greetings
Path of Positivity
Whoopsi Daisy

     I'll have a second post today in the early afternoon (my time) featuring my DT card for the World Wide Open DT Challenge.  Be sure to stop by and see what's happening with our newest challenge.  Happy Crafting.  NanaConnie

Saturday, October 13, 2018

Autumn Leaves

     Well, it's definitely that time of year - the leaves are falling and covering the yard, and we must now rake them into piles and haul them off in bushel baskets.  Of course, the kids will have to jump into one or more of the piles before any such project can be finished.  Sorry, but it's one of the immutable laws of autumn.  :-D

     I'm celebrating that with a lovely image from the Autumn Beauty set by Sparkle N Sprinkle.  I wanted to give you a link to the image but I can't locate the set in the store, in either rubber or digital.  :-(


     I colored with my ProMarkers and polychromos pencils, then cut the image with a stitched, scalloped die from Memory Box.  I used another die from that same set to cut the harvest gold mat for the image.  The sentiment is from that same set, printed onto a scrap, then I cut it with the die and trimmed it into a pie shape since the scrap was too small to be a full circle.

     I used a border die from Poppy Stamps to cut the curved line in a piece of antique yellow CS.  I added a scrap of polka dot dp (SU) which had also been cut with that same border die only this time it wasn't punched along the border.

     Everything was layered onto a burgundy card base.  My final touch was to embellish it with a hand-tied bow made from sheer ribbon and 'dyed' with a ProMarker.  I added the button to the middle of the bow and called the project finished.

     Challenges:
Addicted to Stamps
Cardz TV
Crafty Calendar
Crafty Friends
Creative Fingers
Lil Patch of Crafty Friends
Outlawz SAR
Polkadoodles
Stamping Sensations

     I'm heading back to the craft room to see what other damage I can do to my stash of supplies.  :-D  Happy Crafting.  NanaConnie

Friday, October 12, 2018

Hiding on Halloween

      This is my second post for today so be sure to scroll down one post to see what I did for my GDT spot at Colour Crazy.

     Today we start a new challenge at QKR Stampede and we have our usual "Anything Goes" theme.   I've done another Halloween card and used a QKR image called "Hiding."  I'm not sure if it's the hound or the jack-o-lantern that's hiding from the evil witch flying across the moon but they both look a bit nervous.  :-D


     I used ProMarkers to color the image, then cut it with a Memory Box, stitched die.  I layered that onto pumpkin-gold CS and put that onto the white card front.  I wrapped orange, gingham ribbon around the card front, tied it, trimmed the tails, and added the witch which was stamped onto a die cut, foam, circle so that she'd look like she was flying across a full moon.

     I know this is another CAS card but I prefer them to fancy cards because so many of my cards have to go in the mail.  I rarely make heavily embellished cards for that very reason.  Although this one has a few embellishments, it's still flat, light weight, and will easily fit into an envelope.

     Challenges:
Art Impressions
As You Like It
Aud Sentiments
Creative Moments
Cute Card Thurs
Ellibelle's Crafty Weds
Mod Squad
Penny's Paper-Crafty
Scrappy Land
That's Crafty!

     That's it for today and I wish you Happy Crafting.  NanaConnie

Toadstool Halloween

     This is my first post for today and I'll have a second one in a few hours.  Be sure to check them both.

     I'm excited to be back for another three month term as a Guest Designer at Colour Crazy.  This week our sponsor is Ching-Chou Kuik and our theme is always Anything Goes.  I've used a magnificent Toadstool Fairy image to make a too-cute-to-spook, Halloween card.


      I've heard that on Halloween, woodland fairies costume themselves as toadstools to fool the witches and goblins, and to keep themselves safe.  I think this image is proof the old wives' tale is true!

     I colored with ProMarkers and used a die from Tonic Studio to cut the image.  The cross-stitched rectangle was cut with a die from Lawn Fawn and the rectangle behind it was cut with another Tonic Studio die.  I cut the butterfly and the dragonfly with a die from Cottage Cutz.

     The polka dot ribbon was in my stash and seemed to work well with the Halloween colors mix.  I added tiny, metal brads to the bodies of the bugs, then printed, hand cut, and matted the sentiment.

     Challenges:
Addicted to Stamps & More
Ching-Chou Kuik
Crafty Creations
Creative Inspirations
Creative Knockouts
I {heart} ProMarkers
Outlawz Twisted Thurs
Words to Craft By

     Be sure to come and play along this week.  Because we are a coloring challenge, you are required to color something (can't use pre-colored images) but that's the only requirement.  Come play.  We're having fun!   Happy Crafting.  NanaConnie

Wednesday, October 10, 2018

Scarecrow and Bird

     I've been revisiting my collection of Whimsy Stamps and I can't believe how many I have that I'd forgotten.  So it's time to bring them back and let them see daylight again.  :-D  Today, I'm letting this darling scarecrow with his bird friend enjoy the spotlight.  It's been at least 4 years since I used him (hanging head in shame.)


     I colored him with ProMarkers, then used a die from Tonic Studios to cut the image.  I inked the edges with a stamp pad.  Next, I printed the sentiment and used a Gina Marie die to cut it.  I used the same stamp pad to ink the edges of it.

     The geometric background design was cut with a Memory Box die and I laced glittery, gold, ribbon through one side of it.  I layered that piece onto honey gold CS, then added the image and the sentiment, and put it all onto the card blank.

     Challenges:
Cardz TV
Creative Inspirations
DL.ART
Double D
Ellibelles's Crafty Weds.
If You Give...a Cookie
Outlawz Twisted Thurs.
Quick Quotes
Scrappy Land

     Happy Crafting.  NanaConnie