A new challenge has started over at FarmQuest General Store and our theme is always "Anything Goes."
Friday, February 7, 2025
Owl Always Love You
Christmas Card in February
Another challenge is starting today at FarmQuest Country Christmas where we always allow entries with Anything Country & Christmas.
I used green CS for the card front, and added a scrap of dp from a Recollections stack. I found the two little cardinals and the gold snowflake embellishment (also Recollections) in my Christmas stash.
Challenges:
Monday, February 3, 2025
Butterfly Kind of Day
Is anyone else out there looking forward to spring? Yesterday, the groundhog said another 6 weeks of Winter but I'm thinking of spring and butterflies and buds on the trees. This challenge inspiration photo from Inspiration Station pretty much says it all. :-D
A new challenge starts today and, as always, we give you a photo for inspiration. You can do nearly anything but we do want to know how you were inspired. Was it the butterfly? The colors? The season? A memory? Tell us and add your project to the link up for the entries.
Here's my card ad I've already told you that the butterfly was my inspiration. The image is a clip art photo, edited so that the background stayed pre-colored but the butterfly was gray scale, and I colored it with ProMarkers and gel pens. I cut the image with a Spellbinders die, and added a frame made with pumpkin CS and trimmed to fit. I layered that onto two pieces of kraft CS, added to diagonal corners top and bottom.
The plaid background dp came from a Recollections stack which has been in my stash almost forever! I ran across the stack last month, hidden away in a craft room cabinet, and decided it was time to start using the papers before they got brittle and crumbled to bits. :-D
Tuesday, January 28, 2025
Cozy, Country Home
Good morning and welcome to our latest challenge at FarmQuest.
Our theme for the next month is "Hibernating Animals." I chose a bear and found this adorable clip art image which I printed in gray scale before coloring with my ProMarkers. The sentiment was merged with the image before printing.
I cut it with a die from QuicKutz, leaving a tiny white border, and then inking the edges with a marker. I added chunky glitter to a piece of white CS and used that for the background. I thought it gave the entire card a nice, 'wintery-nap' feel.
Monday, January 27, 2025
Another Gnome (and more to come)
Earlier this month, I did a post showing you a divergence from my normal card making and shared these gnomes: Not a Card! My good friend Lynn (we've been blogging buddies for several years now and have served on more than one DT together) fell in love and told me if I ever decided to go into business selling them, she would sign up to buy the first one. :-D How sweet of her. So, I knew I had to make another one just for her (as a gift. :-D)
I knew her favorite color was blue, which helped me determine the color scheme for him. I used a coat pattern which I bought from Duane K. King (search his name on YouTube if you're interested), sewing blanket stitches all around it, and even added a vest. The hat also came from watching Duane's YouTube videos, appropriately 'squashed' to get the folds in it.
I get to share this with you today because Lynn let me know she received the gnome in her weekend mail. So glad you love him, Lynn. :-D
Sunday, January 26, 2025
Carnation Lady
I'm finally getting around to posting a card for the progressive challenge over at Moondrea Designs this month. I had problems for several days getting the image to print out but Wendy managed to send me a Word document with the image and I was ale to print that just fine. Thanks so much, Wendy!
The image is called "Carnations" and once I had it printed, I was able to color it with a combo of Sanjoki and Ohuhu markers. After coloring it, I cut it with a Tonic Studios die. The pink CS frame was cut with my Fiskars paper cutter and I mounted the image piece onto it. The background dp came from a DCWV stack. I found that delightful, embroidered ribbon in my stash of Christmas ribbons and I'm pretty sure it came from Really Reasonable Ribbon.
Saturday, January 25, 2025
Be a Unicorn
I made two DT cards this month for Star Stampz, where our OPTIONAL theme is "Inspired by a Song." My first card was inspired by "Puff, the Magic Dragon" and this one is inspired by "The Unicorn Song," sung by the Irish Rovers. If you click on the song name, it will take you to a YouTube site where you can hear the song (and see all the lyrics) if you're not familiar with it.
And if you are familiar with it, I can just about guarantee that the refrain is running through your head right now and it will be hours before you can get rid of it! lol
Anyway, my card features the Star Stampz image called "Unicorn Princess" and I think she's adorable. I colored the image with Sanjoki markers, then cut it with a QuicKutz die. I used a Fiskars punch on the corners for some visual interest, then layered the image onto a square of purple CS and rounded those corners with a punch from Uchida.
The plaid dp came from a DCWV stack and the ribbon was in my stash. The gold butterfly is a sticker from Stamp On It.
Wednesday, January 15, 2025
Feed the Birds
I'm honored to be a guest designer for Penny's Paper-Crafty this fortnight and the sponsor of the image I used is All Dressed Up. They supplied images for the DT and GD to use. I used an image called "Feeding the Birds." I thought it made a perfect winter card.
Colour of Love is the second sponsor for the challenge this month.
I colored the image with a combination of Sanjoki and ProMarkers, then cut it with a die from Tonic Studios. I used a Fiskars punch on the four corners. That piece was mounted onto a rectangle of deep blue CS. I cut the sentiment with a QuicKutz die and framed it with a scrap of the blue CS that framed the image.
The snowflake dp came from a DCWV stack and I added some texture by dry embossing it with a brand new folder from Sizzix (thank you, Santa!) My final touch was to embellish the card with a hand-tied, double loop bow made with simple red twine.
Sunday, January 12, 2025
Artist Trading Card
It's been a long time since I made an ATC but I was inspired by the free image over at the Conjuror of Dreams FB challenge this month. That challenge used to e for just tags but now they've changed it to tags, ATCs, cards, whatever. I adore this "New Beginnings" fairy.
The image was pre-colored but I love coloring my own images so I printed her in light grayscale, then colored her with a combination of pencils blended with gamsol (the fairy), water colors (the background & sky), and used gel pens for highlights. I cut the pointed-window shape (I don't know the correct architectural term for that window shape but they are really common in old Gothic era churches), and laid it onto a plain, white ATC. I inked the edges and called it finished.
Friday, January 10, 2025
The Dragon & the Knight
Guess what? There's a new challenge starting today at Star Stampz and it's the first one of 2025. Boy, I'm not used to typing 2025 yet. I had to go back and correct it from typing 2024. :-D Our theme is always Anything Goes with an optional theme. This time, the option is "Inspired by a Song."
I took that to heart and went searching for a Star Stampz image that had a dragon because "Puff, the Magic Dragon" was running through my head. The image is The Dragon and the Knight. I colored it with my Ohuhu markers, then cut it with a Tonic Studios die, and cut the corners with a Uchida punch.
I did the same things to a piece of DCWV dp and used it for the frame around he image. The background was made with another piece of dp from that same DCWV stack. I know I tend to use DCWV papers more than any others and part of that is because they are a favorite of mine but also because I own more DCWV stacks than any other brand. That may have happened because when I first started paper crafting, the craft store where I made my purchases back in those days carried mostly DCWV, I've used other brands over the years but I still tend to go back to DCWV. (and I have a HUGE stash of it which I'll never use up, even if I live to be 100!)
I added a wrap of purple Really Reasonable Ribbon and tied a bow with it also.
Wednesday, January 8, 2025
Not a Card !
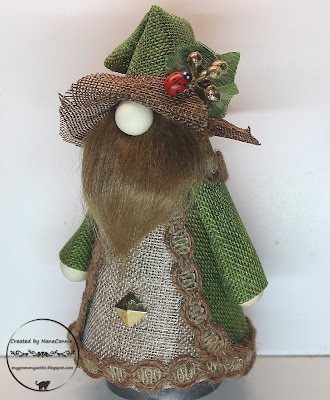
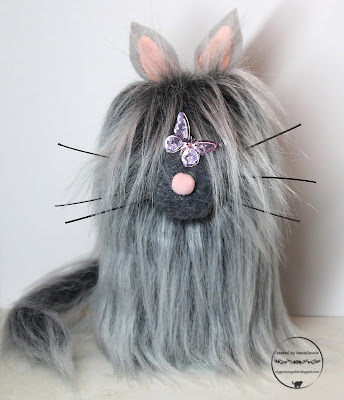
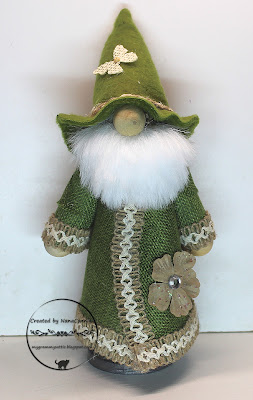
I know I post cards 99.98% of the time but today I want to share something new in my lineup of projects, a fun take on the rage for gnomes. I adore gnomes but up until last month, I was buying gnomes made by other people. I have colored my share of gnome images and made cards with them, but these 3D gnomes are the first of their kind I've made.
These are made from craft foam cones, felt squares (which have been in my crafting stash forever and the package hadn't even been opened!) and faux fur, following a pattern I found on Duane King's YouTube site. The fawn brown gnome with the pointed (but crumpled) hat is his Wizard pattern and the taller gnome is from the Gnome with Coat and Top Hat pattern. They are approximately 6.5 inches and just under 8 inches tall.
While I think these are cute enough, I also know that my finished gnomes will get better as I make more of them. In the meantime, I thought I'd share my first efforts. :-D
Enjoy and Happy Crafting! NanaConnie
Tuesday, January 7, 2025
By-Gone Days
I had a request last month for a masculine card for my neighbor's father. He's turning 91 in mid-January and has been a lifelong farmer in the central valley of California. The request fit in perfectly with the new challenge starting today at FarmQuest General Store (Anything Goes but must have a farm or country feel) and I decided on blues and browns. That's almost always a perfect color combo for a masculine card.
What could be better for a lifelong farmer than an image of long forgotten farm equipment, tucked away in a dusty corner of an old barn? This is a pre-colored, clipart image to which I added the sentiment before printing it. I cut it with a square, QuicKutz die, added a frame made from white CS, cut with a die from Spellbinders. The striped dp is from an old DCWV stack, and I added a bit of left over burlap fabric from another project I had worked on last month. It seemed to give perfect texture and eye appeal without being too frou-frou as an embellishment.
A Gnome's Country Christmas
Here it is the end of the first week in January and we have a new challenge starting at FarmQuest Country Christmas. While our themes are pretty much "Anything Christmas Goes," we do require that your projects have a farm or country aspect to them. So, outdoors rather than indoors, fields and open spaces instead of city streets or skylines, trees and bushes rather than fancy furniture, and of course, Christmas!
My card today features a darling little gnome from Anet Art Store and I printed the image in gray scale, then colored him with my Ohuhu markers. Once colored, I used a QuicKutz die to cut the image and I inked the edges. I put the background together with green CS and a scrap of dp from DCWV. I wanted plenty of trees so that you'd know it was an outdoor scene so in addition to the trees in the image and the dp, I added little, felt trees along the left edge which were cut using a Cottage Cuts die.
Monday, January 6, 2025
Winter Birds
Here it is, time for the first challenge of the new year over at Inspiration Station. We always give you a photo for inspiration and you may create anything you like but be sure to tell us what from the photo inspired you. Here's the photo for this month and I was inspired by the wintery scene and the bird.
Monday, December 30, 2024
Holiday Party Time !
A couple of days ago I did a post in which I mentioned a FB site where certain artistic people create AI clipart, often from specific requests made by members of the site. It's called Free Printable Clipart and if you're interested, you can get there by clicking on the name above.
I joined and have had a wonderful time browsing around and downloading clipart images I'll be using on my cards. Today, I'm sharing two different cards which were made for neighbors who open their hearts and homes to the neighborhood for holiday parties each year.
Because I was making these cards more or less at the last minute (party is tomorrow night!), I chose to use the pre-colored version, exactly as I downloaded it. But I've also used these clipart images printed in gray scale and hand colored by either my sis-in-law or me.
I used scraps of dp for the background on this first card, carefully pieced together and the image was placed on an angle to cover a bare spot where one scrap was too small. The image was cut with a Spellbinders die and I added silver and blue snowflakes. The angel was in my stash of Christmas decorations, the only one I had left and it gave a bright spot of white to the card. The sentiment was printed and cut with a small die from QuicKutz.
Saturday, December 28, 2024
Paths, Trails, or Walkways
Oh, my gosh! The year is nearly over and today we start our last challenge of 2024 over at FarmQuest. As usual, we have a theme - a specific one in addition to the "Farm or Country" which is part of every challenge we have - and today that theme is "Paths, Trails, or Walkways." I suppose I could have searched for a winter pathway but they all seemed to be buried under snow. :-D also, you should know that, starting with this challenge, we are going to a monthly challenge instead of the 7th and the 28th. So, this challenge will run through January 27, 2025!
This image is clip art, printed in grayscale, then colored with water colors and pencil. I cut the image piece with a QuicKutz die, and inked the edges. The background dp came from my scrap basket. I used jute cord to wrap the card front and tie a bow.
Wednesday, December 25, 2024
Cuddles with Santa
It's Christmas Day and, in case you haven't seen my Christmas Greeting to all, just scroll down one post.
I'm also sharing this card today because I'm way too far behind on posting the cards I've made over the last 2 weeks! This one is another collaboration with my SIL, Lainy, where she's done the coloring and I've turned it into a card. She was still coloring images for Christmas cards yesterday! Of course, we both put off a good share of our gift wrapping efforts until yesterday so last minute cards were almost to be expected. :-D
This is another clip art image and this one was AI generated. I've joined a FB group of very talented people who create AI images based on requests from people all over the internet. They are free for personal use. I'll share more about that group (including a link to the site) in my next post. Today, time is short and I need to get this post finished before the dinner bell rings at my house. :-D
Lainy colored this image with colored pencils and, once finished, I cut it with a Tonic Studios die. I inked the edges using a red marker. The sentiment was printed and cut with a QuicKutz die, and I used the same marker to ink the edges of it. The background dp came from an old (very, very old!) K & Co. stack. The red and the green candy cane embellishments were cut with a hand punch but it has no company name on it so I can't tell you who made it. I've had it for a good many years and it's a favorite of mine during the Christmas season. I added a single wrap of green ribbon around the bottom of the front flap.
Make your Christmas as merry as possible! Happy Crafting. NanaConnie
Tuesday, December 24, 2024
Christmas Hug
I adore this image and as soon as I printed it for coloring, my sweet (and very talented!) sis-in-law laid claim to it for coloring. It's a clip art image and I don't even remember where I got it but she colored it with a mix of Ohuhu and ProMarkers. Isn't her coloring fabulous?
Once colored, she gave it back to me because making the actual cards seems to be my portion of the collaborations we do. I haven't gotten her into that side of the creative process but it works out well when she colors and I turn those images into cards.
I cut the image with a QuicKutz die, then used a Fiskars punch on the four corners. I framed that with a piece of scrap, gray CS, and I inked the edges of the frame. For the background, I found bits of dp in the Christmas scrap basket, layered them one above another and thought they worked really well together. I wrapped a snippet of very narrow ribbon around the card front and also tied another scrap of it into a simple bow. The sentiment was printed and cut with an Avery Elle die.
It's Christmas Eve and I wish each and every one of you a very Merry Christmas! Happy Crafting. NanaConnie
Monday, December 23, 2024
Christmas Girl
For all my promises last week about having posts each day for the past 7 days, the "To Do" list just got the best of me and, even though I've been very busy creating in the midst of the Christmas preparations, I didn't have time to sit down and write posts. But today, I finally finished the Progressive Challenge image from Moondrea Designs and I want to get her posted to the Challenge.
I colored with my Ohuhu markers, then added Stickles to the holly leaves, the berries, and the candle flame in the lantern. After it all dried, I cut the image with a Tonic Studios die, and decorated the corners with Fiskars and Uchida punches. I framed the image with a die cut rectangle of green CS (Spellbinders die.) The background dp is a scrap from the Christmas stash (probably DCWV) and the sentiment was printed and cut with another Tonic Studios die.
Hopefully, I'll have additional posts this week. We aren't celebrating our Christmas holiday until Saturday when my college-attending, granddaughter gets home for her Christmas holidays. Maybe I'll have posts all week long of Christmas cards I've made even though Christmas will be on Wednesday. You won't mind, will you? The Christmas holidays don't really end until the New Year, right?
Happy Crafting. NanaConnie
Sunday, December 15, 2024
A Steampunk-y Christmas
It's been ages since I did anything steampunk but my sis-in-law has a grandson who adores steampunk and when she saw this steampunk rabbit image in my collection of images from SheepSki Designs, she wanted to turn it into a Christmas image, even though it wasn't drawn as one. I think she did a fantastic job by using traditional Christmas colors to get the effect she wanted.
I took her colored image (pencils), cut it and the red frame with QuicKutz dies, and decorated the corners of each with Fiskars punches. I found a scrap of dp for the background in my Christmas papers stash and thought it worked well with the steampunk aspect. The sentiment was printed and cut with a Tonic Studios die.
For embellishment that heightened the steampunk, I dug through my drawer full of charms and found a little baggie filled with tiny gears and cogs and other metal bits, many of them actual old watch parts. I bought those more than a dozen years ago at a Michael's store and haven't used them in longer than I can remember. But they were perfect for this card!
Saturday, December 14, 2024
A Farm Country Birthday
When I think of farms and country living, horses always come to mind. So when I saw the theme for our latest FarmQuest challenge, "Things Found in a Barn," I started looking through my collection of images for a horse.
This gorgeous clip art image was colored with pencils, blended with gamsol, then cut with a die from Spellbinders. The kraft CS frame was also cut with a die from that same set. The plaid dp came from a DCWV stack. I printed the sentiment, cut it with scissors to get that particular shape, and matted it with a scrap of kraft CS. I used jute cord for the hand-tied bow.
Friday, December 13, 2024
Season for Hot Chocolate
When it's time for hot chocolate, everyone gets into the act, even sweet little foxes! This delightful image came from a set by Pixel Art Foundry and I'm totally in love with it. It comes in a pre-colored version but this time it was printed in a light grayscale, no line version. Don't they look like they're taking a break from the holiday rush before they head into the final stretch of Christmas Eve madness? lol Kind of like me doing fairly CAS cards for the last dozen I have to get finished before this week ends.
My sis-in-law pulled out her water color pencils to color the foxes, then added highlights with gel pens. She used sparkle pens on the cocoa mugs. Once colored, I cut the image with a Tonic Studios rectangle die and cut the corners with a Fiskars punch. I found a large scrap of green dp for the card front and layered on the image piece. The sentiment was printed and cut with a QuicKutz die.
Thursday, December 12, 2024
Tree Topper Angel
Wednesday, December 11, 2024
Snowflake Santa
I have to share a card with a spectacular image which was colored by my sis-in-law using pastel Ohuhu markers and white gel pens. Didn't she do an incredible job? The image is clip art and I think originally it was a digital coloring book page but I sized it for a card before printing it.
After she colored it, I cut it with a QuicKutz die, then used a Fiskars punch on the corners. The sentiment was printed and cut with a Tonic Studios die. I decided to use blue glitter paper on the card front to enhance the soft blues in the image. The two snowflake embellies are die cut foam and the dies were from Cottage Cuts.
Christmas is less than 2 weeks away and I'm still making cards! Yikes! Have you finished all of yours? Happy Crafting. NanaConnie
Monday, December 9, 2024
"Santa" on Vacation?
This adorable little "Santa" cat has no intention of staying up all night on Christmas Eve, delivering presents to children all around the world. In fact, if he is assigned that particular Santa chore, he's heading off on vacation the day before!
The image is from Conjuror of Dreams and their challenge theme this month is, as always, Anything Goes but the optional theme is "Santa on Vacation." This is my take on the vacation option. :-D
The image is pre-colored, and I cut both it and the mat with dies from QuicKutz. The sentiment was printed and cut with my Fiskars paper cutter. I chose the glittery, red, card stock for background because I wanted a monochromatic look for this particular card.
I may have a second post today but if not, I'll post tomorrow. Happy Crafting. NanaConnie
Saturday, December 7, 2024
Gnome for Christmas
It's the day for a new challenge over at FarmQuest Country Christmas where our theme is always "Anything Country Christmas Goes." We want to see outdoor Christmas scenes or decorations on the farmhouse, or nearly anything that is both Christmas and outdoorsy, but not big city streets or shopping malls or cityscapes.
I chose this clip art image with three gnomes on the Christmas Tree Farm. I don't know the artist but if you do, please let me know. I love to give proper credit where possible. I colored the image with my Sanjoki markers, added highlights to their beards with a white gel pen, and cut the image with an old QuicKutz die. I love the shape of it. I inked the edges in red, then layered it onto a background of glittery, golden holly leaves. That CS came from Paper Studios and the dp strip along the right hand side is a scrap from a DCWV stack.
The glittery golden bow is from K & Co. and I thought it added exactly the proper amount of sparkle and glitz. I admit, when it's Christmas, glitter is my absolute favorite and when it's combined with gold, that takes it over the top! The sparkle adds so much to the festive feel of the holiday. :-D