Tuesday, May 31, 2016

Beach Combing

     The beach is where I should be for the rest of the week since our temperatures are going to soar above 100 for the next 7 days.  They are actually predicting 4 of those days as being between 106 and 110 !  Unfortunately, I have commitments which will keep me in town and unable to go the the beach.  I should probably be committed.  lol

    At least I can share a beach combing card with one of those darling House Mouse images I love.


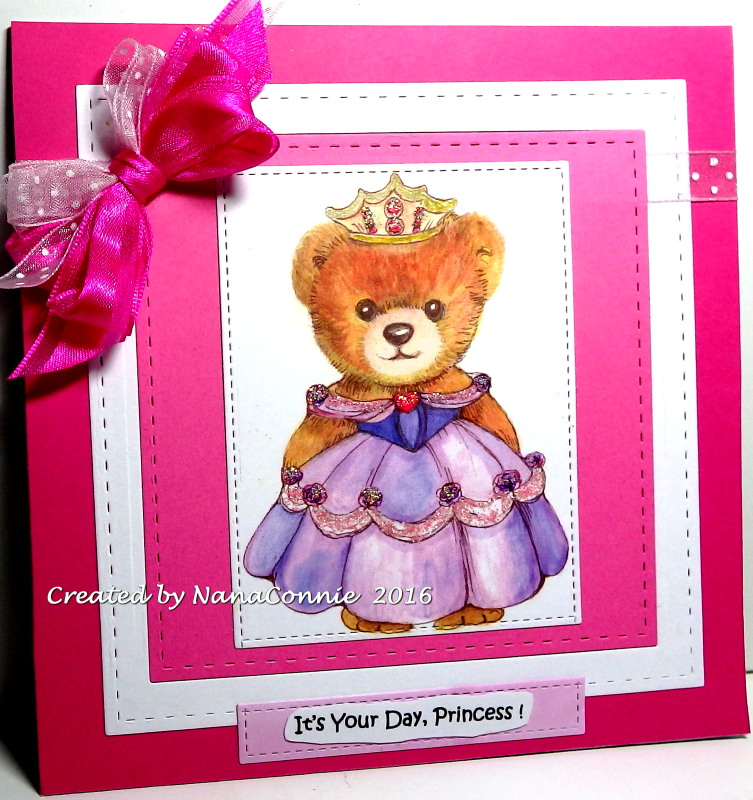
     I gave myself a bit of a personal challenge with this card.  I wanted to see if I could do a design with lots of layers but which still had an overall 'open' look.  I started with a background of kraft CS.  I die cut a forest green layer with one of my Cheery Lynn dies (bought months and months ago and used only once!) and then cut another with the same die using yellow CS.  I cut the yellow die cut in two and all of those layers went onto the card base.

     I colored the image with ProMarkers and watercolor pencils, and then used the die to cut just the edges so that no part of the two die cut layers below would be covered.  I printed the sentiment, fussy cut it, and then added a mat and fussy cut that before adding it to the bottom edge of the image.  If we count the card base and the sentiment, that's a total of seven layers!

     Finally, I die cut a butterfly (also Cheery Lynn), folded it in half, and added it to a top corner.  It's folded because I wanted a profile view of a butterfly instead of a top view.  Does that count as yet another layer?  :-D  I don't know about that but the die cuts certainly to give the card some great, even if simple, texture.

     Everything on the card, including the image and CS, came either from my hoarded stash or from scraps which have been in the "use someday" basket for waaaay too long.  I've done such a good job of using up things from my stash this month that it must be time to go shopping again, right?  Afterall, if I don't get new papers to cut, how will I ever have more scraps to use up?

     Challenges:
613 Avenue Create
Cheery Lynn Designs
Colour Your World
Crafting from the Heart
Craft Your Passion
House Mouse
Incy Wincy
Lil Patch of Crafty Friends
Outlawz Greetings
Penny Black & More

     And so the work week begins a day later than normal.  Hope your weekend was smashing and that you arrived at today rested, relaxed and refreshed.  Happy Stamping.  NanaConnie

Monday, May 30, 2016

Big Birthday Celebration!

     This card is specifically for a dear friend who turned 81 today.  Happy Birthday, Don. :-D  I hope I'm as active and energetic when I get to that age.  Not that I'm decades away from it, mind you, but not there yet!


I did a different take on the sketch at From the Heart Stamps,
using feathers to replace the long, vertical strips,
 and I used colors in the top row of the Color Bingo

Sketch154    

     I used my ProMarkers to color the chicks, then cut and matted the image (which happens to be a From the Heart Stamps image, as is the sentiment.)  I mounted that piece onto a cream -colored, confetti CS base before adding the ribbon and the feathers.  I found a tiny, glittered flower and added a small, golden, Dew Drop to it.

     I love using feathers on cards but forget about reaching for them most of the time.  Maybe I need to change where I store them.  I'm sure it's the old "out of sight, out of mind" thing.

     Challenges:
A Beautiful Mess
Aud Sentiments
Crafting with Friends
Crafty Girls Creations
Creative Fingers
Cre8tive Hands Friends
Docerela Creations
Jo's Scrap Shack
Just Add Ink
Male Room
Outlawz Twisted Thursday
Star Stampz

     Have a great Memorial Day, all my fellow Americans, and take a moment to remember why we celebrate the day.  Reach out and say a huge Thank You to a veteran, won't you?  Happy Stamping.  NanaConnie

Sunday, May 29, 2016

Quilled Flowers

     Something different from me today; a quilled design!  I first saw and became fascinated with quilling about 7 years ago.  I bought paper strips and some tools and a book of 'how to' designs and made a few rather pathetic attempts to produce something that looked like a flower.  Being somewhat discouraged, I gave up and put all the papers and tools away.

     When I sold my home and moved 2 1/2 years ago, those quilling things got packed into one of the boxes and have lain dormant (translate to "That box never got unpacked") until a couple of weeks ago.  Out came everything and I'm going to do a lot more practicing.  Quilling is fun!  Time consuming, but fun.  :-D


     I put these flowers on dimensional dots and mounted them onto a die cut (Spellbinders).  The sentiment is rubber stamped, cut with an oval die (QuicKuts) and that's layered onto a stitched scalloped circle (Memory Box.)  All the die cuts were made from scrap pieces waiting to be used or tossed out.

     The ribbon is purple grosgrain and the bow is made from lavender satin ribbon, both from my stash of leftover bits and pieces.  The card base is made from shiny, metallic CS - hard to photograph but gorgeous IRL.

     Challenges:
Crafting for All Seasons
Crafty Gals Corner
Crafty Sentiments Designs
Create and Inspire
Creative Inspirations
Deep Ocean
Everybody Art
Fairy Tale
Lemon Shortbread
Mod Squad
Penny's Paper Crafty
{PIN}spirational
Pixie's Snippets
Through the Craft Room Door
Word Art Weds.

     I hope you're all enjoying your long weekend.  I'll be back on Tuesday.  Until then - Happy Stamping.  NanaConnie

Saturday, May 28, 2016

Sparkly Ballerina Fairy Bear

     I had so much fun making this card!  As a child, I did ballet classes until I was around 12 and, at that time, the family moved far enough away that it was impossible to continue due to the distance  we would have had to travel.  But I have maintained a love of all things ballet-related throughout the rest of my life.  This darling little bear from Morgan Fitzsimons tugged at my heart and I just had to use it to make a little girl's birthday card.


Colors came from Color My Heart
although in the photo my "Thistle" looks more pink and less violet
but the larger polka dot piece really is violet, not pink.
I also based my design on a sketch I found at Paper Play Sketches.


     I colored her with my ProMarkers and added glitter to her fairy wings before fussy cutting her.  I added a navy blue CS mat and fussy cut it.  The border is done with a Cheery Lynn die, as is the butterfly.  The polka dot papers are from a Paper Studio pad I bought weeks (months?) ago and have never used.  It was one of those "I must have these papers!" purchases and then it went into a drawer.  I matted them with the same navy blue CS.  The butterfly has three layers; pink, white, and navy blue CS, all glued together along the body.  I added more glitter to the wings and body on the top layer.  The image is mounted on dimensional dots.  Lots of texture going on this time.

     Challenges:
ArtbyMiRan
Cheery Lynn Designs
Crafting for all Seasons
Crafty Gals Corner
Create and Inspire
Creative Moments
Cut It Up
Die Cuttin' Divas
I {heart} ProMarkers
Jo's Scrap Shack
Just Add Ink
Mod Squad
Penny's Paper-Crafty
Simon Says Stamp

     Thanks for dropping by and Happy Stamping.  NanaConnie

Friday, May 27, 2016

An Elephant Never Forgets!

     It's Friday so there's a new challenge beginning today over at QKR Stampede.  Our theme this week is "Birthday Cards" and, heaven knows, I can always use another one in my stash!  :-D  On this card, I used this delightful elephant image (Digi 13405 "Forget") and added a fun balloon (ES Digi 5201.)


     I used my ProMarkers to color the elephant and the balloon, then fussy cut both of them.  I used an ink sprayer to make the shiny, ombre card front.  I know I still need lots more practice but this was my first time ever using a sprayer so I think it's "passably" good.

     Before mounting the balloon with dimensional dots, I wound twine around it and ran that twine behind the elephant's ear, then back out so that it could be tied around his front foot, like a string on your finger so that you won't forget something.  I did that by punching a couple of holes just large enough to take the twine (I used a tapestry needle.)  I tied a bow, then added a splash of ribbon, a single flower, and called it good for a CAS design.

     Challenges:
613 Avenue Create
AAA Cards
AuroraWings
Cards in Envy
Colouring in Scrapland
Creatalicious
Digi Choosday
Glitter n Sparkle
Love to Scrap
Melonheadz Friends
Not Just Cards
Petal Lu
{PIN}spirational
Simon Says Stamp
Sisters of Craft

     Another week behind us, a weekend on the near horizon and, for those of us in the USA, a long weekend celebrating Memorial Day and the veterans who served/serve their country.  May God bless each and every one of you.  Thanks for all your sacrifices and those of your families.  NanaConnie

Thursday, May 26, 2016

Life at the Beach

     Early last month I used this beach pail image (From the Heart Stamps) because the weather had turned hot, hit the high-90 degrees, and I thought something from the beach might make it seem a bit cooler.  It didn't.  Last time, I did the whole card including the image in all black and white for a monochromatic effect.  This time I colored it and did a 'cool blue' palette.


I started with the sketch at I {heart} Sketches.
Sketch153
     I used ProMarkers to color and, since the optional twist is to fussy cut the image, I die cut the bottom half and fussy cut the top half of the image.  I adhered the image so that I could get an out-of-the-box effect.  The stitched die is from Memory Box and the plain circle dies used to cut the mats are from QuicKutz.

     All the papers were in my scrap basket, including the navy blue for matting the rectangles.  They were all waiting for me to find an excuse to use them.  With all those layers, I decided that a simple bow made from burlap ribbon would be enough embellishment.

     Challenges:
613 Avenue Create
Craft-Dee BowZ
Crafting from the Heart
Craft Your Passion
Crafty Friends
Die Cuttin' Divas
Dragonfly Dreams
Incy Wincy
Lemon Shortbread
Love to Scrap
Outlawz Twisted Thursday
Ribbon Girl
Scrapy Land
Stamping Sensations
Unicorn

     Happy Stamping.  NanaConnie

Wednesday, May 25, 2016

For the Big Wheel

     Today is my day to post some Designer Inspiration on the MHK Designs blog and I hope maybe this card will encourage you to see how much fun masculine, vintage cards can be.  I love making masculine cards but combining that with vintage is wonderful.  This "Big Wheel" image from the "Wheely Like You" set was perfect for a card I'm giving to a lovely gent who recently got a promotion to upper level management.


I started with the sketch from Cheerful Sketches.


     I used a masculine color combo of white, brown and beige, using CS for the die cut image, sentiment, the mats for those, and for the rectangles, then added a piece of plaid fabric (starched and ironed.)   I heat embossed a rubber-stamped strip with gold EP, dry embossed the card base using a Darice embossing folder, and used a few wheel and gear embellies to emphasize both the masculine and vintage elements of the card.

     I love embossing as a technique, especially when I can do both heat and dry embossing on the same card.  All those layers add to the vintage feel and I added a few dark brown pearls to one upper and one lower corner.  I thought the gears and the pearls were enough embellishment so settled for just those two things.

     Although this set comes with some really great sentiments, I printed one of my own this time because I wanted it to be specific to the job promotion.  :-D   After I had it all finished and photographed, I thought about how a bit of sponged distressing around the edges of each layered piece would have added a bit more vintage flavor but I guess that can wait until the next card.  :-D

     Challenges:
Brown Sugar
Craft for the Craic
Crafty Catz
Crafty Friends
Creative Card Crew
Cuttlebug Mania
Deep Ocean
Di's Digi Designs
Dream Factory
Going Grey with Scrap Creations
Jo's Scrap Shack
My Sheri Crafts
{Pin}spirational
Scrapper's Delights
Scrapy Land
Simply Papercraft

     Don't forget that MHK Designs has a new challenge that started last Saturday and there's plenty of time for you to play along.  Check out the challenge post by clicking here and then come play along with us.

     Have a wonderful day and Happy Stamping!   NanaConnie

Tuesday, May 24, 2016

Get Well Puppy

     A new challenge starts at Tuesday Throwdown today and, sadly, this is my last week on the DT over there.  I started with Tuesday Throwdown in the late spring of 2011, took a short break in 2014, and have enjoyed every moment there.  The team is such a wonderful group of crafty women; warm, helpful, and so supportive & loving.  I'll miss every one of them.  BTW, they're looking for a couple of new team members so, if you think you might be interested, leave me a comment below and I'll forward your name and blog info to them.

     Our theme this week is "For a Child" and our sponsor is Digital Delights.  I used one of their images which I had in my own collection and I thought it was perfect as a get well card for a child.


     I did a very CAS design, cutting the image and the offset blue mat with my stitched square dies from Cheery Lynn Designs.  The chair is supposed to be red but it came out more sienna in the photograph.  The stitched ribbon was in my stash and the polka dot ribbon for the bow was a left over piece I found in my "ready-to-toss-out" basket.  There was just enough to make that small bow, which is fine because, truth be told, I like small bows best.  Small bows leave more room for the image to be the main focus and the card is flatter for mailing.

     Challenges:
613 Avenue Create
As You Like It
Cards in Envy
Cheery Lynn Designs
Crafting with Friends
Cre8tive Hands Friends
Creative Corner
Di's Digi Designs
Glitter n Sparkle
Hannah and Friends
Lil Patch of Crafty Friends
Ribbon Girl
Simply Papercraft

     That's it for me, signing off from Tuesday Throwdown.  Goodbye to all the friends I've made at Tuesday Throwdown over the years, those still on the team and those who have come and gone before this.  I'll be around blogland and will come play in the challenges whenever possible.  Love you all !  Happy Stamping.  NanaConnie

Monday, May 23, 2016

Serenity

     The fairy in this image just seems so serene and wise.  Wish I could be dipping my toes in a pond somewhere.  Of course, I also wish I was small enough to sit on a waterlily.  :-D


I based this on the sketch from the Outlawz.


     I used ProMarkers on the fairy, chalks on the flower and water, and her wings are done with loose purple glitter.  The frames are cut using a die set from Spellbinders.  I backed the stacked frame layers with navy blue CS and added royal blue, satin ribbon, lacing it through one of the frames.   All those layers went onto the card front.  The sentiment is mine, printed, hand cut and added to the ribbon.  The multi-color ribbon for the bow came from my stash of bits and pieces.

     Challenges:
Scrapy Land

     I wish you well as your new week takes hold.  So glad you stopped by for a visit, however brief.  If you  have a bit of time, feel free to browse around while you're here.  Happy Stamping.  NanaConnie

Sunday, May 22, 2016

Princess Bear

     This is an image I bought ages ago from Morgan's Artworld and this is the first time I've colored it up and used it.  I thought it would make a great birthday card for a young girl.


     I started coloring with my ProMarkers but added a few strokes of gel ink to the fur and then put glitter on the flowers & on the bunting on her shoulders and skirt.   I also added glitter to the gems in her crown and colored the crown itself with gold paint pen.  I was attempting to make her skirt look somewhat iridescent, hence the blue, lavender, and pale pink colors.

     Everything was cut with stitched dies from either Lawn Fawn (the squares) or Die-Namics (the rectangles.)   I used two different ribbons from my stash and tied a double bow.

     Challenges:
ArtbyMiRan
Brown Sugar
Chocolate, Coffee & Cards
Crafting with Friends
Crafty Catz
Creative Fingers
Fussy and Fancy
Morgan's Artworld
Polka Doodles

     Have you had lots of crafting time this weekend?   Whatever you've had, I hope it has soothed and relaxed your soul so that you're recharged for the week ahead.  Happy Stamping.  NanaConnie

Saturday, May 21, 2016

MHK Designs Tulips and Butterflies

     Today starts the May/June challenge over at MHK Designs and here's our inspiration photo:


Remember, you can use the colors, the photo, 
a specific thing within the photo, 
or a combination of everything.
If you use an image from MHK Designs
then the theme is "Anything Goes"
whether you use the inspiration photo or not.

Here's what I did using "Tulip of Thanks."


     I printed two of  the flowers, die cutting one and fussy cutting the other.  I colored with ProMarkers and, though it doesn't show very well in the photo (try enlarging it for a better look), added glitter to the top one.  I mounted that flower on dimensional dots after cutting away the leaf and adhering it so that it pointed in the other direction.  

     The three, green, CS rectangles are also all die cut with my Pinpoint Rectangles die set from Memory Box.  I scattered die cut butterflies (also Memory Box) across the card, adding pearls to them for the bodies.  The final touch, making this almost a vintage card, was the lace and stitched ribbon.

     Challenges:

     I hope you'll come and play in our challenge this month.  It runs through June 15 and you can use any image from any company with the inspiration photo or you can do "Anything Goes" if you use an image from MHK Designs.  Hope to see you there.  Happy Stamping.  NanaConnie

Friday, May 20, 2016

Sketch, Panda, and QKR Stampede

     Good Friday morning to all of you!  Another new challenge is starting at QKR Stampede this morning and this week we have a sketch challenge.  It's a great sketch; very versatile and fun to use.


     Here's my version and I used QKR Stampede Digi 24320 Panda and Digi 15810 Huggable for the sentiment.

     It may be a bit hard to tell in the photo but this is an easel card.   I left the image black and white, cut it with one of my oval dies from Spellbinders, and added an oval mat, also die cut.  The leaves are cut with my favorite die from my collection of Cheery Lynn dies.  The striped background dp is from SU and has been in my stash more or less forever!  :-D  I added a few green sequins for some sparkle and bling.  Can you believe there are 5 different layers on this otherwise CAS design, not counting the leaves or sequins?  

     Challenges:

     That's all for today but we do hope you're going to play along at QKR Stampede this week.  Use the sketch as your basic design and remember you can use any image you like.  If you happen to use an image by QKR, your card will be entered to a separate drawing just for those who used QKR images and that means your chances of winning increase dramatically.  See you there.  Happy Stamping.  NanaConnie

Tuesday, May 17, 2016

Wine and Age

     The sentiment on this card says it all and now I have one more birthday card in my stash.  I can't say who'll get this one because some people in my circle of friends and family read my blog and I certainly don't want to give it away.  :-D


The image, sentiment, and sketch are by From the Heart Stamps.
There's a twist with this sketch -"Crop the Digi" - which I did.

Sketch152

     I used my ProMarkers to color the inside circle of the image, leaving the outer circle in black and white.  I used two of my Die-Namics stitched circle dies to cut the image.  The sentiment is cut with with a square die from my Spellbinders collection.  The papers were scraps in my stash and the sheer ribbon I used was also a scrap.  I love the color and texture of it so much, I simply couldn't throw it out so found a way to use it.  :-D

     Challenges:
2 Creative Chicks
A Bit More Time to Craft
Art Impressions
Aud Sentiments
C.R.A.F.T.
Crafting with an Attitude
Dies R Us
Hannah & Friends
Not Just Cards
Paper Creator's Crafts
Petal Lu
Sisters of Craft
Sparkles Forum
Sweet Stamps

     Almost Hump Day and then we're on our way to the weekend - woohoo!  Enjoy your day and make it the best one so far this week.  Happy Stamping.  NanaConnie

Monday, May 16, 2016

Daphne's Daffodil

     This wonderful, sweet image is the FB Progressive Challenge freebie from ArtbyMiRan.  She became a birthday card because I'm stocking up on those.  No particular person in mind for this one but it will probably go to my sister-in-law who has the next family birthday coming up at the end of this month.  :-D


     I used my ProMarkers to color the image in lovely, spring greens and then used my latest Cheery Lynn framing die to cut it.  I backed it with pale green CS so that the frame element would be better showcased.  I added the leafy die cut, also a Cheery Lynn die, and punched flower petals for the white flower, adding a sparkly sequin to the center.  Green isn't my usual color choice for a monochromatic card but I rather like it on this one.

     Challenges:
A Beautiful Mess
ArtbyMiRan
Aud Sentiments
Chocolate, Coffee & Cards
C.R.A.F.T.
Craft Rocket
Crafty Catz
Crafty Creations
Creative Corner
Creative Fingers
Creative Moments
DL.ART
Inspiration Destination
Star Stampz

     I hope your week is going well even if it is a Monday and the first day back to work.  Count your blessings -- you have a job and a paycheck.  :-D  Happy Stamping.  NanaConnie

Sunday, May 15, 2016

Staring You in the Face

     The image on this card is one of the new ones from Bugaboo Stamps and as soon as I saw it, I went on a shopping spree.  It just made me smile.  :-D


I started with the sketch from The Outlawz
but modified it to suit my die cut/embossing on the corner.


    This is another of those cards where everything I used came from the scrap basket or my stash of things needing to be used.  :-D  I always feel so self satisfied when I do that and then I give myself permission to go on a shopping trip for more supplies.

     I also challenged myself to see if I could use at least 12 shades of pink in the coloring (ProMarkers with watercolor pencils) and papers in the overall design but still wanted the image to look more or less "natural," meaning I didn't want to give her bright pink hair but still wanted it to have a pinkish tinge.  At my count, I used 15 different colors of pink, including a couple that favor the coral side of the hues.  :-D

     The corner die cut was done with a die from Poppy Stamps and the image and mat were cut with a couple of stitched circle dies from Die-Namics.  The papers were open stock scrapbooking papers from my stash of leftovers.  I used two shades of pink CS.  The flower and butterfly embellies are double layered and the top layer is sparkly with glitter.  Each one has a gem stone in the center for a bit of bling.

     Challenges:
Catch the Bug
Crafting by Designs
Crafting for all Seasons
Crafty Addicts
Crafty Creations
Crafty Friends
Di's Digi Designs
House That Stamps Built
Inspiration Destination
In the Pink
Let's Color Saturday
Outlawz Twisted Thurs
Pencil Case
Scrapy Land
Simon Says Stamp

     We're starting a new week and, hopefully, it's going to cool down a bit.  We all but hit 100 degrees out here where I live (some nearby areas did get to an official 100 -- we got to 99) and it's just too early in May for that to happen.  I'm afraid it's a sign of a long, hot summer coming up this year.  Ugh.  Oh, well, good excuse to stay inside and craft, right?   Happy Stamping.  NanaConnie

Saturday, May 14, 2016

Magical Birthday

     I've been fascinated with unicorns since I was a child.  The one in this image is so fantastic, I just had to use him for another birthday card.  I think I wish I could give this to myself.  :-D


I used the colors at The Outlawz.
I wish my purple doily had stayed purple instead of turning maroon!  Sigh...

    I used my ProMarkers and Copics to color the image, fussy cut the unicorn, then found a Cheery Lynn doily die to cut the mat.  I also cut a simple white circle and put it into the center of the doily, giving something of a 'full moon' look to the scene.

     I also used two pieces of dp, each of which had punched, rounded corners and those were found in my scrap basket, intended to be used on some previous project and then rejected in favor of something else.  How nice that they worked so well in this card design.  :-D

     The sparkly ribbon came from my stash and is probably from Really Reasonable Ribbon.  I tied a quad-loop bow.

     Challenges:
Aud Sentiments
City Crafter
C.R.A.F.T.
Craft-Dee BowZ
Crafty Addicts
Crafty Catz
Create and Inspire
Fabrika Fantasy 
Kitty Bee Designs
Penny's Paper-Crafty
Southern Girls
WordArt Weds.

     That's it for my second post of the day.  I'm going to have brunch with my daughter and then do a bit of craft shopping.  See you tomorrow.  Happy Stamping.  NanaConnie

Birdbrain Graduation

     Yesterday I shared a graduation card with you that I had done either for my granddaughter or her best friend.  Today, I'm sharing the second of those two cards and I still haven't decided who's going to get which one.  :-D  This one has an image by From the Heart Stamps and I'm also using the sketch from their challenge.


Sketch151
     I colored the image with ProMarkers, then die cut it with a stitched circle die from Memory Box.  I layered that onto black CS.  The sentiment is printed, hand cut, and matted with a scrap of that same black CS.  Since their school colors are blue and gold, I tried to keep to that color combo when designing the card.

     The dp is from my scrap basket.  I love that kind of argyle-plaid paper and I've used every single bit of it rather than throw away any of it.  I still have one full sheet of it left but hesitate to cut into it because I just love it so much.   It must be the geometric pattern -- those are always among my favorites because they work so well for masculine but also for girl cards.

     The stitched ribbon is the last bit of one-yard sample I had in my stash.  I added the yellow ribbon flower and the 3D grad hat for embellishment.

     Challenges:
As You Like It
Aud Sentiments
Connie Can Crop
Crafting with an Attitude
Crafty Catz
Creative Corner
Creative Fingers
DL.ART
Hanna and Friends
Outside the Box
Simply Papercraft

     Happy Stamping.  NanaConnie

Friday, May 13, 2016

No More School Days!

     Happy Friday, friends and followers.  Are you looking for information on the newest challenge at QKR Stampede?   Well, it started today and our theme is "Graduation Cards."  Since I have a granddaughter who's leaving Middle School for High School this year, I'm doing cards for her and her lifelong best friend.  They both love my humorous cards so here's the first one and I'm not sure which of them is going to get it.


     For this card, I used the QKR sentiment 13513 "School Day" and the image 13912 "School Days."
I added the "No More..." to the sentiment and added the 3D grad cap to the image so if you go looking for those parts of the image or sentiment, you won't find them.  :-D

     I colored the image with my ProMarkers, then cut it using a die from Cheery Lynn.  I printed the sentiment and cut it by hand.  I put blue CS behind the die cut image piece, matching the blue in his shirt as closely as possible, and decided that the frame was enough embellishment so added nothing further.

     Challenges:
Artistic Inspirations
Cheery Lynn Designs
Colouring in Scrapland
Crafting from the Heart
Crafting with an Attitude
Creative Card Crew
Cre8tive Hands
Creative Ladybirds
Outlawz Greetings
Incy Wincy
Lemon Shortbread
Through the Craft Room Door

     I hope you'll come play along this week.  Those graduations are happening already and you don't want to miss out on getting a card ready.  Happy Stamping.  NanaConnie

Thursday, May 12, 2016

Lovely Victorian Hat

     As soon as I saw this image over at Julia Spiri, I grabbed it and made this card!  It's actually called "The Victorian Hat" hence my post title today.  Naturally, I had to do a vintage card.  I'm going to use it for a birthday card because my stash is very low on birthday cards but I'm going to put the sentiment inside, along with a handwritten, personal note, and use this for my daughter's birthday card.


     I colored with ProMarkers, use a die from one of my Spellbinders sets to cut it out, and then cut a large oval for the mat (QuicKutz).  I added pearls, dried flowers, a die cut butterfly (2 layers) and used ribbon to make a double-color, double-loop bow.  Too bad it looks so pink in the photo.  It's really pale lilac.

     Challenges:
A Bit More Time to Craft
Crafts Galore Encore
Crafty Girlz
Creative Card Crew
Digistamps4Joy
Digitally Sweet
Double D
I {heart} ProMarkers
Julia Spiri
Lunagirl Moonbeam
Paper Creator's Crafts
Scrapy Land
Sisterhood of Crafters
WordArt Weds

     Hope your week is going well.  We're on the downhill slide to the weekend now so hang in there.  Happy Stamping.  NanaConnie

Wednesday, May 11, 2016

Inlaid Die Cut Butterfly

     I'm experimenting again with inlaid die cuts.  That's the challenge theme from AAA Cards and I do like the way this turned out.


     All the dies I used this time are from Spellbinders and I just love the way they work together.  For the background, I nested together 4 dies from one of my framing sets and cut both light and dark turquoise CS, then alternated the colors.  These are not stacked layers -- the two colors are actually inlaid so that when it's finished, there's only one layer.  I did layer everything onto white CS but that was only for gluing purposes.  I trimmed away all but the tiniest border of white before applying that piece to the black card base.  The outside frame and the oval were both embossed by using the die again but this time with a rubber pad for embossing instead of cutting.

     Then I used two butterfly dies to cut butterflies from two shades of CS in the purple family.  I inlaid those the same way but left a couple of negative pieces of the lavender instead of inlaying the darker purple.  I just liked the look of it that way.

     The sentiment is hand stamped and die cut.  While it was still in the die, I drew around the inside of the die with purple ink.  After removing the die, I edged it with purple ink.  Finally, I added one of those bows which I make by the dozens and put pearls on the butterfly body.  I kept it very CAS, even though my "white" space is black on this card.  :-D

     Challenges:
613 Avenue Create
Artistic Inspirations
Craft-Dee BowZ
Crafting from the Heart
Craft Your Passion
Crafty Cardmakers
Dare 2B Artzy
Our Crafty Corner
Outlawz Twisted Thursday
Pile It On
Ribbon Girls
Scrapy Land

     We're halfway through the week and nearly half way through the year - can you believe that?  Next month is the turning point and we'll celebrate the longest day of the year here in the Northern Hemisphere, although the hottest days of summer will still be ahead of us so I'm not sure the days really feel all that much shorter.  :-D  Happy Stamping.  NanaConnie

Tuesday, May 10, 2016

Double Spotlight on Flowers

IF YOU'RE LOOKING FOR MY TUESDAY THROWDOWN CARD TODAY, 
PLEASE SCROLL DOWN ONE POST.

     Our challenge for May over at Open-Minded Crafting Fun has four sponsors; Dr. Digi's, Julia Spiri, Lemon Shortbread, and Scribbles Designs.   We have a fun theme of "Using Your Favorite Technique."   There are several I really like to use but doing a Spotlight Technique has been a favorite ever since I first tried it.  Recently, I learned how to do a Double Spotlight and I love that even more!

     The image I used is "Flower Pot 2" from Scribbles Designs.


I took my colors mostly from the inspirational photo at


     After the image was printed, I printed a second one and colored only the flowers (ProMarkers.)  I cut it with a Scalloped Stitched Circle die from Memory Box, then cut out the center of that piece with another, smaller die from that same set.  I mounted the center piece onto Pop Dots so that it was raised above the main spotlight piece.  Lining up the spotlight pieces with the black and white image underneath resulted in an out-of-the-box technique also.

     With so much detail from the two techniques, I used a very CAS design for the overall card.  The sentiment was printed, hand cut, and adhered to the background dp which I found in my scrap basket.  I thought the tiny dots in the dp pattern complemented the stitches in the die cuts.

     Challenges:
A Bit More Time to Craft
Artistic Inspirations
Card Mania
CAS on Sunday
Classic DT
Crafts Galore Encore
Crafty Hazelnut's Patterned Paper
Crafting from the Heart
Craft Your Passion
Dragonfly Dreams
Eureka Stamps
Incy Wincy
My Crafting Stories
One Stitch at a Time
Scrapy Land

     I hope we're going to see you entering the challenge this month.  Just decide on a technique and make something you can enter.  We can hardly wait to have you inspire us.  :-D  Happy Stamping.  NanaConnie

Thinking of You

     Our newest challenge at Tuesday Throwdown this week is sponsored by our very own Crafty Girl, whose marvelous images can be found here.  Our theme is a very simple one, "Thinking of You."  I used her Flower Trio image.


     I've been on a kraft kick lately and this time I combined it to get my favorite 'kraft and...' combo, kraft and pink.  I colored the image with my Promarkers and cut it out.  I embossed bright pink CS and added it to the bottom of the card front.  The ribbon is from my stash and I made the bow using that same ribbon plus a narrow, grosgrain so that it's a double layer bow.  The flower is a kraft paper embellie with a bead in the center.

     Challenges:
A Gem of a Challenge
Catch the Bug
Color Your World
Come and Get It
Corrosive Challenge
Glitter n Sparkle
Lil Patch of Crafty Friends
Ribbon Girls
Scrapper's Delights
Sweet Stampin'

     Come play along with us this week, won't you?  A "Thinking of You" theme is almost as good as an Anything Goes.  :-D  Happy Stamping.  NanaConnie

Monday, May 9, 2016

Kitten Cuddles

     This image from Ppinkydolls was the freebie for the May Progressive challenge at The Outlawz and you know I fell in love with it!


     I decided on a CAS design with very limited embellishments.  I colored the image with my ProMarkers plus I added sparkle gel ink to her wings.  The top wing is layered on with Pop Dots for a bit of dimension.  Then I used my largest square die (Spellbinders) to cut it.  I added a piece of sheer ribbon to the image piece and layered that onto a blue card base so that it looks framed or matted.  The butterfly is double layered with one colored and the other one white with a gem for a bit of sparkle.

     Wouldn't this make a perfect get well card for a child?

     Challenges:
A Beautiful Mess
Allsorts
Animal Friends
ArtbyMiRan
Aud Sentiments
Crafting -with-Friends
Creative Fingers
Jo's Scrap Shack
Julia Spiri
Outlawz CAS
Outlawz Twisted Thurs
Path of Positivity
Quick Quotes
Show Us Your Pussie Cats Only
Simply Papercraft
STAMPlorations
 

     I hope you had a sparkling weekend and a wonderful Mother's Day for those of you who are mothers or have mothers.  Mine was fantastic.  :-D   Happy Stamping.  NanaConnie